2004 660 LT Rhino (re)Build

dgoodwin10

Well-Known Member
Joined
Jul 22, 2014
Location
Birmingham, AL
This will be my first time posting here, but I've been a casual lurker for a while and decided it was time to contribute. I first met some of you guys at the ECORS race in Auburn back in 2011 when I worked recovery and had the unfortunate privilege watching Rob's buggy burn to the ground. My only real tie to North Carolina is my wife being from Gastonia. Figured some of you might enjoy this build, so here goes.

Cliff notes on me: Always been interested in off roading and tinkering in general, but didn't have any friends seriously into wheeling until I met some guys in college (fall of 2010) and it all went downhill from there. I’ve got a long way to go to ever claim to be an actual fabricator or mechanic, but I want to get there. I’m a firm believer all the good tech still lives in the forums and not in the dumpster fire that is FB/IG/etc.


After years of riding shotgun I decided to sell off several project Seadoos (I used to flip 90's 2 strokes in college and had a few sitting around) and bought what I could afford to get out in the woods - a 2004 Rhino. This entire build has been done on a shoestring budget and in my carport as I don't have a shop yet.


Sale Ad1 .JPG


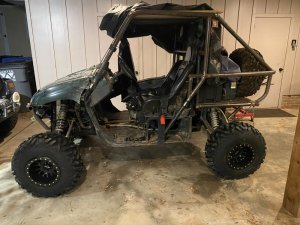
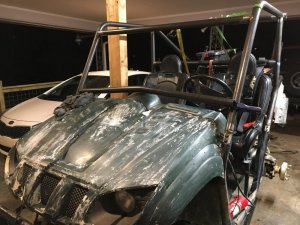
This was the day I brought it home. It has a +6 HCR LT kit, 2.0 Kings, 686cc stroker motor, and a pile of other stuff. It was a solid foundation to start out, but had a lot of hard miles on it and the PO wasn't the best mechanic. The first trip out was to Top Trails in Talladega and the thing did remarkably well, walking up everything I pointed it at. The trip went great until I clipped a stump at speed and broke my left wrist, leaving me in a cast from my knuckles to my shoulder for 12 weeks and only kinda able to work on small projects. Power steering, new radiator and electric fan, new exhaust, radio, added lighting, water temp and fuel gauge were all added.

The work space:

Carport 1.JPG


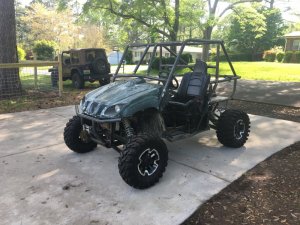
Once I was back to wheeling again a smoking deal on a set of 29" Bighorns came up, so off came the 26s.

Bighorns 1.JPG


The larger tires made a dramatic difference in capability but my 35hp needed a .5mm primary clutch shim to gain back some of the lost bottom end. I wheeled it like this relatively unchanged for almost 2 years, having a few issues (some self inflicted stupidity), which were mostly axle related. Either my (lack of) driving ability or the 29s stressed these axles to the point of being able to break almost on command (to the tune of $250 per shaft). I ride with mostly RZR 1000s and, believe it or not, this Rhino has made just about every obstacle they have and done it with relative ease... when the axles hold.

MMORV 1.JPG


Morris Mountain

Chocco Boat Ramp.JPG


Boat Ramp at Chocco


Mulburry Creek 1.JPG


Mulberry Creek in Plantersville, AL (rock crawlers don't swim)


MMORV 2.JPG


Copperhead at MMORV

And no, I didn't make it up Boat Ramp . The last picture of me pulling cable was 15 mins into a ride and another broken axle, which almost lead to me selling this rig in December of 2019.

And since that'd be a terrible place to end a build thread, stay tuned for phase 2.
 
Awesome.
Following.

Why did you pour gas on @rockcity rig tho?
:flipoff2:
 
Awesome.
Following.

Why did you pour gas on @rockcity rig tho?
:flipoff2:

We'd already broken out the s'mores at that point. The fire wasn't hot enough for optimum crisp yet. :lol:

I flock to beaters (if you know the reference, we can be friends), so after a lot of thought and an improved budget (read: wife finished grad school and got a job), I decided to blow the Rhino apart and fix all the issues and wear items. The end goal is to be bulletproof reliable and improve the rear bed situation to have room for enough gear to support a Windrock level ride. There won’t be much tech in here since none of this is groundbreaking, but I wanted to show the process if nothing else.

Everything that moved was beyond worn out, so every bushing, bearing and rod end was replaced, along with downsizing tires to 27” Ranger takeoffs to hopefully help the axles live. Also a new steering rack, belt and all fluids were replaced.

The main issue with the axles stems from the use of factory CV joints, which severely limits the shaft size. I have used (and broken) 4340 and even stepping up to 300m shafts hasn’t solved the problem yet. I know custom axles that replace the factory CVs are inevitable, but that is a significant investment I'm trying to avoid as long as possible. Another option I’m exploring is the use of VW axles. Back when R6 swaps were popular in Rhinos Gear One made a conversion kit to allow the use of VW Type 1 axles .

Broken Axle.JPG


Disassembly 1.JPG


Side note for anyone that's still paying attention: I scuffed and primed the hood with Rustoleum Ultimate Bond Primer and had the paint flake off after less than a year. The rear fenders were prepped the exact same way, however I used Adhesion Promoter prior to painting and have had no issues. The plastics have been stripped in prep for a new paint job.

axles.jpg

Gear One VW Tye 1 axle kit.


Steering Rack.JPG


A note on the bearings: The OEM bearings are made by NTN. For the Rhino guys, below are some PNs for bearings that you can get from most any bearing supply store and avoid Yamaha's markup:

NTN

  • F: NTN 6006LLU
  • R: NTN 6206LLU
SKF

  • F: SKF 6006-2rsj
  • R: SKF 6206-2rsj
Timken

  • F: Timken 6006rs
  • R: Timken 6206rs
Since I was in it this far into this project, scope creep took over and out came the bender and notcher. Cage time! :D
 
Great start,

Following.

I had a 660 rhino a few years ago. I really liked it, tough and would go almost anywhere (except the first ledge on daniel).

I never had an issue with axles, but then again I only ran 27s on mine.
 
I guess using RZR axles/diff in the front is not possible?

Or what about a 930CV conversion? The CVs are pretty cheap and can get upto 30 spline..

I've contemplated the axle issue six ways to Sunday and haven't really settled on anything yet. I hope with the suspension now being tight, smaller tires and the addition of limit straps the axles will hold up and the problem is solved.

If that doesn't work, the easiest option is to order Gorillas or Turners for all 4 corners but I've heard they're getting difficult to purchase (and $500+ each).

For the not so easy option: Rhino diffs are actually pretty stout and will tear themselves out of the frame before they grenade, but stronger axles would only put more of a load on the diffs. I am big proponent of using off the shelf stock parts, so the thought of cutting the frame off at the firewall, tubing it out and swapping the diffs and suspension out to accept stock RZR/ YXZ1000 parts is appealing, similar to what a friend did to repair his XP900.

Wolfe Fab.jpg
 
Last edited:
I made a list of things I wanted to incorporate into the design and spend a few hours making sure what I wanted wasn't going to end up in a fail thread somewhere. What I landed on was:

1. Keep stock mounting locations.

2. Lower the cage height to allow wearing a helmet plus 2” to any tube.

3. U4 cars look cool. Make it look like one of those.

4. Integrate a tube bed with storage, but maintain access to the rear of the machine for service.

5. Cage (or doors) needs to be wider than my shoulders (it’s not currently).

Here is what I was aiming for:

015.JPG


usnickb.jpg


I picked up 120' of .120" 1.75" HREW (because not racecar) and started bending tube with my Protools 105 bender. For anyone holding out the SWAG air/hydro conversion is worth its weight in gold! The welder I’m using is a $100 Harbor Freight parking lot sale Vulcan Omnipro 220, which replaced my 110v Lincoln 140 machine. So far, I have been very impressed with the HF welder.

Bender.JPG


Off came the factory 'cage':

Cage.JPG


I started with the A and B pillars

Cage 1.JPG
 

Attachments

  • Cage 2.JPG
    Cage 2.JPG
    141.6 KB · Views: 214
  • Cage 09.JPG
    Cage 09.JPG
    173 KB · Views: 192
Looks like a cool project. Check into Cobra Axles out of Texas I believe. They have pretty much replaced Gorilla as the "Go To" axle.

I also believe I have a Superatv power steering kit that's new in the box for a Rhino in my storage.
 
After getting the passenger compartment roughed in, I moved on to the bed area.

Cage 2.JPG


Bed roughed in:
Cage 3.JPG


Bed tied into the frame:
cage 35.JPG


I am planning to attach the factory bed sides to the bed. This was the first mockup.
Cage 4.JPG


The bed was dimensioned around this gear specifically, with a little room to spare.
Cage 5.JPG
 

Attachments

  • Cage 6.1.JPG
    Cage 6.1.JPG
    184.9 KB · Views: 190
  • Cage 6.JPG
    Cage 6.JPG
    161.6 KB · Views: 206
  • Cage 7.JPG
    Cage 7.JPG
    152.6 KB · Views: 213
  • Cage 8.JPG
    Cage 8.JPG
    200.3 KB · Views: 462
  • Cage 09.JPG
    Cage 09.JPG
    173 KB · Views: 218
Slowly catching up to current day.

Windshield bar installed.

Cage 6.JPG


Cage 6.1.JPG


Now, before you tell yourself 'This idiot doesn't know what a triangle is' fear not. Triangulation is coming.

The stock bumper on a Rhino leave a lot to be desired, so a new piece was in order. I never liked how low the winch was from the factory, so the winch was mounted further up and the bumper itself tucked in tighter to the body. I replaced the old ebay 3500# winch with a Badlands 5k unit from Harbor Freight. Several guys I ride with have had great service out of these units, so I decided to give one a try.

Cage 7.JPG


Unfortunately, this project comes to a halt about now. With Spring comes yard projects and a bathroom renovation, so the poor Rhino was shoved into a trailer in early June.
Cage 8.JPG
 
Now, to totally derail this thread and understand why I ran out of time and money.....

My wife and I bought our house summer of 2017 and have been slowly putting our touch on it. It was built in 1960 and has been well taken care of, but hasn't been updated. Our hall bathroom was a beaut:

Bathroom 1.JPG


Bathroom 2.JPG


Memorial Day weekend brought out the weapons of mass construction and the bathroom was torn down to the studs and subfloor. With the help of my dad, we did all of the rework ourselves with the exception of the tile. I wrapped this up a few weeks ago.

Bathroom 3.JPG


Bathroom 4.JPG
 
winch with a Badlands 5k unit from Harbor Freight. Several guys I ride with have had great service out of these units, so I decided to give one a try.

I've heard the same thing and ready to pull the trigger on one for our "new" ('16) Viking.
Do they come with a solid state ("Albright") contactor or some OG solenoid variety?
 
I've heard the same thing and ready to pull the trigger on one for our "new" ('16) Viking.
Do they come with a solid state ("Albright") contactor or some OG solenoid variety?

I have the (now) older gray winch and its a solenoid type contactor. The new ZXR line might be different.

If you have this winch, I (so far) highly recommend this remote: Wireless Winch Remote . I have a Badlands 12k on my truck and am about to put a 5k on my trailer. This remote will work on any Badlands winch with the 5 pin connector.
 
Unfortunately, I haven’t made any progress in a while because most of my project funds and time have gone into setting up my new shop. I’ll post shop updates later (for anyone that might care). The only real update is a set of new wheels and tires. I got a ridiculous deal on a set of new 12x10 Method 406 beadlocks that I got for $22 each. (Retail is $229 each). They’re wider than I would have liked, but for that price I like them just fine.

Wheels 0.jpg


Wheels 1.jpg
Wheels 15.jpg

I'm impatient and couldn't wait to see what this would look like so on went the spare 26x11. It looks ridiculous and I love it. I have a set of 27x10x12 Bighorn knockoffs on order and will have them mounted this week so of course I’ll post pics of those.

Wheels 2.jpg


Got the tires mounted and kinda bolted up (new lugnuts were on the way). The 27x10 tire size looks perfect on this rig, even with the wider wheels

01ca65ebd8734e7c7991e946953e8a86d4467239b4.jpg
01f2d36c76ce5ffdd77eba2646915e3a3abbf4a221.jpg


Nothing quite brings back motivation (and temptations for financial irresponsibility) for a project like new tires and wheels.


After a week of the new tires and wheels I realized I liked them...because they were cheap. I threw them up on FB to at least get my money back and ended up selling them for $850 :rockon: 
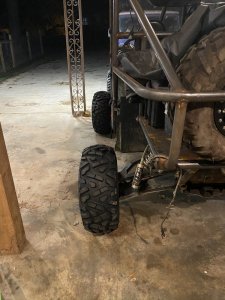
(had $520 in them). I settled on a set of 14x7 System3 SB-3 wheels on 27x11 Wanda tires. This allowed me to ditch my wheel spacers and have a MUCH larger tire selection (even though I still went with the China cheepies).

01d636c95b22be83a28996718aa51126355d6d43a5.jpg


I got a text last week that our riding group was going to my favorite town at one of my favorite parks: Boggin on the Plains (formerly Great American Park), so I've decided to zip tie this thing together enough to go wheeling this weekend. Prep started Sunday night to get the essentials in order.
 

Attachments

  • 01a821ff705501d81d9c96afb3da1cae062c56e3da.jpg
    01a821ff705501d81d9c96afb3da1cae062c56e3da.jpg
    153.9 KB · Views: 193
  • 01d705cf58563bef415195c61f309cd24258c69f08.jpg
    01d705cf58563bef415195c61f309cd24258c69f08.jpg
    161.2 KB · Views: 155
Back
Top