Alternator/Welder

buckshot500

Well-Known Member
Joined
Mar 23, 2008
Location
Clover S.C.
HOLY CRAP!!!!

I stopped in at Black's alternator today. After a quick explanation, Steve told me I was wasting my time & should just go buy a welder. Then I mentioned I wanted it to be in my jeep, so I could weld anywhere I could drive the jeep to.

I said they do make a nice setup that uses an alternator, but that it was about $1000.00. So he showed me some large frame Ford alts, & then I asked him about the Leece-Neville deal.

He brings out two monstrosities & throws 'em on the counter.

The 160 amp unit would be $200.00, & the 190 amp one would be $300.00.

He could redo a LG frame Ford for like $150.00 to be like 130-140 amps.

Then he digs under the counter & says I just remembered this thing.
It's a Leece knock off & he's not allowed to sell it because they weren't able to regulate the voltage in it. It's 220 amps! (My use requires that it not be regulated)

Only thing is, he cant get a replacement winding if I fry it. Diodes not a problem, he can replace those any time.

Then he says "I'm gonna make your whole day!" I'll rewire it the way you'll need it, & you can have it for $150.00.

I took a few minutes to think it over & pulled the trigger on it.
It'll be ready Monday afternoon, if I am off from work I'll go get it. Otherwise I'll get it one day next week.

(Now I know what your thinking, how's Bucky gonna buy something instead of getting it from the junkyard.
Well even though it's brand new, I still see it as a redneck mod, 220 amp welder in a jeep! Hells yeah!)

He said I can spin it with no load, as long as I haven't energized the field wire.

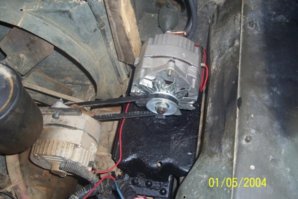
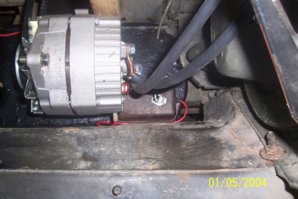
I'll need to put a switch & a rheostat on that line. The deal I'm going with, will have it removed & packed in an onboard box, with the other welding equipment. When I need it, I just throw it up on the pivot & put the belt on & tighten it up.

Start the engine & get ready to weld. Right before I strike the arc, I throw the switch. When I stop welding for a length of time greater than changing a rod, I switch off the field. This should prevent it from frying itself.

I forgot to ask him if it had a provision for A.C., but I'll find out when I pick it up. (Ooh TIG Aluminum trailside!) !Click the image to open in full size.

220 amps should be more than enough to run 5/32" E6010, & 1/8" E7018

1/8" cutting rods too.:huggy:
 
premier power welder makes a nice set up for 850.00 every thing is built in so you don't fry any thing really nice.
Hmm, what to do with the $700.00 I didn't spend? ? ? ? ?
Well, it's not over yet. I still have to buy a rheostat & some brackets & terminal lugs that fit my leads.
Here is the pics ofWELDZILLA!
ai254.photobucket.com_albums_hh83_buckshot500_Weldzilla_IMG_0410.jpg

ai254.photobucket.com_albums_hh83_buckshot500_Weldzilla_IMG_0413.jpg

ai254.photobucket.com_albums_hh83_buckshot500_Weldzilla_IMG_0419.jpg

ai254.photobucket.com_albums_hh83_buckshot500_Weldzilla_IMG_0418.jpg
 
Have you checked into how a Premier Power welder actually works? You've got a great idea but I'm alittle puzzled. It's my understanding that the on board welders do generate welding amperage but also impose a very high frequency to help carry over the AC current at a very low voltage, much like other modern inverter welders on the market. From the ones I've used they will burn a good arc at very small arc gaps. Think burying the rod in the puddle so to speak. They however struggle to hold a long arc while trying to weld with a whip technique, proving to me they have a very low open circuit voltage available to aid in jumping the gap to establish an arc. In welding with stick or DC or AC you normally use a Constant Curent (amps)application since voltage (V) is inversely related to current and always varying due to arc gap. A book I got states that a open circuit voltage of 80V is needed to establish an arc for DC and is constantly needed for AC welding. But after the arc is established in DC welding voltage settles into a range that is put out by these altenators 5V -30V. So its my thinking that the little box that comes with the Store bought onboard welders have inverters in them to serve this purpose, and some electronics to allow variability in welding output. It's really just food for thought and if you've got this thought out I'd like a good explination on how it works, cause digging this up takes alot of concentration on my part to not get it all confused.:beer:
 
Have you checked into how a Premier Power welder actually works? You've got a great idea but I'm alittle puzzled. It's my understanding that the on board welders do generate welding amperage but also impose a very high frequency to help carry over the AC current at a very low voltage, much like other modern inverter welders on the market. From the ones I've used they will burn a good arc at very small arc gaps. Think burying the rod in the puddle so to speak. They however struggle to hold a long arc while trying to weld with a whip technique, proving to me they have a very low open circuit voltage available to aid in jumping the gap to establish an arc. In welding with stick or DC or AC you normally use a Constant Curent (amps)application since voltage (V) is inversely related to current and always varying due to arc gap. A book I got states that a open circuit voltage of 80V is needed to establish an arc for DC and is constantly needed for AC welding. But after the arc is established in DC welding voltage settles into a range that is put out by these altenators 5V -30V. So its my thinking that the little box that comes with the Store bought onboard welders have inverters in them to serve this purpose, and some electronics to allow variability in welding output. It's really just food for thought and if you've got this thought out I'd like a good explination on how it works, cause digging this up takes alot of concentration on my part to not get it all confused.:beer:


It depends on the size of the alternator, but most welding done with these weldernators is done at ~60V dc or higher. Drive the rpms up until it hits 110v and you can run most power tools.
 
I guess that is accomplished by a very specific external voltage regulator?
 
You use an alternator with (external) no voltage regulator, and adjust it yourself by engine rpm. Use a hand throttle or the like.
 
Drew, even premier's use dc adjusted with a hand throttle. There is no fancy inverter, just switches between regulated and un regulated dc current. And isolates the vehicles charging system in the process. Most people arent gonna worry about getting the perfect weld voltage/amperage, as it's usually only gotta make it back to camp to be repaired right.

I have about 90% of the stuff to build a decent weldernator, with a 110 outlet for tools and a voltmeter, but getting the buggy done is priority over that. The welder will be done later in my spare time.
 
Thanks for the clarification guys, electricity and how it behaves in a designed circuit has always baffled me. The basic I got a handle on, after that I tend to over think. Anyways keep posting up your build cause I can get my hands on some really nice altenators off some Fire trucks and need a good reference. I think I'll stick to what I know best: melting stuff with electricity.
 
Can't wait to see how it works. Been wanting to do this on my rig for a while now.
 
I guess I will stick wit my Ready Welder, 45-350 amps, and 100% duty cycle, and I don't have to be able to get to the item that needs welding, just have to have the batteries available.
 
had a ready welder...nice unit

built me a weldernator and mounted it on my Willys...used it 3 times first trip out.

sold the ready welder.It just didn't seam practicle for what I needed.

I have less than 70 dollars in my build.
 
i did the weldernator write up on wheelindixie. we have used it in the shop and on the trails and it works awlsum. there is really no need to do that high an amp unit. to keep it cost effective to replace if something burns up. IMHO.
 
58Apache,I didn't put a amp. guage or a tach.on my rig.Do you have any idea what the rpm vs amp rate is and also since I got the 62 amp rated alt.,is this the max it puts out or since the reg. is missing,does it put out more?
 
Wow, big response! Sorry I hadn't checked back here for a few days.

Braxton's answer to warrior's question is dead on, no regulation.

Since this will be a separate alternator, I don't have to mess with my charging system. Don't like the possibility of frying it & being stuck, so I went with two alts.

The thing about this deal is making the alt have no regulator. The current is controlled by the input to the alternator's field terminal.
Control is accomplished with a rheostat. You turn it down to get a colder weld puddle. Some people have been using a dimmer switch. I'm still sorting some things out, but I found you can spin the alt without a load on the battery terminals, as long as you have no juice going to the field terminal. So you want to energize the field wire just prior to striking an arc. Then shut it off asap after breaking the arc. This will help the diodes last longer. Gotta go to work now, I'll check back tonight.
 
Since this will be a separate alternator, I don't have to mess with my charging system. Don't like the possibility of frying it & being stuck, so I went with two alts.
as far as i know there is no way to run one alt and have it be both charging and a welder so you have no choice but to run two. and its still pretty easy to fry your own rigs elec system. MAKE SURE YOU REVERSE POLARITY WORKING ON YOUR OWN RG
 
58Apache,I didn't put a amp. guage or a tach.on my rig.Do you have any idea what the rpm vs amp rate is and also since I got the 62 amp rated alt.,is this the max it puts out or since the reg. is missing,does it put out more?
honestly we dont watch the rpm's. there is a hand throttle we can use. we set it and strike an arc. if it nees more we increase the rpm. less and we decrease. hell we broke the hand throttle and i stood and worked the throttle under the hood. reved it up just before striking the ark.
 
now lets step off into the leeds:

explain exactly what polarity and reverse polarity is.I know what I have read in my research but want confirmation in which is positive grounded and negative grounded.

In reading on the rods,I belive I read that standard 6011 rods work better with positive ground.Right?

If I understand all this,the stinger should be attached to the case by the bolt,the ground clamp to the alt.output. This would put it in polarity and be set up for welding on the base rig itself. Right?

If a frog had wings it wouldn't bump it's arse. Right?
 
oh I tried to find pictures of my setup but cant.

I moved my battery from it's normal place to lower on the frame.I then mounted the welder on the plate that originally was the battery tray.Alternator on the engine is a double pulley and the belt to drive the welder just hangs free.when I need to weld,I just put the belt between the two alternators,wedge them tight,throw the switch,rev up the engine via the hand throttle and then start welding.

I run alot of rpm's on that flathead so I believe I am gonna upgrade the case to put out more power (100amps = 50 dollars) and maybe see if I can install a smaller pulley to underdrive it.
 
The things I've read said you must hook the welding rod lead to the + on the weldernator to keep from frying your vehicles electronics when welding on that vehicle. Remember that's just what I read. Try it out and let me know cause I'm getting ready to build one myself.
 
thanks for finding that Brandon.

Right now I have it set up as a neg. ground.Stinger on the output.I was hoping folks that actually stick weld for a living would chime in and shed some light on setting up leeds.
 
here you go to make it easier, jimmy

If the positive lead is attached to the welding rod, it is straight polarity. If the negative is attached to the welding rod, it is reverse polarity.

Jimmy, with yours spinning backwards, I don't know if that changes things up any as I don't know how that affects the output on the alternator.
 

Attachments

  • weldinator 1.jpg
    weldinator 1.jpg
    63.7 KB · Views: 569
  • weldinator 2.jpg
    weldinator 2.jpg
    118.4 KB · Views: 763
Back
Top