Carberator tech ?

rattlecanpaint

Well-Known Member
Joined
Apr 18, 2005
Location
Winston Salem
Got a Weber carb for my 22R and after looking at all those vacuum lines on the stocker, I wonder why they had 8-10 different places on the carb for vacuum lines to come from and not just one like the Weber. Anyone know the inside details of the carb? As in, does it give vacuum at different times to the different ports to actuate different items?

Those of you who did away with the stock carb and the malaria germ looking gob of vacuum lines, What did you do with the EGR, PCV and other stuff that all those vacuum lines controlled? Eliminate, leave it there or make it work?
 
Go buy a weber carb book (amazon). They are really cool carbs but hard to tune if you don't understand the emulsion tube concept.

Typically the base plate is manifold vacuum the upper are ported or off idle ports.

A vac distributor would be attached to the ported vac. source.

PVC usually goes to air filter.
 
The carb I got only has one vacuum port on it and it looks to be the ported. My distributor has 2 vacuum line coming from it. The pcv went to the bottom of the old carb. There was another hose from the valve cover that went to the air cleaner but isn't the one with the pcv valve in it. I've really got no place to put the pcv hose at all on this new set up.
 
When i installed a holley 350 on my 22r i had one for pcv valve, and 2 for distributor. The EGR i blocked off and removed, i still have a few block off plates for the port on the cylinder head to get rid of EGR


Found a old pic
ai128.photobucket.com_albums_p174_bthelton_engine002.jpg
 
Where did you put the two from the distributor? I see a place for one, but not the other.
 
Found a old pic
ai128.photobucket.com_albums_p174_bthelton_engine002.jpg
[/QUOTE]

sweet i've been thinking about a 350 holley conversion, was that a kit? oh and i must say thats one pimp filler cap:Rockon:
 
Found a old pic
ai128.photobucket.com_albums_p174_bthelton_engine002.jpg
sweet i've been thinking about a 350 holley conversion, was that a kit? oh and i must say thats one pimp filler cap:Rockon:[/QUOTE]


No kit, i ordered i LC engineering carb off ebay had it rebuilt. All you need is the adapter and and a regular Holley 350 jetted 61 and 70 i believe. The cap is actually made local to me in taylorsville
 
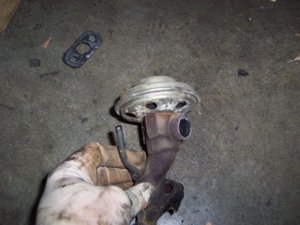
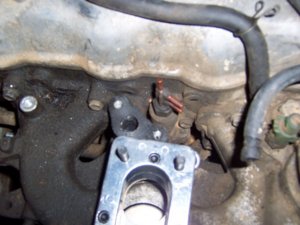
Well, here's what I did. When I tried to take off the egr valve to remove the accelerator cable bracket, the thing broke in two. So I took off the tube that goes to the intake and found it completely blocked with carbon. Stuff was like a rock so I had to break a hole in it and then get a pencil grinder to clean the rest of it out, then I took a shop vac and vacuumed up the debris.
 

Attachments

  • brokeegr.jpg
    brokeegr.jpg
    96.7 KB · Views: 314
  • cleanedegr.jpg
    cleanedegr.jpg
    72.7 KB · Views: 338
Then I took the plate and fitting that weber supplied for EGR and bolted it on and attached the PCV line there, the other line from the valve cover will attach to the bottom of the air cleaner. I also took off the pulsed air line from around the back of the head and the exhaust manifold. I just ran one vacuum line off the carb put a T in it and ran the two lines to the vacuum advance. Does anyone know if the 2 lines are just a redundant system?
 

Attachments

  • crackedmanifold.jpg
    crackedmanifold.jpg
    89 KB · Views: 324
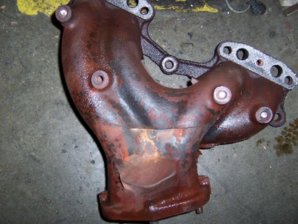
The 3 in the face of the manifold? No, broken bolts. I figure I'll get a header since I've got to have all new exhaust anyway.
 
Both diaphragms cause advancement. The diaphragm closest to the valve cover (direct manifold vacuum) advances more than the other (ported vacuum). Basically, it senses both ported and direct manifold vacuum and adjusts the timing using both accordingly.

In muscle car forums you'll see long, heated debates about using either ported or manifold vacuum (older American cars didn't have dual diaphragm setups like Toyota). Both have their advantages depending on how the engine is setup (ie modifications) and what RPM it will be running at. Toyota was ahead of the game and used both, resulting in super accurate advancement of timing in ALL conditions.
( the above copied from a yotatech.com post .....)

.....and your exhaust manifold is cracked, just as well, it works better as a door stop anyway. You see more power just by loosing the stock exhaust manifold than most other mods ( very restrictive ) Don't go over 2.25" dia. exhaust though, you'll lose power and make more noise. the header "might" come with the AIR block off plates, some engines had them stock as they didn't have the AIR system on them at all.
 
Ah, that's what I needed to hear. Question though, wouldn't direct manifold vacuum be advancing the timing at idle? Or am I thinking it works opposite of how it actually does? I.E. applying vacuum advances the timing?
 
No you set your timing at idle and it stays there until you skinny pedal it.
I would lose the "t" and use use one vac line. Try one , see how it works and try the other.
Just a note on the "lean best" setting.
Once you set it drive it a day or 2 and then adjust it 1/4 of a turn one way or the other ... drive it a few more days and then go the other way until you hit a spot that works.


Matt

edited for clarification: I re-read that and while it's right, it's not. Set your timing however Toyota recommends, then set you idle. I would think you should be good there, but it seems to me Webers work best when timing is set at idle, and you might even see better performance with a 2* increase in the setting at idle.
I think I have mine at 12* while factory specs for Samurais are 10*.
 
Back
Top