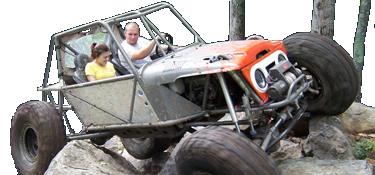
Formula Toy 522

bunchr1

Active Member
Joined
May 11, 2008
Location
Granite Falls, NC
Ok, I've not posted alot on this forum, mainly because I spend most of my time on Pirate4x4, but now that I am on here more, and I may be seeing some of you on the trails now, I decided to start a build thread.
Now, MOST of the build is done, and it is currently "wheelable", but as we all know, a build is NEVER done lol. So, from my other build thread, here it goes...
It all started with an 88 Toyota pickup I got last year.
aimg576.imageshack.us_img576_8153_img00071.jpg

aimg576.imageshack.us_img576_4922_img00072i.jpg

While waiting on my chassis to be built, I started doing the little things that needed to be done.
I made a crawl box for the dual case setup
aimg94.imageshack.us_img94_8325_img00087o.jpg

And I scored a front shift tcase from a member on the board here and converted it to top shift and bolted it all up...
aimg94.imageshack.us_img94_8507_img00097y.jpg

While waiting, I ordered some more parts, including some H1 recentered beadlocks and 37" Goodyears from TrailWortyFab
aimg94.imageshack.us_img94_3512_img00095b.jpg

aimg94.imageshack.us_img94_8568_img00096z.jpg

Finally, while waiting, I went ahead and built the front axle. TrailGear products with a LockRight and stock gears. At this point stock birfields..
aimg341.imageshack.us_img341_218_img00102q.jpg

More to post, just gimme time..lol.
 
Here's the FToy Chassis that Hendrix Motorsports provides. It was the first from the new East Coast Vendor Poorboys Fab.

aimg97.imageshack.us_img97_8890_ftoy522023.jpg


I had Alpine Autoworks in TN do a little more work for me. A little added bracing...

aimg97.imageshack.us_img97_2043_ftoy522025.jpg


And then, it was set on a Early model SA Toyota Pickup frame.

aimg576.imageshack.us_img576_7620_ftoy522042.jpg

aimg97.imageshack.us_img97_3293_ftoy522040.jpg

aimg97.imageshack.us_img97_5562_ftoy522039.jpg

aimg97.imageshack.us_img97_3725_ftoy522041.jpg
 
After a couple months of waiting, I finally made the L O N G trip to Memphis to pick up the chassis. Here is some pics from that night..

img00109a.jpg

aimg138.imageshack.us_img138_1551_img00110q.jpg


A couple of weeks into it, and it was a roller. Springs, axles, steering, and wheels/tires and it moved around a little...

aimg819.imageshack.us_img819_3687_img00111.jpg

aimg819.imageshack.us_img819_6201_img00114.jpg


Then, I started gutting the donor 88 Pickup for parts... This went fairly quick...

Pedal assembly
img00115i.jpg


Booster and Master Cylinders mounted
img00116e.jpg


IFS Steering box and steering shaft ran..
aimg84.imageshack.us_img84_4074_img00117o.jpg


22RE dropped in...
aimg27.imageshack.us_img27_5306_img00120c.jpg


Trans and dual cases. Front Range off Road Crossmember in the rear
aimg22.imageshack.us_img22_6451_img00121t.jpg


Original radiator mount made..
aimg37.imageshack.us_img37_2665_img00126w.jpg
 
Sent the harness out of the donor truck to Dave's Off Road to be stripped and butchered into something a little more simple for the buggy...

aimg717.imageshack.us_img717_4944_img00128l.jpg


And the truck afterwards..

img00129l.jpg

aimg717.imageshack.us_img717_9664_img00130p.jpg


I started on the floor and other mounts...

aa.imageshack.us_img801_4683_img00132.jpg


Seats mounted

aa.imageshack.us_img713_8499_img00048.jpg


Steering finished, then later moved down a bit...

aa.imageshack.us_img185_9418_img00047o.jpg


Firewall mocked up and gas pedal installed... Expanded metal to be used on either side...

aa.imageshack.us_img824_6541_img00046a.jpg


Few small things mounted, including lights and such...

aa.imageshack.us_img594_4062_img00045z.jpg


Fuel Cell in the rear. 10 Gallon from Jegs

aa.imageshack.us_img69_7317_img00049g.jpg
 
Tore it all apart to do some finish-welding and I also got the flooring in. I used expanded metal so the mud and dirt can be washed down, not to mention I can see under the buggy if I get caught up on something...

aa.imageshack.us_img24_4767_img00056vv.jpg


And I painted it Smoke Gray...

aa.imageshack.us_img687_8444_img00059d.jpg


Got most of the parts back on....

aimg832.imageshack.us_img832_6519_img00124.jpg

aimg832.imageshack.us_img832_6797_img00125.jpg

img00133k.jpg

img00134s.jpg
 
My first attempt at driveshafts. The rear is the stocker, just shortened. The front is the stocker, but I used square stock to lengthen it..

aimg251.imageshack.us_img251_5030_img00145b.jpg

aimg844.imageshack.us_img844_631_img00146.jpg

aimg828.imageshack.us_img828_8963_img00147b.jpg


It's first drive!!!

img00150s.jpg


More pics with lights on...

aimg87.imageshack.us_img87_4805_img00153n.jpg

aimg34.imageshack.us_img34_4185_img00154j.jpg

aimg189.imageshack.us_img189_9941_img00155l.jpg


And a pic with a narrowed grille... Didn't keep it on long.

aimg404.imageshack.us_img404_595_img00161w.jpg
 
Some testing pics... Took it to BCDS in West Virginia to work out some kinks and see how it does...

aimg526.imageshack.us_img526_4715_1022352.jpg

aimg843.imageshack.us_img843_5900_1022351.jpg

aimg526.imageshack.us_img526_9615_1022354.jpg

aimg526.imageshack.us_img526_2643_1022357.jpg

aimg507.imageshack.us_img507_6738_1022367.jpg

aimg441.imageshack.us_img441_5238_1022364.jpg


Also took it to The Farm for last years BDB Fall Farm Event in Lincolnton. I added Lexan sides to help keep out the elements...

ai57.photobucket.com_albums_g218_seed60_The_20Farm_2010_10_PA300915.jpg


So, there ya go.
 
Yes I want a couple of bars to go from the windshield bars to the front grill hoop, but I don't have a bender... I'll measure the wheelbase tonight.
 
I'm diggin this build. Simple, clean, great job.......
 
Thanks. I wanted it all to be simple. As it sits, everything "fits" the 88 Toyota Pickup with the exception of the front rotors (FJ60's) and the fuel pump (cheap inline fuel pump).
 
I told ya we never get done with these things...

I got these this evening...

aimg840.imageshack.us_img840_9469_2011031618504967.jpg


Longfields, Chromo Hub Gears, Marlin Inner Seals, and done some preventive maintenance... Next stop, the rocks!!
 
Just to kill some time, I decided to put a roof on the buggy. I plan on doing the hood next. The hood, roof, dash, and maybe toolboxes are all going to be red. Here's some pics..

aimg14.imageshack.us_img14_5754_20110401170500832.jpg

aimg576.imageshack.us_img576_4938_20110401165824661.jpg
 
Well I took her to The Farm and got some 'wheeling time in. It FAR surpassed my expectations. I was able to do all the trails I hit (didn't hit 5 ways out) without any winching or help, just a spotter or two! I got a few pics of me on Get Skinny...

aimg11.imageshack.us_img11_4787_20110604094548611.jpg


aimg17.imageshack.us_img17_232_20110604094614916.jpg


aimg219.imageshack.us_img219_3177_20110604094649385.jpg
 
just 1/8" tabs and machine screws with lock nuts. Here's the best pic I have of it...
aimg14.imageshack.us_img14_5754_20110401170500832.jpg
Thanks, I will defiantly be using a similar technique. I was just going to weld the skins in place, but as much time as I spend on my roof I figure I should make them replaceable. Thanks again
 
Back
Top