SXOR single seater build

Hokie_YJ

Well-Known Member
Joined
Jul 22, 2006
Location
Johnson City, TN
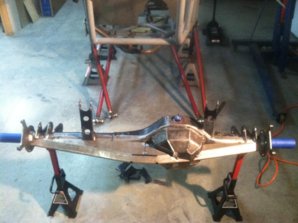
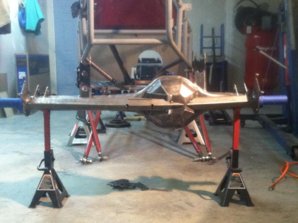
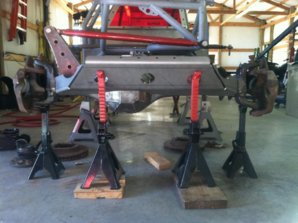
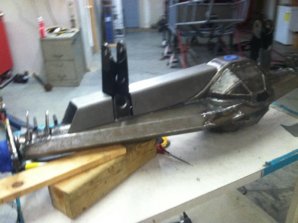
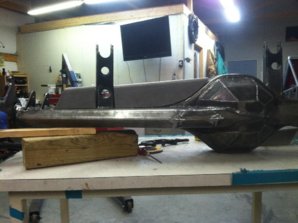
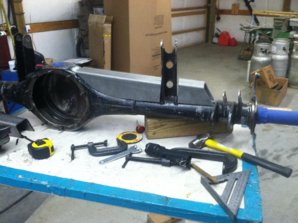
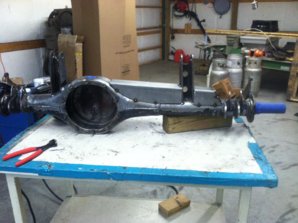
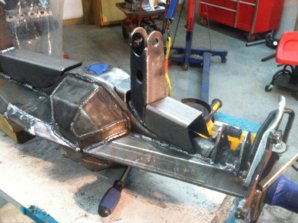
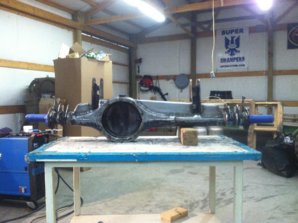
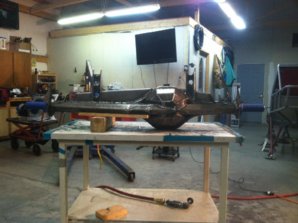
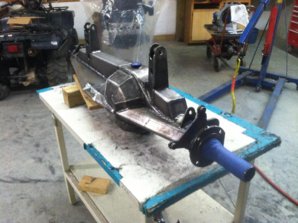
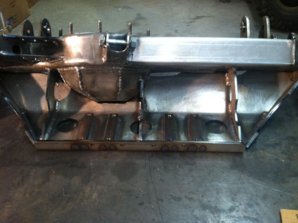
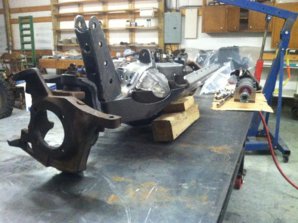
I went and picked up my next project today. I found a deal on my favorite chassis design that was just too good to pass up. I picked it up as a rolling chassis. It's been built for several years, but it's never been wheeled. It will most likely be a slow build as I plan to keep my other buggy for now also.


I've been in love with this chassis design ever since I saw this buggy several years ago.
ai38.photobucket.com_albums_e102_boomboom33_Project_20Redneck_20Rock_20Rod_848354664_BDF4M_L.jpg


Hopefully when it's done it will look something like these. The first pic is actually the same buggy as above, it's just been updated and re-skinned.
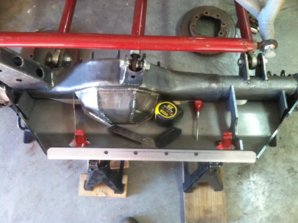
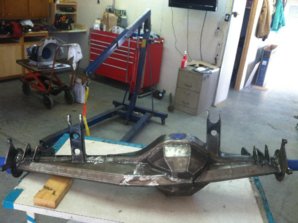

ai38.photobucket.com_albums_e102_boomboom33_Project_20Redneck_20Rock_20Rod_851948626_Uq6Df_L.jpg

ai38.photobucket.com_albums_e102_boomboom33_Project_20Redneck_20Rock_20Rod_DSC_4703.jpg


Specs:
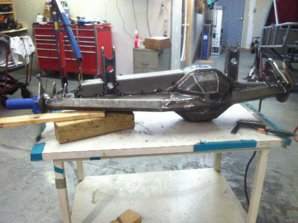
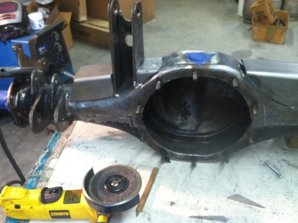
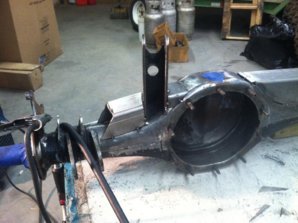
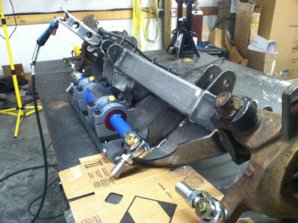
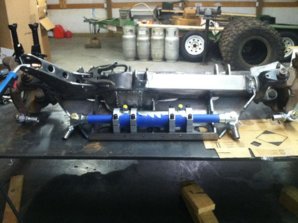
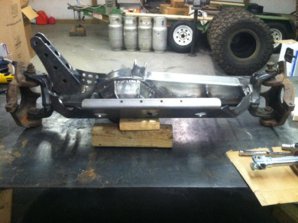
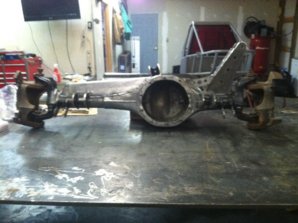
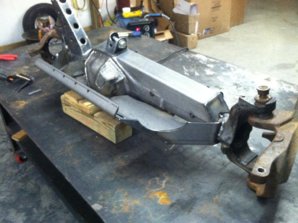
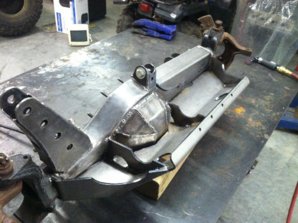
-'05 SXOR rear engine, single seat chassis
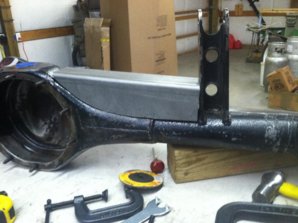
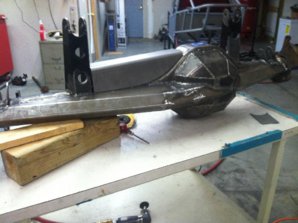
-empty flipped 609 housings (rear does have 35 spline shafts and the front has Dodge unit bearing outers with factory stubs)
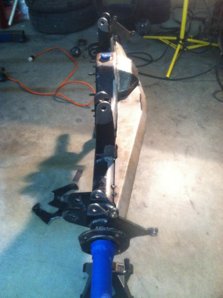
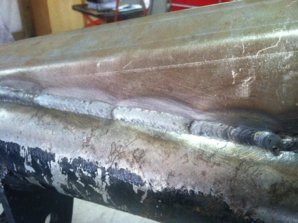
-3-link front, 4-link rear with .250 wall links
-14" SAW air shocks
-New SXOR Liberty hood and lexan skins


Plans:
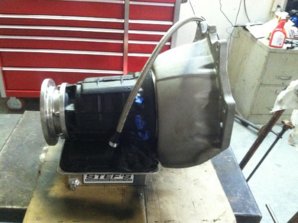
Drivetrain - Hopefully 6.0/TH350/Atlas
Axles - 35 spline center sections, either spools, Detroits, or some combination of the two. Also will probably swap to Superduty unit bearings for the ability to go 35 spline and run lockouts or drive flanges
Steering - Definitely full hydro with DE ram
Wheels/tires - Either 37" or 40" Trepadors on Raceline Monsters


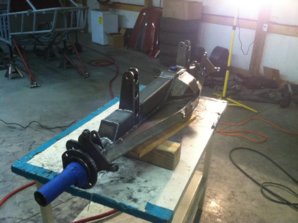
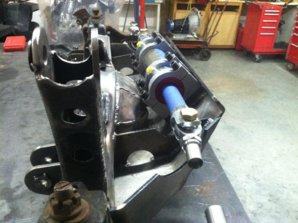
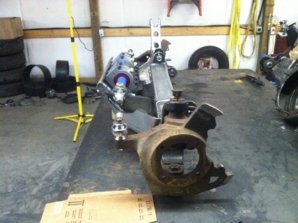
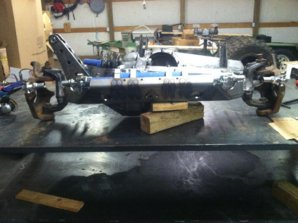
Here's a couple quick pics. I'll get some more detailed ones up soon.

ai38.photobucket.com_albums_e102_boomboom33_Project_20Redneck_20Rock_20Rod_P1000638.jpg

ai38.photobucket.com_albums_e102_boomboom33_Project_20Redneck_20Rock_20Rod_P1000639.jpg

ai38.photobucket.com_albums_e102_boomboom33_Project_20Redneck_20Rock_20Rod_P1000640.jpg
 
No "real" progress to report, but I have picked up a few parts for this thing this week. I ended up buying a set of shafts from the PO that were already cut for this front axle. They are Moser 35 spline chromo inners, and CTM 300m custom made Dodge unit bearing style outers. Inners and outers are clearanced for 50* steering. Also, just today I found a smokin deal on Pirate on some lightly used 35 spline 9" Detroits. I picked up two of them for about $100 less than the price of one new one. They should be here by next week.

Also I think I've had a change of heart on the motor choice. I believe I may go with the supercharged L67 V6. It's what the PO was planning to run and it even already has some of the mounts tacked up for it. Plus they're just plain sweet little motors!

Progress will continue to be slow as I'm still trying to buy a house, but once everything is done and I'm settled in it should hopefully move a little faster.
 
super cool!
 
I had totally forgotten about posting this thread here. Almost 3 years later there's finally actual progress being made on this thing. I'm going to copy and paste everything from another thread and update this one.

Parts list so far.
Engine: 6.0L LQ9 with cut down stand-alone harness and re-programmed computer.
ai38.photobucket.com_albums_e102_boomboom33_Project_20Redneck_20Rock_20Rod_null_zps44f5bf27.jpg

Transmission: Hughes built Powerglide with Atlas adapter
Front axle: 35 spline Moser inner shafts and custom made CTM stubs for the Dodge unit bearing outers with CTM joints. Yukon nodular 3rd, spool, 5.13s, 1350 yoke
Rear axle: FF 60 outers, with 35 spline shafts. Yukon nodular 3rd, spool, 5.13s, 1350 yoke.
Wheels: 17x9 Stazworks double beadlocks
ai38.photobucket.com_albums_e102_boomboom33_Project_20Redneck_20Rock_20Rod_null_zps607035f6.jpg

ai38.photobucket.com_albums_e102_boomboom33_Project_20Redneck_20Rock_20Rod_null_zpsb7b241e5.jpg

Tires: 39" BFG Reds
ai38.photobucket.com_albums_e102_boomboom33_Project_20Redneck_20Rock_20Rod_null_zps791b877b.jpg

ai38.photobucket.com_albums_e102_boomboom33_Project_20Redneck_20Rock_20Rod_null_zps2f571dc7.jpg
 
I found a pair of new 14" ORIs last week. I went ahead and picked them up, and they came in today. I'm going to order another pair just like them either this week or next, but they're on a 6-8 week lead time right now. I went ahead and mocked them up on the front, and I thought I'd pull the rollers off and see how it looks with the 39s. I've still got to swap the tires over to the other wheels, but at least it gives an idea of how it's going to look.
It's sitting at full bump right now, and the belly height is 15.5". Right now it's about 74" outside to outside in the front ad about 70" in the rear. I didn't think to measure the backspacing of the wheels before I mounted them, but it looks like they're 4-4.5". The Stazworks wheels I'm going to run are 6" backspacing. The front may clear alright, but I think I'll definitely have to run spacers in the rear to clear the shocks, or find new wheels.
Anyway, on to the pics.
ai38.photobucket.com_albums_e102_boomboom33_Project_20Redneck_20Rock_20Rod_null_zps68668003.jpg

ai38.photobucket.com_albums_e102_boomboom33_Project_20Redneck_20Rock_20Rod_null_zpsfb08f3db.jpg

ai38.photobucket.com_albums_e102_boomboom33_Project_20Redneck_20Rock_20Rod_null_zps81b1b194.jpg

ai38.photobucket.com_albums_e102_boomboom33_Project_20Redneck_20Rock_20Rod_null_zpsd20b8404.jpg
 
Progress is still slow, but at least it's progress.
The factory 9" housings needed a little beefing up so I got a couple of DIY diff cover kits from BTF. I've got a couple ideas for trusses for both axles. I just need to pick up some steel and start making sparks.
ai38.photobucket.com_albums_e102_boomboom33_Project_20Redneck_20Rock_20Rod_null_zpsb2153c1e.jpg
ai38.photobucket.com_albums_e102_boomboom33_Project_20Redneck_20Rock_20Rod_null_zps9ec10204.jpg
ai38.photobucket.com_albums_e102_boomboom33_Project_20Redneck_20Rock_20Rod_null_zps10e20a49.jpg
ai38.photobucket.com_albums_e102_boomboom33_Project_20Redneck_20Rock_20Rod_null_zps49b6aa69.jpg
I picked up a set of motor mounts for the LQ9 from Rock Tactics. Ignore the ugly TIG welds, I'm an electrician not a welder. :icon_lol:
ai38.photobucket.com_albums_e102_boomboom33_Project_20Redneck_20Rock_20Rod_null_zps4c56088d.jpg
ai38.photobucket.com_albums_e102_boomboom33_Project_20Redneck_20Rock_20Rod_null_zps43b94d97.jpg
ai38.photobucket.com_albums_e102_boomboom33_Project_20Redneck_20Rock_20Rod_null_zps53a78bed.jpg
ai38.photobucket.com_albums_e102_boomboom33_Project_20Redneck_20Rock_20Rod_null_zpse479f60c.jpg
 
I got the motor up on the stand and gave it a good cleaning and a coat of paint. Soon I'll be ready to mock it up in the chassis and start building the mounts.
ai38.photobucket.com_albums_e102_boomboom33_Project_20Redneck_20Rock_20Rod_null_zps0795d8ae.jpg
Since Powerglides are known for having weak bellhousings I decided to just go ahead and go with a Ultra Bell. I made the rough cut with a sawzall, but I need to come up with a better way to to make the finish cut. I was a little nervous taking a sawzall to a high dollar transmission.
ai38.photobucket.com_albums_e102_boomboom33_Project_20Redneck_20Rock_20Rod_null_zps02a8564c.jpg
ai38.photobucket.com_albums_e102_boomboom33_Project_20Redneck_20Rock_20Rod_null_zpsd0d73f36.jpg
ai38.photobucket.com_albums_e102_boomboom33_Project_20Redneck_20Rock_20Rod_null_zps32e90f29.jpg
The new Atlas showed up this week too. I love when the brown Santa comes to visit.
ai38.photobucket.com_albums_e102_boomboom33_Project_20Redneck_20Rock_20Rod_null_zps8978bcd9.jpg
Specs:
Competition case - 3.0 ratio
27 spline input
Driver side front output clocked flat
Competition 32 spline front output
Competition short tailshaft
1350 non-cv yokes
 
Believe it or not I'm still working on this thing. Slowly.
I've made a little progress over the last few weeks.
I finally got thebellhousing cut the rest of the way down on the powerglide, and gave it a good coat of paint.

ai38.photobucket.com_albums_e102_boomboom33_Project_20Redneck_20Rock_20Rod_null_zps8c412f4b.jpg
The Ultra-Bell bolts up here to the pump bolts. It's really an easy install, and pretty cheap insurance.
ai38.photobucket.com_albums_e102_boomboom33_Project_20Redneck_20Rock_20Rod_null_zpsc840e717.jpg
ai38.photobucket.com_albums_e102_boomboom33_Project_20Redneck_20Rock_20Rod_null_zps5922ea56.jpg

ai38.photobucket.com_albums_e102_boomboom33_Project_20Redneck_20Rock_20Rod_null_zps8d4da6bb.jpg
Then I bolted on the Atlas adapter, and added a Stef's Fabrication deep aluminum pan and Lokar locking dipstick.


I didn't get a picture with the tape, but it's right 18.75" overall length. That's why I chose a Powerglide for this build. Space is tight, and it offers a lot of strength in a small package.
 

Attachments

  • ai38.photobucket.com_albums_e102_boomboom33_Project_20Redneck_c556ee0fe7b1cec58a043f9d71c6b5cf.jpg
    ai38.photobucket.com_albums_e102_boomboom33_Project_20Redneck_c556ee0fe7b1cec58a043f9d71c6b5cf.jpg
    123.4 KB · Views: 429
  • ai38.photobucket.com_albums_e102_boomboom33_Project_20Redneck_29e60af34742a6fe9346a38b839566d9.jpg
    ai38.photobucket.com_albums_e102_boomboom33_Project_20Redneck_29e60af34742a6fe9346a38b839566d9.jpg
    117.6 KB · Views: 468
  • ai38.photobucket.com_albums_e102_boomboom33_Project_20Redneck_c556ee0fe7b1cec58a043f9d71c6b5cf.jpg
    ai38.photobucket.com_albums_e102_boomboom33_Project_20Redneck_c556ee0fe7b1cec58a043f9d71c6b5cf.jpg
    123.4 KB · Views: 433
  • ai38.photobucket.com_albums_e102_boomboom33_Project_20Redneck_29e60af34742a6fe9346a38b839566d9.jpg
    ai38.photobucket.com_albums_e102_boomboom33_Project_20Redneck_29e60af34742a6fe9346a38b839566d9.jpg
    117.6 KB · Views: 470
Since this is a rear engine buggy I'm runnin a front sump pan from a GTO. I got a trap door baffle that bolts in place of the factory baffle from Improved Racing. I plan to also add a 3 Qt. accumulator so hopefully oiling won't be an issue.


Attachments

  • ai38.photobucket.com_albums_e102_boomboom33_Project_20Redneck_86a8c560d229744d902968c4831b8932.jpg
    ai38.photobucket.com_albums_e102_boomboom33_Project_20Redneck_86a8c560d229744d902968c4831b8932.jpg
    126.6 KB · Views: 443
  • ai38.photobucket.com_albums_e102_boomboom33_Project_20Redneck_15f08a0ac77265d7a38984a3b49e70a5.jpg
    ai38.photobucket.com_albums_e102_boomboom33_Project_20Redneck_15f08a0ac77265d7a38984a3b49e70a5.jpg
    59 KB · Views: 480
  • ai38.photobucket.com_albums_e102_boomboom33_Project_20Redneck_5abce3d74e5bf655ba279d202f8aa88d.jpg
    ai38.photobucket.com_albums_e102_boomboom33_Project_20Redneck_5abce3d74e5bf655ba279d202f8aa88d.jpg
    98.8 KB · Views: 450
I've also been working on the rear axle. I decided to run Spidertrax/Wilwood brakes on all four corners to save some weight, plus they're pretty cool looking too.
I'm still kicking around the design for a bracket to bolt them to the Dodge knuckles in the front, but the rear was pretty simple. I had the hubs turned down so the rotor hat would slip on from the front. I got the caliper brackets from Racing in the Dirt, and I just had to weld a little spacer on them to get the spacing right.
ai38.photobucket.com_albums_e102_boomboom33_Project_20Redneck_20Rock_20Rod_null_zps384f3718.jpg
ai38.photobucket.com_albums_e102_boomboom33_Project_20Redneck_20Rock_20Rod_null_zps9b1064e3.jpg
ai38.photobucket.com_albums_e102_boomboom33_Project_20Redneck_20Rock_20Rod_null_zps017b8016.jpg
I also added an Artec backbone truss. It's made to go on a fabricated 9" housing, but I chopped it up and grafted it onto my housing. It's tacked on, just waiting on my new blue welder to show up before i burn it in.


I can't decide if I want to truss the top of the housing or not. What do you guys think?
 

Attachments

  • ai38.photobucket.com_albums_e102_boomboom33_Project_20Redneck_3bea59839fe707c2bf12b39ad829b948.jpg
    ai38.photobucket.com_albums_e102_boomboom33_Project_20Redneck_3bea59839fe707c2bf12b39ad829b948.jpg
    119.6 KB · Views: 458
  • ai38.photobucket.com_albums_e102_boomboom33_Project_20Redneck_a6417df4001ebe5400b2b0b2113aa3fb.jpg
    ai38.photobucket.com_albums_e102_boomboom33_Project_20Redneck_a6417df4001ebe5400b2b0b2113aa3fb.jpg
    120.2 KB · Views: 489
  • ai38.photobucket.com_albums_e102_boomboom33_Project_20Redneck_04c6066da236002bfed3487e5be3fe82.jpg
    ai38.photobucket.com_albums_e102_boomboom33_Project_20Redneck_04c6066da236002bfed3487e5be3fe82.jpg
    116.4 KB · Views: 493
I've made a little progress the last couple days.
I picked up my new to me welder yesterday. It's way more welder than I'll ever need, but it's nice to finally use a real machine. The only problem is now I can't blame the machine for my horrible welds.

I immediately put it to work welding up the backbone truss on the rear axle. I spread the welding out over two days. I used the lowest settings possible and just made 1-2" welds in different areas, and let it cool. Hopefully I didn't warp the housing too bad. I guess we'll see.

This machine can even make a hack welder like me look halfway decent.

In between welding on the rear axle I started mocking up the Artec ram mount on the front axle.


Tomorrow I'll start trying to hack up the RuffStuff trusses for the top of both axles.
 

Attachments

  • ai38.photobucket.com_albums_e102_boomboom33_Project_20Redneck_66ac91a2055754fb8ebd6f26a408f29f.jpg
    ai38.photobucket.com_albums_e102_boomboom33_Project_20Redneck_66ac91a2055754fb8ebd6f26a408f29f.jpg
    111 KB · Views: 479
  • ai38.photobucket.com_albums_e102_boomboom33_Project_20Redneck_3feccda0792b697b7f6c4d72e9d3019b.jpg
    ai38.photobucket.com_albums_e102_boomboom33_Project_20Redneck_3feccda0792b697b7f6c4d72e9d3019b.jpg
    120.2 KB · Views: 509
  • ai38.photobucket.com_albums_e102_boomboom33_Project_20Redneck_2e2f5294139c99b9759a553ba6133d17.jpg
    ai38.photobucket.com_albums_e102_boomboom33_Project_20Redneck_2e2f5294139c99b9759a553ba6133d17.jpg
    175.9 KB · Views: 480
  • ai38.photobucket.com_albums_e102_boomboom33_Project_20Redneck_5d2057d1b8a4d82740c9321780170aba.jpg
    ai38.photobucket.com_albums_e102_boomboom33_Project_20Redneck_5d2057d1b8a4d82740c9321780170aba.jpg
    120.3 KB · Views: 503
  • ai38.photobucket.com_albums_e102_boomboom33_Project_20Redneck_6262dd34e52f3460388ae6c6a33136d4.jpg
    ai38.photobucket.com_albums_e102_boomboom33_Project_20Redneck_6262dd34e52f3460388ae6c6a33136d4.jpg
    135.9 KB · Views: 467
  • ai38.photobucket.com_albums_e102_boomboom33_Project_20Redneck_66ac91a2055754fb8ebd6f26a408f29f.jpg
    ai38.photobucket.com_albums_e102_boomboom33_Project_20Redneck_66ac91a2055754fb8ebd6f26a408f29f.jpg
    111 KB · Views: 550
  • ai38.photobucket.com_albums_e102_boomboom33_Project_20Redneck_3feccda0792b697b7f6c4d72e9d3019b.jpg
    ai38.photobucket.com_albums_e102_boomboom33_Project_20Redneck_3feccda0792b697b7f6c4d72e9d3019b.jpg
    120.2 KB · Views: 551
  • ai38.photobucket.com_albums_e102_boomboom33_Project_20Redneck_2e2f5294139c99b9759a553ba6133d17.jpg
    ai38.photobucket.com_albums_e102_boomboom33_Project_20Redneck_2e2f5294139c99b9759a553ba6133d17.jpg
    175.9 KB · Views: 504
  • ai38.photobucket.com_albums_e102_boomboom33_Project_20Redneck_5d2057d1b8a4d82740c9321780170aba.jpg
    ai38.photobucket.com_albums_e102_boomboom33_Project_20Redneck_5d2057d1b8a4d82740c9321780170aba.jpg
    120.3 KB · Views: 488
  • ai38.photobucket.com_albums_e102_boomboom33_Project_20Redneck_6262dd34e52f3460388ae6c6a33136d4.jpg
    ai38.photobucket.com_albums_e102_boomboom33_Project_20Redneck_6262dd34e52f3460388ae6c6a33136d4.jpg
    135.9 KB · Views: 528
I worked some more today on the rear axle. I got the long side of the truss cut out and about half welded. Tomorrow I'll finish welding the long side and start mocking up the short side.


Attachments

  • ai38.photobucket.com_albums_e102_boomboom33_Project_20Redneck_054c56917cc68afc7759d09e53430dc7.jpg
    ai38.photobucket.com_albums_e102_boomboom33_Project_20Redneck_054c56917cc68afc7759d09e53430dc7.jpg
    115.2 KB · Views: 438
  • ai38.photobucket.com_albums_e102_boomboom33_Project_20Redneck_ac7f40a516dc1ca5e128a800c3357b08.jpg
    ai38.photobucket.com_albums_e102_boomboom33_Project_20Redneck_ac7f40a516dc1ca5e128a800c3357b08.jpg
    129.2 KB · Views: 492
  • ai38.photobucket.com_albums_e102_boomboom33_Project_20Redneck_092ae4ef55046ed44c0991d88e2259f7.jpg
    ai38.photobucket.com_albums_e102_boomboom33_Project_20Redneck_092ae4ef55046ed44c0991d88e2259f7.jpg
    109.3 KB · Views: 492
  • ai38.photobucket.com_albums_e102_boomboom33_Project_20Redneck_1fa16852bc60d537e9d311d630db8d32.jpg
    ai38.photobucket.com_albums_e102_boomboom33_Project_20Redneck_1fa16852bc60d537e9d311d630db8d32.jpg
    112.9 KB · Views: 439
  • ai38.photobucket.com_albums_e102_boomboom33_Project_20Redneck_d6d7476e93f5de611baf41c5f4b9acf6.jpg
    ai38.photobucket.com_albums_e102_boomboom33_Project_20Redneck_d6d7476e93f5de611baf41c5f4b9acf6.jpg
    118.2 KB · Views: 459
  • ai38.photobucket.com_albums_e102_boomboom33_Project_20Redneck_2b9ab5ece30bdc2ddcbd062cc9e0b37d.jpg
    ai38.photobucket.com_albums_e102_boomboom33_Project_20Redneck_2b9ab5ece30bdc2ddcbd062cc9e0b37d.jpg
    151.9 KB · Views: 437
  • ai38.photobucket.com_albums_e102_boomboom33_Project_20Redneck_28b6222e1cd564f1f9426a71e5e7c7b8.jpg
    ai38.photobucket.com_albums_e102_boomboom33_Project_20Redneck_28b6222e1cd564f1f9426a71e5e7c7b8.jpg
    118.5 KB · Views: 422
  • ai38.photobucket.com_albums_e102_boomboom33_Project_20Redneck_2b9ab5ece30bdc2ddcbd062cc9e0b37d.jpg
    ai38.photobucket.com_albums_e102_boomboom33_Project_20Redneck_2b9ab5ece30bdc2ddcbd062cc9e0b37d.jpg
    151.9 KB · Views: 452
  • ai38.photobucket.com_albums_e102_boomboom33_Project_20Redneck_28b6222e1cd564f1f9426a71e5e7c7b8.jpg
    ai38.photobucket.com_albums_e102_boomboom33_Project_20Redneck_28b6222e1cd564f1f9426a71e5e7c7b8.jpg
    118.5 KB · Views: 466
  • ai38.photobucket.com_albums_e102_boomboom33_Project_20Redneck_054c56917cc68afc7759d09e53430dc7.jpg
    ai38.photobucket.com_albums_e102_boomboom33_Project_20Redneck_054c56917cc68afc7759d09e53430dc7.jpg
    115.2 KB · Views: 467
  • ai38.photobucket.com_albums_e102_boomboom33_Project_20Redneck_ac7f40a516dc1ca5e128a800c3357b08.jpg
    ai38.photobucket.com_albums_e102_boomboom33_Project_20Redneck_ac7f40a516dc1ca5e128a800c3357b08.jpg
    129.2 KB · Views: 472
  • ai38.photobucket.com_albums_e102_boomboom33_Project_20Redneck_092ae4ef55046ed44c0991d88e2259f7.jpg
    ai38.photobucket.com_albums_e102_boomboom33_Project_20Redneck_092ae4ef55046ed44c0991d88e2259f7.jpg
    109.3 KB · Views: 488
  • ai38.photobucket.com_albums_e102_boomboom33_Project_20Redneck_1fa16852bc60d537e9d311d630db8d32.jpg
    ai38.photobucket.com_albums_e102_boomboom33_Project_20Redneck_1fa16852bc60d537e9d311d630db8d32.jpg
    112.9 KB · Views: 481
  • ai38.photobucket.com_albums_e102_boomboom33_Project_20Redneck_d6d7476e93f5de611baf41c5f4b9acf6.jpg
    ai38.photobucket.com_albums_e102_boomboom33_Project_20Redneck_d6d7476e93f5de611baf41c5f4b9acf6.jpg
    118.2 KB · Views: 443
I finally finished the rear axle today. That was a lot of cutting, grinding and welding! I think I've blown a whole stick of DOM out of my nose the last 4 nights.
That's one RuffStuff Toyota truss hacked into 4 pieces. It's not fancy, but I think it'll get the job done.


I also added RuffStuff weld washers on all the link and shock tabs. I'm not posting pics of those though, the welds are UGLY. LOL
 

Attachments

  • ai38.photobucket.com_albums_e102_boomboom33_Project_20Redneck_db7e5049825d59ff87bb010536e4f2e9.jpg
    ai38.photobucket.com_albums_e102_boomboom33_Project_20Redneck_db7e5049825d59ff87bb010536e4f2e9.jpg
    146.5 KB · Views: 422
  • ai38.photobucket.com_albums_e102_boomboom33_Project_20Redneck_8062261c8d778ad6343c845d19046a5f.jpg
    ai38.photobucket.com_albums_e102_boomboom33_Project_20Redneck_8062261c8d778ad6343c845d19046a5f.jpg
    121.6 KB · Views: 467
  • ai38.photobucket.com_albums_e102_boomboom33_Project_20Redneck_9d80b7141b145cab5b8534260f5b2721.jpg
    ai38.photobucket.com_albums_e102_boomboom33_Project_20Redneck_9d80b7141b145cab5b8534260f5b2721.jpg
    154.9 KB · Views: 450
  • ai38.photobucket.com_albums_e102_boomboom33_Project_20Redneck_f5f0f4a9f7ee06dcab4b17bf75535046.jpg
    ai38.photobucket.com_albums_e102_boomboom33_Project_20Redneck_f5f0f4a9f7ee06dcab4b17bf75535046.jpg
    140.6 KB · Views: 438
  • ai38.photobucket.com_albums_e102_boomboom33_Project_20Redneck_ea96f50ed362a80854ab65b0aee4d1e4.jpg
    ai38.photobucket.com_albums_e102_boomboom33_Project_20Redneck_ea96f50ed362a80854ab65b0aee4d1e4.jpg
    114.5 KB · Views: 452
  • ai38.photobucket.com_albums_e102_boomboom33_Project_20Redneck_8ea830ae1629481c15efab33f4329f66.jpg
    ai38.photobucket.com_albums_e102_boomboom33_Project_20Redneck_8ea830ae1629481c15efab33f4329f66.jpg
    101.1 KB · Views: 438
  • ai38.photobucket.com_albums_e102_boomboom33_Project_20Redneck_4ae3f9e58d259c179a998b0bd84cece9.jpg
    ai38.photobucket.com_albums_e102_boomboom33_Project_20Redneck_4ae3f9e58d259c179a998b0bd84cece9.jpg
    140.9 KB · Views: 455
  • ai38.photobucket.com_albums_e102_boomboom33_Project_20Redneck_db34bedac219d111cab83a2d7fad5514.jpg
    ai38.photobucket.com_albums_e102_boomboom33_Project_20Redneck_db34bedac219d111cab83a2d7fad5514.jpg
    118.4 KB · Views: 462
  • ai38.photobucket.com_albums_e102_boomboom33_Project_20Redneck_4ae3f9e58d259c179a998b0bd84cece9.jpg
    ai38.photobucket.com_albums_e102_boomboom33_Project_20Redneck_4ae3f9e58d259c179a998b0bd84cece9.jpg
    140.9 KB · Views: 458
  • ai38.photobucket.com_albums_e102_boomboom33_Project_20Redneck_db34bedac219d111cab83a2d7fad5514.jpg
    ai38.photobucket.com_albums_e102_boomboom33_Project_20Redneck_db34bedac219d111cab83a2d7fad5514.jpg
    118.4 KB · Views: 453
  • ai38.photobucket.com_albums_e102_boomboom33_Project_20Redneck_db7e5049825d59ff87bb010536e4f2e9.jpg
    ai38.photobucket.com_albums_e102_boomboom33_Project_20Redneck_db7e5049825d59ff87bb010536e4f2e9.jpg
    146.5 KB · Views: 468
  • ai38.photobucket.com_albums_e102_boomboom33_Project_20Redneck_8062261c8d778ad6343c845d19046a5f.jpg
    ai38.photobucket.com_albums_e102_boomboom33_Project_20Redneck_8062261c8d778ad6343c845d19046a5f.jpg
    121.6 KB · Views: 454
  • ai38.photobucket.com_albums_e102_boomboom33_Project_20Redneck_9d80b7141b145cab5b8534260f5b2721.jpg
    ai38.photobucket.com_albums_e102_boomboom33_Project_20Redneck_9d80b7141b145cab5b8534260f5b2721.jpg
    154.9 KB · Views: 482
  • ai38.photobucket.com_albums_e102_boomboom33_Project_20Redneck_f5f0f4a9f7ee06dcab4b17bf75535046.jpg
    ai38.photobucket.com_albums_e102_boomboom33_Project_20Redneck_f5f0f4a9f7ee06dcab4b17bf75535046.jpg
    140.6 KB · Views: 467
  • ai38.photobucket.com_albums_e102_boomboom33_Project_20Redneck_ea96f50ed362a80854ab65b0aee4d1e4.jpg
    ai38.photobucket.com_albums_e102_boomboom33_Project_20Redneck_ea96f50ed362a80854ab65b0aee4d1e4.jpg
    114.5 KB · Views: 469
  • ai38.photobucket.com_albums_e102_boomboom33_Project_20Redneck_8ea830ae1629481c15efab33f4329f66.jpg
    ai38.photobucket.com_albums_e102_boomboom33_Project_20Redneck_8ea830ae1629481c15efab33f4329f66.jpg
    101.1 KB · Views: 452
Lots of overtime and the cold weather have kept me out of the shop for a couple weeks, but I finally got a little more done this week. I got the truss and ram mount finished on the front axle. Not a lot of progress, but here's some pics.


I've got the knuckles off now and got the tie-rod hole drilled out for a 3/4" bolt. While they're off I'll mock up the Spidertrax brakes, and make my caliper bracket to bolt to the knuckles. I'm going to run Dynatrac Pro Steer balljoints. They're pricey, but hopefully they'll be worth it. I hope they'll hold up ok to the full hydro and 39s. I've got a set ordered and they should be here by the middle of next week.
 

Attachments

  • ai38.photobucket.com_albums_e102_boomboom33_Project_20Redneck_713c7fca5ffa3232d44bcf7aa3ea4a34.jpg
    ai38.photobucket.com_albums_e102_boomboom33_Project_20Redneck_713c7fca5ffa3232d44bcf7aa3ea4a34.jpg
    138.7 KB · Views: 475
  • ai38.photobucket.com_albums_e102_boomboom33_Project_20Redneck_d05f5c9f553590ea71557726501689ee.jpg
    ai38.photobucket.com_albums_e102_boomboom33_Project_20Redneck_d05f5c9f553590ea71557726501689ee.jpg
    135.8 KB · Views: 459
  • ai38.photobucket.com_albums_e102_boomboom33_Project_20Redneck_4927a8a2066e54c6c01b72c6f471b87d.jpg
    ai38.photobucket.com_albums_e102_boomboom33_Project_20Redneck_4927a8a2066e54c6c01b72c6f471b87d.jpg
    126.7 KB · Views: 491
  • ai38.photobucket.com_albums_e102_boomboom33_Project_20Redneck_5350a47380ea81735b429e6919a00b31.jpg
    ai38.photobucket.com_albums_e102_boomboom33_Project_20Redneck_5350a47380ea81735b429e6919a00b31.jpg
    103.9 KB · Views: 430
  • ai38.photobucket.com_albums_e102_boomboom33_Project_20Redneck_a01ca891381c838e828bcfb2463ed1e7.jpg
    ai38.photobucket.com_albums_e102_boomboom33_Project_20Redneck_a01ca891381c838e828bcfb2463ed1e7.jpg
    160.5 KB · Views: 496
  • ai38.photobucket.com_albums_e102_boomboom33_Project_20Redneck_a7b46ad181910d738f4bd678e742fa3d.jpg
    ai38.photobucket.com_albums_e102_boomboom33_Project_20Redneck_a7b46ad181910d738f4bd678e742fa3d.jpg
    126.8 KB · Views: 460
  • ai38.photobucket.com_albums_e102_boomboom33_Project_20Redneck_3eb5d7c4bd2e6770e7dd0e47ecc0b3ec.jpg
    ai38.photobucket.com_albums_e102_boomboom33_Project_20Redneck_3eb5d7c4bd2e6770e7dd0e47ecc0b3ec.jpg
    132.3 KB · Views: 428
  • ai38.photobucket.com_albums_e102_boomboom33_Project_20Redneck_6bbb6d50e82364c577930ac58d379c9c.jpg
    ai38.photobucket.com_albums_e102_boomboom33_Project_20Redneck_6bbb6d50e82364c577930ac58d379c9c.jpg
    141.6 KB · Views: 439
  • ai38.photobucket.com_albums_e102_boomboom33_Project_20Redneck_1abb0dfdc530e23adfaafc005fe5bf26.jpg
    ai38.photobucket.com_albums_e102_boomboom33_Project_20Redneck_1abb0dfdc530e23adfaafc005fe5bf26.jpg
    126.2 KB · Views: 464
  • ai38.photobucket.com_albums_e102_boomboom33_Project_20Redneck_148edc1daaa5ffe4698c18037dbc0f67.jpg
    ai38.photobucket.com_albums_e102_boomboom33_Project_20Redneck_148edc1daaa5ffe4698c18037dbc0f67.jpg
    142.7 KB · Views: 472
  • ai38.photobucket.com_albums_e102_boomboom33_Project_20Redneck_92a0798156f9b1d7e133478ee4765905.jpg
    ai38.photobucket.com_albums_e102_boomboom33_Project_20Redneck_92a0798156f9b1d7e133478ee4765905.jpg
    155.6 KB · Views: 504
I got a little time in the shop this afternoon. While I've got the knuckles off the front axle I figured I'd work on getting the Spidertrax brakes mocked up.

You can see I had to modify the knuckles just a little to make everything fit. The "wings" had to be cut off the knuckle because they interfered with the rotor, and I had to grind down around the original caliper bolt holes to clear the mounting ears on the Wilwood calipers. The original caliper bolts are a funky M11 thread that I couldn't find anywhere so I tapped them out to 7/16"-14.

ai38.photobucket.com_albums_e102_boomboom33_Project_20Redneck_d8a504ab8ec096643e73de4c143baf80.jpg

I just made a simple, ugly, but functional caliper bracket out of some 2"x.25" flat bar and some .5"x.6875" spacers. I drilled and tapped the spacers to 3/8"-24. The caliper bolts to the bracket from the front, and then the bracket bolts to the knuckle from the back.

ai38.photobucket.com_albums_e102_boomboom33_Project_20Redneck_afd70fe56b21accc296ffa51f4bd30a9.jpg
ai38.photobucket.com_albums_e102_boomboom33_Project_20Redneck_c35e43f4a1f2cf407388ec45fba0df13.jpg
ai38.photobucket.com_albums_e102_boomboom33_Project_20Redneck_ba5f7572de1eda2b0b30b7e04f3f5566.jpg
ai38.photobucket.com_albums_e102_boomboom33_Project_20Redneck_cb8d7eef5bc00ee227b42d6a90653d9a.jpg

ai38.photobucket.com_albums_e102_boomboom33_Project_20Redneck_bc7122e4172243b3caeb7c2d2c78579d.jpg
ai38.photobucket.com_albums_e102_boomboom33_Project_20Redneck_394b7123758bb2ad01600376dcc034ca.jpg

ai38.photobucket.com_albums_e102_boomboom33_Project_20Redneck_4c43bd05d55357d497fc323557041594.jpg

Like I said, they're ugly, but they'll work.

ai38.photobucket.com_albums_e102_boomboom33_Project_20Redneck_43ed99f567146f9f15b18d7a77aa6ef2.jpg
 
I didn't have a lot of time in the shop today so there's not a lot of real progress. I did get a few things done though.

I cleaned and spray bombed the wheels. If I get some time tomorrow afternoon I may start mounting the tires.

ai38.photobucket.com_albums_e102_boomboom33_Project_20Redneck_705406a1c53ee204a7739e704f27370f.jpg

After that I put the GTO oil pan on the engine, and put on the fittings to adapt the steam ports to -4 AN. And I figured I'd stick the headers on for a test fit. They're OBX LS turbo headers. They're supposed to come up and froward, but it makes them too wide to fit the chassis. This way they're narrow enough, but it's gonna be tight with the steering pump. I've got the engine bracket kit from Wide Open Design that I think will move it up high enough, I just have to get a new water pump before I can put it on. I also put in new spark plugs, and Taylor Thundervolt plug wires with heat shield boots.

ai38.photobucket.com_albums_e102_boomboom33_Project_20Redneck_e9b300027fe4ad6b718c6e8d89ceedaf.jpg

ai38.photobucket.com_albums_e102_boomboom33_Project_20Redneck_ce60ccec8475952af5f1c856dbf10fa4.jpg
 
When time has allowed over the last week I've been working on installing the WOD LS engine bracket kit. Along with a new water pump, alternator, and PSC CBR pump. It's a very nice kit, and the install was very easy. I only had a couple if minor problems with the power coat being too thick in a few holes. That was easily solved. Also, I bought the belt they recommended for the kit, but it was too long. I stepped down to a slightly shorter belt. Maybe one of my pulleys is a different size than what they spec'd it for. Just something to keep in mind if you're installing this kit.

ai38.photobucket.com_albums_e102_boomboom33_Project_20Redneck_141b32c5cc1e369eb74e2420b7a7cea7.jpg

Today I cut a couple of pieces of 1/4" plate and formed them to the bottom of both axle housings to act as a skid plate since the housings are just 1/8" thick. Definitely not fancy, but it will work.

ai38.photobucket.com_albums_e102_boomboom33_Project_20Redneck_787617664046f622103a9850722b88a5.jpg

After that I spent the rest of the day mounting the tires on the beadlocks. That's definitely not a job I want to do again any time soon. It about wore me out.

ai38.photobucket.com_albums_e102_boomboom33_Project_20Redneck_b5900b5effd98e7c404918021aaf6bb4.png

ai38.photobucket.com_albums_e102_boomboom33_Project_20Redneck_d561ada11f3041e4707cb18fa16bd9d0.jpg

Not a lot of progress, but at least it is moving forward. Friday starts my long weekend though, I'll be off for 9 days, Hopefully I'll make some good progress during that time. My next goal is getting it back to a roller, and the start mocking up the drivetrain.
 
It may not look like a lot, but by my standards I've gotten quite a bit done the last couple of days.

First off I installed the inner axle seals in both housings. I used the seals Trail-Gear sales for their 9" housings. Mine used the 2.75" I.D. seals. Even though the rear is FF I'm using seals on it too. The center section will have to be over filled for the flipped pinion and I didn't want to have the tubes full too. I didn't get any pics, but they were a pretty simple install.

Then I got the axles and ORI's hung.

ai38.photobucket.com_albums_e102_boomboom33_Project_20Redneck_7bbfec894830eae6fbf569aca0ed1e5e.jpg
ai38.photobucket.com_albums_e102_boomboom33_Project_20Redneck_f65580341bbf03a3daec75fa40969ffd.jpg
ai38.photobucket.com_albums_e102_boomboom33_Project_20Redneck_c456e45d4a32650db5a36b184bfee157.jpg

Then bolted on the rear brakes and checked the clearance with these wheels. Like I had expected it looks like I will have to run wheel spacers. It's that or new wheels, and I really just don't want to go to all that trouble right now. I already had some spacers, so these pics are with 1.5" spacers installed.

ai38.photobucket.com_albums_e102_boomboom33_Project_20Redneck_82a067234dec0d03b71a6b4578181a38.jpg
ai38.photobucket.com_albums_e102_boomboom33_Project_20Redneck_29801c32108b468ce332adc9c869d510.jpg
ai38.photobucket.com_albums_e102_boomboom33_Project_20Redneck_e208652291fb885d0988a9015334bb6c.jpg
ai38.photobucket.com_albums_e102_boomboom33_Project_20Redneck_c33ca8ab45c4837fb3c27aef13de110a.jpg

Then I got the Dynatrac ball joints installed and the knuckles back on the axle. The unit bearings and brakes bolted up to check clearance. And mounted the ram and measured for my tie rods. I'll cut them tomorrow. I can't bolt the front wheels on yet because I'm a dummy that didn't order lug nuts when I ordered studs. They'll be here sometime this week though.

ai38.photobucket.com_albums_e102_boomboom33_Project_20Redneck_00cf0e896820f4f3f3c4cd4ba9f2fc90.jpg
ai38.photobucket.com_albums_e102_boomboom33_Project_20Redneck_53e0e551a415bdc286a82c3562584092.jpg
ai38.photobucket.com_albums_e102_boomboom33_Project_20Redneck_9f5415d04666dec5bb58a8a586e40209.jpg
ai38.photobucket.com_albums_e102_boomboom33_Project_20Redneck_3a5e897bf700cd12693d2a36e92ddf19.jpg
ai38.photobucket.com_albums_e102_boomboom33_Project_20Redneck_7f3d920c7ec726878f6c10d972e36e1e.jpg
ai38.photobucket.com_albums_e102_boomboom33_Project_20Redneck_067dd6fcfaa9bd7e64ae6a0c658bf527.jpg
ai38.photobucket.com_albums_e102_boomboom33_Project_20Redneck_c71b1e0afc54dcc7bef42573f27ec1bf.jpg
ai38.photobucket.com_albums_e102_boomboom33_Project_20Redneck_47246d85341cd09dc4b8d45e595204a7.jpg
ai38.photobucket.com_albums_e102_boomboom33_Project_20Redneck_3fdbf75bb1a4964096f6368243d8fe5f.jpg

I'll be working on it more this week. I may start tomorrow on putting the drivetrain together and getting it ready to set in the chassis. At least it's kinda starting to look like something now.
 
I got a little bit of time to work on it today. I got the Poweglide and Atlas mated together.

ai38.photobucket.com_albums_e102_boomboom33_Project_20Redneck_118098bcb43f7287766dbbfac5c480ab.jpg

ai38.photobucket.com_albums_e102_boomboom33_Project_20Redneck_8eed8bb61bd8b14ec1bd42ae7096033a.jpg

I also got the tie-rods cut and the inserts welded in. Each insert got two passes with the TIG and two plug welds with the MIG. Then I hooked the tie rods up and used an air hose to cycle the steering. I don't know yet if I can use the full 8" of stroke, or if I will have to limit it.

ai38.photobucket.com_albums_e102_boomboom33_Project_20Redneck_0a8ff7b65c76fa9f0ca195c6eb119286.jpg

ai38.photobucket.com_albums_e102_boomboom33_Project_20Redneck_88d87d74ed1f2905b98eb73889f895c6.jpg

ai38.photobucket.com_albums_e102_boomboom33_Project_20Redneck_17a29cfcc551591eea292b3e829e6292.jpg

ai38.photobucket.com_albums_e102_boomboom33_Project_20Redneck_5d91afdc2858fe98113b8069398bd324.jpg


ai38.photobucket.com_albums_e102_boomboom33_Project_20Redneck_18200ee2d498cd988f1f8a71ff67d1c2.jpg

I know the angle of the tie-rod at full lock is not ideal, but the ram is as close to the axle as I could get it.
 
I spent a few hours in the shop this afternoon. Not a lot of progress, but I got a few things done. I put the wheels and tires on the front and got it off the jack stands to get some better pictures.

ai38.photobucket.com_albums_e102_boomboom33_Project_20Redneck_3bf1fb3cadb1c72616416d2b66665758.jpg

ai38.photobucket.com_albums_e102_boomboom33_Project_20Redneck_88d5c7216285327a78795616194dfea5.jpg

ai38.photobucket.com_albums_e102_boomboom33_Project_20Redneck_3ef80cce8d24890729a548b9e6d4019b.jpg

ai38.photobucket.com_albums_e102_boomboom33_Project_20Redneck_254d014af41363b8320d9d894a3d09dd.jpg

ai38.photobucket.com_albums_e102_boomboom33_Project_20Redneck_7d8cfdc538a80367efab2f47f6d5f66c.jpg


Then I used the hoist to flex it out and see how everything looks. There's a couple of issues there, but I kinda expected them. The rear tires get into the shocks pretty good when it's flexed out. And the front passenger side shock hits the chassis just a little. The front will require re-doing a small section of tube, not a big deal really. I don't know whether to try to run bigger spacers on the rear to clear the shocks, or if I should just get new wheels.

ai38.photobucket.com_albums_e102_boomboom33_Project_20Redneck_c25105a0d902aac923212263173c9cce.jpg

ai38.photobucket.com_albums_e102_boomboom33_Project_20Redneck_db4b1abc7dee1cb92958b720e1774e35.jpg

ai38.photobucket.com_albums_e102_boomboom33_Project_20Redneck_147d81297fd23ecfc85fa7f6c83555eb.jpg

I also got the transmission/t-case mated to the engine. Planning on sitting it in the chassis first thing in the morning to start working on mounting it.

ai38.photobucket.com_albums_e102_boomboom33_Project_20Redneck_f73fb9dd14eb2b3b489e949f64bc4b3f.jpg

ai38.photobucket.com_albums_e102_boomboom33_Project_20Redneck_031b0713fba0aa357f6e62553aa37057.jpg
 
I sat the drivetrain in today, it's a VERY tight fit. It's just sitting on blocks right now. I still have to do a lot of measuring and checking before I start mounting it, but it's a start.

One issue is the oil pan. I'm going to have to go back to an F-Body style pan. The GTO pan just isn't going to work. The the oil filter and part of the sump want to occupy the same space as the pinion yoke. I was hoping to get farther along today, but it was slow going and I didn't get as much time in the shop as I hoped to. I snapped a few pictures, but they don't show much really.

ai38.photobucket.com_albums_e102_boomboom33_Project_20Redneck_f39992b2cee15f8baf4085d4539a1b9d.jpg

ai38.photobucket.com_albums_e102_boomboom33_Project_20Redneck_ea12ddf4bb22b49e303d16e4f48cb5ae.jpg

ai38.photobucket.com_albums_e102_boomboom33_Project_20Redneck_46927b5c20434ebb6680cae9a0dc7c15.jpg

ai38.photobucket.com_albums_e102_boomboom33_Project_20Redneck_c873fce95193c96d11040197239c7a6b.jpg
 
Back
Top