401 swap into my CJ7

TKFireman

Active Member
Joined
Feb 4, 2009
Location
Apex, NC
TKFireman's CJ7

Let me start by saying that I've never rebuilt an engine/tranny or t-case before. My '80 CJ7 currently has a 304/T176/D300 with edelbrock performer intake, holley TA670, GM HEI ignition and stock exhaust manifolds. I bought a 401 out of a '77 Chief and have been working on rebuilding it for about a year now as funds allowed, hopefully going to start the swap within a few weeks. Plan to rebuild the T176/D300 and carb while I'm at it, add long tube headers and switch to hydraulic clutch set-up. Thought about going to a 5 speed, but thats gonna have to wait for a while. Here is what I have now and some pictures
Engine specs
bored .030 over
crank ground .010/.010
decked .010
rotating assembly balanced to 4 grams out front and rear
master rebuild kit
heads resurfaced
all new springs and rockers - stock
Melling torque cam
new timing cover
new harmonic balancer
new fuel/water pumps
Luk clutch kit
Holley carb rebuild kit
T176 rebuild kit
Dana 300 kit is on order
flowtech long tube headers
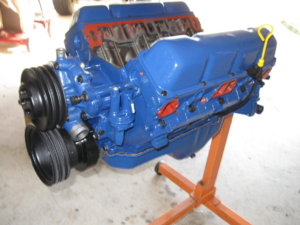
How it sits now, have it bagged to keep trash out for now
 

Attachments

  • IMG_0945.jpg
    IMG_0945.jpg
    121.3 KB · Views: 1,851
I looked for a high volume oil pump, but couldn't find one. I used a new timing cover and new Melling oil pump kit. I lapped the oil pump cover on a piece of glass to make it perfectly smooth and flat. I checked the gaps between the pump vanes and housing with a feeler gauge and between the pump and cover with plastigauge, all were in spec according to the Haynes manual. I don't see any reason it won't have good pressure, but again this is my first engine build so I'm half expecting it to blow up and form a mushroom cloud when I turn the key for the first time.....
 
I would like some info on this oil pump. I rebuilt mine from bottom to top and it still idles at 5psi. Thanks
 
I would like some info on this oil pump. I rebuilt mine from bottom to top and it still idles at 5psi. Thanks


steve my ju 360 idles at 40-50 psi, pretty much all the time. The only time it gets low is on steep inclines and high rpms.

I have no idea what was done to my engine prior to me getting it, it was in a cherokee that a friend bought years ago for junk
 
The biggest problem I see is it is the wrong color. Every one knows any other color than AMC blue will result in a loss of at least 10 HP. ;)
ai168.photobucket.com_albums_u179_amcjeepman_DSCN0116.jpg

As far as High pressure/high volume oil pumps ther are none that go in the factory timing cover. There are some modified front covers that will drive a seperate external oil pump out there, but not neccessary for the typical rebuild. There are some tricks, such as smaller holed cam bearings and some mods to the oil galley pulgs that will increase pressure to the mains. Its a little late for that since the motor is togather though. I wouldn't worry though mine has been togather for years with out those mods and has the typical low oil pressure when warm at idle and I've had no problems.
 
I did a lot of reading about oil mods, extra lines to the 7/8 piston galley, external distributor gear lines and came to the conclusion that my engine will rarely if ever see 5000 rpm, not a race engine and those oil mods are probably not needed. I thought about the AMC blue, but went with Ford Dark Blue instead, mainly just because it was more readily available.
Having trouble loading more pictures, think they are too big, got to figure out how to resize them or something
 
alright, got it figured out, linked pics from photobucket
ai785.photobucket.com_albums_yy137_TKFireman_IMG_0504.jpg

ai785.photobucket.com_albums_yy137_TKFireman_IMG_0909.jpg

ai785.photobucket.com_albums_yy137_TKFireman_IMG_0921.jpg
 
I did the 7/8 cly lube line on mine. I am thinking that is the culpret of the low pressure since it transfers the oil to the rear of the engine.....Dunno. Been that way for 4 years now and no issues as far a overheating or anything. As for the color, go with what you want. It sill ruins the same :lol: Here is mine.
picture.php
 
I've got a little done, got the trans and t-case out, removed the radiator and grill to make a little extra room, hope to get the trans/t-case rebuilt in the next few days, never done it before, gonna take my time and try to do it right.
ai785.photobucket.com_albums_yy137_TKFireman_IMG_1006.jpg

ai785.photobucket.com_albums_yy137_TKFireman_IMG_1018.jpg

ai785.photobucket.com_albums_yy137_TKFireman_IMG_1008.jpg
 
Transmission turned out to be more of a headache than I expected, mostly because I didn't know what I was doing, but I got it done, shifts good now everything sealed up and waiting for a coat of paint.
ai785.photobucket.com_albums_yy137_TKFireman_IMG_1037.jpg

Started tearing down the T-case this afternoon, doesn't seem nearly as complicated as the transmission, but we'll see. I'm going by the lomax 4:1 install instructions, even though I'm just rebuilding and not going 4:1. It mentions removing to pressed in detent plugs, which I'm sure has the springs and detents under them for the shift rails, but it doesn't say how to do it, and rebuild kit doesn't come with new ones, so I left them in. I want to modify the shift rails so I can run front wheel drive high if needed, but not real sure about taking the rails out, and being able to get the back in again, with the springs and detents. Anyone done this before?
Here are a few pictures, including my homemade twin sticks
ai785.photobucket.com_albums_yy137_TKFireman_IMG_1038.jpg

ai785.photobucket.com_albums_yy137_TKFireman_IMG_1040.jpg

ai785.photobucket.com_albums_yy137_TKFireman_IMG_1042.jpg

Yoke nuts were pretty tight, but with a little help from a long pipe, they came right off
ai785.photobucket.com_albums_yy137_TKFireman_IMG_1043.jpg

ai785.photobucket.com_albums_yy137_TKFireman_IMG_1046.jpg

ai785.photobucket.com_albums_yy137_TKFireman_IMG_1055.jpg

ai785.photobucket.com_albums_yy137_TKFireman_IMG_1056.jpg
 
Got a lot done today, old engine is out, did a lot of prepping and painting brackets and bolts. Painted the trans and t-case the same ford dark blue as the engine. I decided not to paint the cross member, as the bottom of the tub and frame aren't done, and hopefully it will change in the future anyway, but we'll just have to wait and see. Hopefully gonna take the intake to the machine shop Monday to get it fully cleaned. Still need to clean up the engine bay and wiring. What should I use to seal the intake gasket? I've heard to use copper coat, but not sure, and are the intake ports and water ports sealed the same? Still need to get materials to re-do the exhaust, suppose to pick up clutch master cylinder monday, I have a clutch pedal from a YJ to put in, need to modify the pad to match the CJ pad. Thinking I will go to NAPA and get them to make me hydraulic line for it when I know how long it needs to be.
ai785.photobucket.com_albums_yy137_TKFireman_IMG_1093.jpg
 
WOW

Thats alot of work! Looks like the frame & tub are average clean, but, the transfer case looks like it's been sitting in the ocean! Is that Salt, or just a bad case of grease? As for the shift rail questions, try "Granny". "Twin Stick Builder"[retired].
L O L
 
Its a lot of work to do by yourself, that's for sure. I'll have some help when I drop in the new engine. The t-case had a thick coating of grease on it, all cleaned and painted now. The trans/t-case had a major leak, maybe both of them, one reason I rebuilt both of them.
 
got more done today - no pictures- nothing exciting, cleaned up the engine bay, and painted, painted intake and installed the little plate that keeps oil from going up the PCV valve under it that the PO didn't put on, luckily I had the one from the 401. Got a new alternator, 63 amp, 2 groove pulley, will be able to run a stock belt set-up if I can find a stock york pulley. Installed the motor mounts and brackets on the 401 and put in an adapter for the mechanical oil pressure gauge. Have a friend coming over Wednesday morning, hopefully gonna install the engine then

Got a clutch master cylinder, made some calls, NAPA and a few other hydraulic places didn't want anything to do with making a clutch hose. I called a performance shop a few towns over and think I can get one from them with AN fittings and adapters. While talking to them I found out that they have a chassis dyno and charge $100 for 3 runs and to help tune an engine, maybe more depending on what needs to be done to tune. Think I will have to make a trip over there when I get this thing going....
__________________
 
The 401 is in. It fought us the whole way yesterday, but its in along with tranny, t-case, exhaust, drive shafts and skid plate. I haven't hooked up any wiring or hoses yet. I'll post some pictures, but will probably be tomorrow. I couldn't mount the slave cylinder in the stock location because of the headers, modified it slightly and mounted it to the trans side of the bellhousing, I think it will work. Its still in a nice straight line with the release arm.

I think I'm going to have to run custom fuel lines because the headers are touching the solid fuel lines aganist the frame and the brake distribution block, would proabably run fine, but I'm sure it would vapor lock. Anyone have any recomendations on doing the fuel lines?

I still need to hook up all wiring, front accesories, hoses, starter, mount the master cylinder, get a hose for the hydraulic clutch, switch in the YJ clutch pedal, prime the oil system, rebuild and install the carb, install the distributor and set timing, and I'm sure some other things as well, but I'm getting there.
 
Turns out there is a little more clearance than I originally thought, when I first looked at the fuel lines and headers, the tranny was still supported by a jack stand, after lowering it down to its final position bolted to the skid plate, it opened up a little. I think I still need to re-locate the fuel lines to the top side of the frame rail, and I think I can fabricate a heat shield to protect the fuel lines, prop valve, slave cylinder and hose. It wouldn't hurt to replace those lines anyway of course.

When I removed the carb, I found that there was a spacer plate under it, has Mr. Gasket stamped on it, what is this spacer for? Is it an option, or a must have for the carb? I included a picture of it.

Here are some pictures, between the 100 degree heat and all we had going on, I forgot to take a lot of pictures, but I got a few.
ai785.photobucket.com_albums_yy137_TKFireman_IMG_1123.jpg

ai785.photobucket.com_albums_yy137_TKFireman_IMG_1124.jpg

ai785.photobucket.com_albums_yy137_TKFireman_IMG_1126.jpg

ai785.photobucket.com_albums_yy137_TKFireman_IMG_1127.jpg

ai785.photobucket.com_albums_yy137_TKFireman_IMG_1131.jpg

ai785.photobucket.com_albums_yy137_TKFireman_IMG_1138.jpg
 
Man that's a good looking engine.

Keep it up. It's well worth it.
 
Thanks Ron, I'm sure that international with the caddy engine is a blast to drive, its a sweet looking truck
 
the plate thats was under the carb is to adapt a spread bore carb to a stardard holley patern intake or vice versa. i didnt see what carb your running but from the pic of it i dont think you will need it
 
the plate thats was under the carb is to adapt a spread bore carb to a stardard holley patern intake or vice versa. i didnt see what carb your running but from the pic of it i dont think you will need it

The carb is a Holley Truck Avenger 670 cfm. The studs from the intake go straight through the plate and through the carb, so I'm sure I don't need it as an adapter. I have read a little about spacer plates, open design versus 4 hole design and different thicknesses, but don't know if it is something I want to use on an engine that is built and used for low RPM torque? How will the plate effect performance if any? This engine will rarely if ever see 4500+ rpms
 
I know you may not think you need it but I would recommend a phenolic spacer between the carb and intake. With the gas we presently have the spacer is a buffer from the heat from the engine and will keep the carb and gas cool which in turn will make it run better and keep vapor lock to a minumum. All my vehicles have carbs and they all have the exact same issues when the engine runs at normal temps. Many of my friends have the spacers and swear by them. I just bought one for the Caddy and will give you an update as soon as I put it on.

Thanks for the compliment on the IH.
 
Thanks for the explanation Ron. One reason I started this project was to learn as much as I could about engines and the rest of the drive train.
 
x2 on what RonS said about the phenolic spacer as a heat buffer . I belive its Spectre makes one with a removable 4 hole center section so you can try it as an open spacer or a 4 hole spacer and see how you like the feel of it. In my experience a 4 hole will help with off idle torque and throttle response, but with your 401 using a dual plane intake and 670 carb throttle response should be there and you may like the slight bump in power from the increased intake volume the open spacer provides.

Now all that probably doesnt matter as much withwith an offroader to some people but i have a lot of drag racing experience and itr still carries over or me.

Basically run a phenolic spacer as a heat buffer and if you get one with a removable center section run it boths ways and choose the one that has a better feel to you
 
Thanks for your explanation and advice as well cj5walt
 
Back
Top