Bathroom remodel question (Newb!)

Cherokeekid88

Well-Known Member
Joined
Jun 30, 2007
Location
High Point, NC
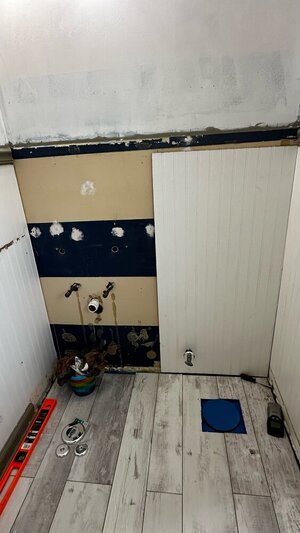
So, we are redoing our downstairs half bath. New floors, new vanity, toilet, beadboard, base boards, chair railing. paint, light fixture, and fan. So I have all the flooring down and now we are redoing the back wall beadboard. Its a 48" x 49.5" area that needs to be covered. Went to Lowe's yesterday to get a sheet of beadboard, well the one sheet cut to height isn't wide enough to fit all the way across... now keep in mind that I have never done any remodeling except for new light fixtures and small things like that. So my question is this... Would it be better to have smaller sheets of beadboard joined together or have my two 24" x '48" sheets and try and fill the 1.5" gap in the middle the two board would create? I've got all the studs marked on the wall, got my adhesive ready and my brad nails ready to go.

Also want to add that the section of the wall we are redoing the bead board on is the same wall as all the plumbing, Not that it really matters, but it does make it a little more difficult making sure all the plumbing holes line up and everything is nice and square.
I like to keep the seams to a minimum, using as big of pieces as possible to cover the area. At the same time you'll be limited by the studs or where you can nail/screw.
You might put a layer of cheap plywood sheathing up first to make a solid substrate so you can nail and screw your little heart out and not worry about hitting a stud.
Bead board usually has a pattern? Cut it down one of the grooves or whatever. Seam it there and go all the way across with no gaps.
Unless you really do want to just try to fill the 1.5" gap with molding or something, I'd probably just bite the bullet and get an extra piece.
You might need it.

I'm in no way a professional, but I've been remodeling my house for the last 6yrs....
 
You can rip the beadboard/wainscot right at a joint and but it with another with some latex caulk and make it look pretty good.

But you can also buy it in a 4x8 sheet and not worry about that. Or you could use some larger corner trim on each end assuming this is some sort of alcove. What material are you using
 
We have painted beadbord wainscoting in out living room. You don't notice the joints at all, what with furniture and all. But in a half bath, folks will be sitting there almost eye level with it, very close, good lighting, etc. I'd buy a second full sheet.
 
I like to keep the seams to a minimum, using as big of pieces as possible to cover the area. At the same time you'll be limited by the studs or where you can nail/screw.
You might put a layer of cheap plywood sheathing up first to make a solid substrate so you can nail and screw your little heart out and not worry about hitting a stud.
Bead board usually has a pattern? Cut it down one of the grooves or whatever. Seam it there and go all the way across with no gaps.
Unless you really do want to just try to fill the 1.5" gap with molding or something, I'd probably just bite the bullet and get an extra piece.
You might need it.

I'm in no way a professional, but I've been remodeling my house for the last 6yrs....
So a full sheet comes up 1.5" short. I've got the right side up and looking good. Well I had the guy at Lowe's cut up the sheet into 1/4's so I have (4) 24" x 48" sheets. Which was stupid on my part, but I thought what I could do is take 2 of the 24" sheets and cut (2) 12.75 sheets and only have 2 seams to deal with.
 
We have painted beadbord wainscoting in out living room. You don't notice the joints at all, what with furniture and all. But in a half bath, folks will be sitting there almost eye level with it, very close, good lighting, etc. I'd buy a second full sheet.
Honestly, Our half bath is pretty small and with the vanity and the toilet being on the wall I'm working on, there isn't that much that gets shown, but I still want it to look good and really try instead of just saying "Its good enough"
 
Are you “picture framing” the beadboarded wall with trim? I’ve always like using 1x3 or 1x4 to do that (sides, top, bottom). If your doing that put the seam in the middle and run another vertical piece of trim to cover the seam.
 
Are you “picture framing” the beadboarded wall with trim? I’ve always like using 1x3 or 1x4 to do that (sides, top, bottom). If your doing that put the seam in the middle and run another vertical piece of trim to cover the seam.
We are doing chair railing in the middle of the wall all around. then new baseboards at the bottom. So that was my original idea was to take my (2) 24" pieces and hang them and at that point I would have a 1.5 gap down the middle. I just didn't know how hard it would be to find something that look similar and would line up the way everything else does.
 
If you're just using the cheap pressboard bead board it's like $25 a sheet at Lowe's, if you don't go get another 49.5" piece cut you are going to look at that seam every time you take a shit and wish you had.
Well see thats what I wanted to get, but the largest piece at lowe's they had was 48 L x 96 H so I had to get them to cut it in half horizontally to get my 48" H I needed. which only left me with (2) 48" x 48" piece and would have a 1.5" gap on either side. again, I am brand new at doing this, so I am learning as a go.
 
Last edited:
Buy another sheet, center the 1st one, make sure bead/joint is at either side of original. Install 24-3/4 sheet either side or wherever the joints look symetrical.
 
Are you “picture framing” the beadboarded wall with trim? I’ve always like using 1x3 or 1x4 to do that (sides, top, bottom). If your doing that put the seam in the middle and run another vertical piece of trim to cover the seam.
this right here. Easiest way to buy yourself 3/4" on either side.
 
You're going to have some molding or something trimming it all out, so why not "frame" it in with some 1X3's or 1X4's And just squeeze the area in that you are filling in. And depending on which side it's on, would make a good place for hand towel holder, shelf or what ever
 
Is the beadboard on just the wet wall or all 4 walls? If all 4, don't picture frame it. If it's just the wet wall (behind the sink and toilet), picture frame your heart out.
 
It is on all 4 walls and all the other walls currently have chair railing installed, so I wanted to keep the look consistent.
Rip two sheets down the middle and butt the factory edges together in the middle of the wall somewhere inconspicuous.

If you have a good table saw, you can make both filler strips out of the same sheet. If not, just buy an extra sheet and put the cut edges in the corners.
 
You're going to have some molding or something trimming it all out, so why not "frame" it in with some 1X3's or 1X4's And just squeeze the area in that you are filling in. And depending on which side it's on, would make a good place for hand towel holder, shelf or what ever
OK, I am having hard time trying to picture this and figure out how it would look.

Currently, all the 3 other walls have beadboard installed with chair railing half way up the wall at 4ft. So I want to replicate that, but because the sheets only come in 4ft pieces in length, I am coming up 1.5" short on one side using two separate pieces or .75 inches on both sides if I use one sheet. I currently have a loose fitted piece of bead board that measures 48" x 24" and so my plan was to go buy another sheet and have them cut me a 48" x 25.5" piece and just join those 2 pieces together and smooth out.

that would also leave me with a sheet that measures 48" x 48" and I could just install that one sheet and make it to where I'd either leave .75" gap on both sides or one side leave a 1.5" gap. I guess I am having a hard time visualizing what I could use to fill those gaps in that will still be appealing to the eye.

Check out the pic attached. This is a rough layout of what I've got going on. This board is just test fitted and not attached to the wall at this point.
 

Attachments

  • bathroom.jpg
    bathroom.jpg
    86.9 KB · Views: 77
I currently have a loose fitted piece of bead board that measures 48" x 24" and so my plan was to go buy another sheet and have them cut me a 48" x 25.5" piece and just join those 2 pieces together and smooth out.
Do that, but make sure both pieces can be attached to the stud at the joint. This may require cutting it wider and trimming the piece on the right a little.
 
Side question: I haven't looked but should my toilet flange be level with the new flooring or slightly above it? I've read that it should be 1/4" above the flooring and some things say as long as it nots below the flooring and leveled with the flooring, it would be fine.
 
as long as it nots below the flooring and leveled with the flooring

Better if it's not sticking up above the finished floor.

This board is just test fitted and not attached to the wall at this point.

You want the left hand seam to be a factory edge. Then cut another sheet to match whatever width is left over, putting the cut edge in the corner (so the two sheets meet at factory seams).
 
Better if it's not sticking up above the finished floor.


You want the left hand seam to be a factory edge. Then cut another sheet to match whatever width is left over, putting the cut edge in the corner (so the two sheets meet at factory seams).
When I went home for lunch, I checked the toilet flange and its a little over 1/8 of an inch above the flooring.
 
When I went home for lunch, I checked the toilet flange and its a little over 1/8 of an inch above the flooring.
Probably not enough to matter. If it sticks up too much, it can cause the toilet not to settle all the way down to the floor. Depends a little on the shape of the bottom of the toilet, too.
 
Back
Top