Blue Chevrolet

a_kelley

mechanical fixer
Joined
Jan 26, 2010
Location
Rutherfordton
This came into my shop as a Toyota pickup. Original power train and drive train was removed.

In went a Chevy 350, nv3500, np208, d44 front & 12 bolt rear.

IMG_20190309_230249132s.jpg


For the brakes, everything on the axles is Chevy, so going to run the Toyota booster with an adapter from sky off road with the Chevy master & prop valve & rubber lines. Is there any reason to use 1/4" line instead of 3/16" to feed the rear drums?

IMG_20190309_230307178s.jpg
IMG_20190309_231118968s.jpg


Now .... all the details to make it work.

Steering & front axle - custom pitman arm, reused Chevy push-pull linkage, need to notch in a pipe for the rear spring bushing. It'll be close to the body mount but at the bottom of the frame, so no interference. Running bastard Chevy front leaves, as this truck was originally IFS. Need to address the shock mounts as well (intending to use Chevy front shocks unless the Toyota ones will provide enough damping for the extra weight.. I'm sure there's a valving difference.)

IMG_20190304_162952946s.jpg


Chevy parts for the clutch, didn't have a dust cover, so out came the plasma cutter after some CAD(cardboard aided design) work

IMG_20190309_225759556s.jpg


And my punch list.

IMG_20190309_231538453s.jpg
 
Last edited:
A toyota with 10 bolts and lift blocks? (Even though thats not a 10 bolt front)
 
I like it. :)
I never realized the 3500s came with the slave on the passenger side. Never paid much attention to those I guess.
As far as 3/16 vs 1/4" line to the rear, I really don't think it would benefit since that's not the major restriction, that is, if you're looking for better braking. The only suggestions I have on that involve swapping axles, but I wasn't gonna go there yet. :lol:
:beer:Hell yeah.
 
Looks like a great project.

Another option for the rear brakes is to convert to rear disc.
I was able to get the parts, (calipers with integrated E-brake, brackets, rotors, pads, etc.) for less than $200
 
A toyota with 10 bolts and lift blocks? (Even though thats not a 10 bolt front)
Uhmm, I'm pretty sure it is. Takes the same gears the rear do.. or is it a 12 bolt? I haven't popped the covers and resealed yet, but I'll bet they're probably 3.08 gears. Lift blocks were on it originally and he's on a budget, so they stay for now.... Though I'm sure they will especially considering it's on 36s.
 
I like it. :)
I never realized the 3500s came with the slave on the passenger side. Never paid much attention to those I guess.
As far as 3/16 vs 1/4" line to the rear, I really don't think it would benefit since that's not the major restriction, that is, if you're looking for better braking. The only suggestions I have on that involve swapping axles, but I wasn't gonna go there yet. :lol:
:beer:Hell yeah.
Reason I wondered was the Chevy originally ran 1/4 line to the rear.
 
Reason I wondered was the Chevy originally ran 1/4 line to the rear.
Not only that, the Ford f250s came with quarter inch lines (or they're stupid metric equivalent) I noticed. Just from my elementary guesses I would say that it would allow the calipers to release pressure quicker, but we're talkin about hydrodynamics and stuff I have no idea on.
That is a Dana 44 front by the way. If it's native to that particular truck then I would venture to say that maybe a 12 bolt rear.
 
It's a dana 44 for sure and like @XJsavage said, usually paired with a 12 bolt.
 
Plumbed the clutch today.

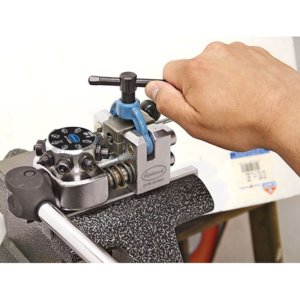
My flare tool only does 3/16 line.. but it does perfectly every time.
IMG_20190312_182514264s.jpg
IMG_20190312_182727742s.jpg


All bent up and installed
IMG_20190312_184304979s.jpg


Tried bleeding it, kept getting air.. new slave, and no leaks, so I'll be changing the master tomorrow. At least it's cheap. It has had fluid in it the whole time, so not sure why it went out. I tried pulling the air out with the vacuum bleeder from the master and just continuously pulled air, so it's bound to be the master. I did verify the clutch released with a c clamp. Of course, it better have, it's all new.

IMG_20190312_193226191s.jpg


Maybe I'll get the master in and bled tomorrow, and then install transfer case and size the drive shafts, and maybe plumb the brakes. I'm hoping the front will be right as is, since the axle and motor/trans/transfer is close to the original position.. the rear is too long period, but that's nothing that can't be fixed with a grinder, plasma, indicator, and welder. Of course I've got 4 hours of driving and two/three other jobs to be done tomorrow - so that will cut into my available time.. Unless maybe I can get wifey to for the drive.. she might if I pay her well enough and her schedule allows, but that's out she doesn't want to drive much tomorrow, oh well..
 
Last edited:
Believe it or not, I bought it at advance about five seven years ago. They don't sell it anymore. And mine broke yesterday. I bet its flared hundreds of times.. I want to say it was made by Lisle corporation. It was lifetime.. I'll post a link to it when I find it. I did wonder if they made it for other sizes also.
 
Cal-van inline flare tool. They sell a complete kit for 3/16-3/8 for like $54. Same type.

Screenshot_20190313-130140.png


  • Specifications: this flaring set includes 3/16 in., 1/4 in., 5/16 in. and 3/8 in. double and single flares which are designed to reduce the chance of the tube slipping from the clamp. Double and bubble flares measure 4.75mm, 6mm, 8mm
 
Last edited:
Cal-van inline flare tool. They sell a complete kit for 3/16-3/8 for like $54. Same type.

View attachment 288496
I should have spent the money and got one of those too. My little inline 3/16 tool worked fine for a while but I made the mistake of trying to flare 3/16 stainless line with it and it's stripped out the threads. :(
 
I should have spent the money and got one of those too. My little inline 3/16 tool worked fine for a while but I made the mistake of trying to flare 3/16 stainless line with it and it's stripped out the threads. :(

Stainless will send a cheap flare tool straight to the trash
 
I went ahead and bought that kit and will have it Friday. I hated life trying to use the multisize tool I had on 1/4" line on occasion and ended up just getting premade line sections.

Anyhow in other news, got my motor but wasted most of my day doing it. Started to replace the clutch master but the line is seized to the line nut. I hit it with some Kroil, and it's soaking.. I'll see if I can wring the line off when I get back over to the shop.
 
Not to steal this thread... However, while we are on the topic of brake flaring kits,
Has anyone tried the
Eastwood Professional Brake Tubing Flaring Tool,
Item #25304

Eastwood Brake.jpg

The Eastwood one is about $200.
The one from Cal-Van looks good, but a takes a bunch time to use
 
Believe it or not the cal van tool flares a line in about twenty seconds with hand tools, start to finish. And you can use it on the vehicle. The one you posted looks good if you're doing them day in and out and on the bench. @3mco would know if it's good.. I think that's about what he was describing to me when I was over his place..

Anyhow, the Toyota clutch master is swapped out and making pressure now.. only trouble is that it's not moving enough fluid volume to release the clutch. Looks like I get to fabricobble a Chevy clutch master in. Doesn't look too hard to do.. not that I can get my hands on one right now. I guess I'll remove this new toy master and return it.. unless someone needs it? I sure don't. I was looking at the wrong year for master bore. .775 was the Chevy and the Toyota is .625. doh.
 
Last edited:
Also the best way to bleed a clutch is with a cap for the master with a hole in it to attach a vacuum pump to.. helps pull the air out real fast then finish bleeding conventionally.
 
Not to steal this thread... However, while we are on the topic of brake flaring kits,
Has anyone tried the
Eastwood Professional Brake Tubing Flaring Tool,
Item #25304

View attachment 288569

The Eastwood one is about $200.
The one from Cal-Van looks good, but a takes a bunch time to use
\hijack\
My manager told me just the other day he has one of those...works great on everything BUT stainless. Even took it back to Eastwood (since they're just right up the road from here) and showed them, as they claimed that it will flare stainless as well. They were surprised to say the least. Needless to say, he ended up putting a regular steel line in instead of using stainless in that particular spot. At first he was disappointed since he was resto-modding his '66 Vette, but quickly settled to an "eh, fuggit" mentality.

\end_hijack\

This looks cool! I love watching other people actually accomplish work and live vicariously through y'all. :lol:
 
This looks cool! I love watching other people actually accomplish work and live vicariously through y'all. :lol:
One thing this thread is missing is the hours spent pulling the old powertrain & drivetrain & hacking all the IFS off with a disc grinder and sawzall. I wish I had bought my plasma forever ago, I love it. It get used, a lot. Thanks @guffey24
 
Not to steal this thread... However, while we are on the topic of brake flaring kits,
Has anyone tried the
Eastwood Professional Brake Tubing Flaring Tool,
Item #25304

View attachment 288569

The Eastwood one is about $200.
The one from Cal-Van looks good, but a takes a bunch time to use

I have this one, but mine is better, its a 'Ebay' brand. [Summit] :flipoff2:
But i will say there are times when a smaller thing is better.
Like redoing a line which the end is fubar but the rest of it is fine.
[/lookatme] OFF
 
Best flaring setup I've used is a hydraulic one, but they're definitely spendy. No problems at all with stainless.
 
Well good thing I prefer nicopp or if I get it local regular steel line. I think I got the clutch master sorted out. Bought the Chevy master, adapted it to the Toyota, had to move the point it attaches to the pedal to get enough stroke (checked it first).. need to make a longer pushrod.

IMG_20190314_122017111s.jpg

IMG_20190314_104120640s.jpg


Got the longer pushrod made. Realized the Chevy master uses a bubble flare and just put everything down and moved onto another vehicle since my flare tool will be in tomorrow. So tomorrow I will get it hooked up and bled. (The line attaches at the bottom of the master, so I figure I'll attach the line first, then install it.. much easier cause the line is a tight fit to the inner fender)
 
Last edited:
Back
Top