Garfunkel XJ rebuild

Shreddinlettuce

Well-Known Member
Joined
Nov 20, 2016
Location
Asheville
25683276-D250-4ABD-BF79-ED19D77C637A.jpeg
Waiting on my long term project CJ/yj to be finished I needed something to wheel. In comes this turd of an XJ with some decent parts and kid who decided he was a mechanic. A few grand later and I now have 2 money pits! At least this one drives! I mean it drove from South Carolina (at 30 mph due to death wobbles at 40. At least per the gage). Turns out the tie rods weren’t tight, and the pitman arm wallowed out, and the po has used an impact on the wheel spacers and sheared off the lugs on the cheap off brand hockey pucks, so he just bolted the wheels on and let the tierods rub the wheel weights off! Anyway, delifting from 6.5 to 3”, fixing the steering with new components, and installing new wheel spacer with a set of Milestar Patagonia 31’s for now is the plan.
 

Attachments

  • 244289D7-71F6-4E11-8992-363971F118DC.jpeg
    244289D7-71F6-4E11-8992-363971F118DC.jpeg
    146.7 KB · Views: 328
  • 569B2F9D-C9E7-413B-956C-542F4C6C89AB.jpeg
    569B2F9D-C9E7-413B-956C-542F4C6C89AB.jpeg
    166 KB · Views: 309
Waiting on steering fixes I started on some small projects.

got a replacement door for the driver side that only has cosmetic dents and some interior parts, super cleaned the engine bay, and started removing the sound deadener to prepare for interior bedliner.

I also removed the parts store budget lift blocks and cut the u bolts to a reasonable length.
 

Attachments

  • 8466A99F-9801-41FB-9466-9ACB8AFDAFA4.jpeg
    8466A99F-9801-41FB-9466-9ACB8AFDAFA4.jpeg
    162.2 KB · Views: 317
  • 04999B87-E7A6-415C-BCC1-96AAC8D716FE.jpeg
    04999B87-E7A6-415C-BCC1-96AAC8D716FE.jpeg
    119.3 KB · Views: 315
  • 282AB3AE-CA59-4ACB-BD53-07189C393EC0.jpeg
    282AB3AE-CA59-4ACB-BD53-07189C393EC0.jpeg
    237.9 KB · Views: 308
  • 6655F127-8804-4A4C-891A-DDD03C2E8E56.jpeg
    6655F127-8804-4A4C-891A-DDD03C2E8E56.jpeg
    125 KB · Views: 315
  • 49B61DB6-2F5C-4CBF-8953-1F4D5B056129.jpeg
    49B61DB6-2F5C-4CBF-8953-1F4D5B056129.jpeg
    283.5 KB · Views: 331
Only 1 problem area on the floor. The exhaust must have cooked the paint.
 

Attachments

  • C4A1945A-4B2C-4691-8EC2-994A36AD7F5A.jpeg
    C4A1945A-4B2C-4691-8EC2-994A36AD7F5A.jpeg
    164.7 KB · Views: 305
Took a stab at mounting tires with the harbor freight $5 levers. Easier than I thought. I’m leaving the balancing act up to 12oz of ceramic beads.
 

Attachments

  • 140343F1-C4E4-4EAC-AA14-AE6FE2919230.jpeg
    140343F1-C4E4-4EAC-AA14-AE6FE2919230.jpeg
    119 KB · Views: 290
Hey we have twin Jeeps! Can you save the old driver door for me? Mine is dented too but I wouldn’t mind a spare if you’re going to scrap it. I might be able to fix that one easier than my current one.
 
Hey we have twin Jeeps! Can you save the old driver door for me? Mine is dented too but I wouldn’t mind a spare if you’re going to scrap it. I might be able to fix that one easier than my current one.
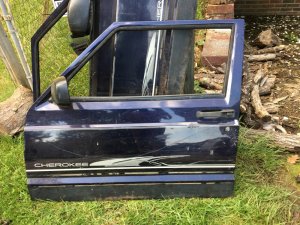
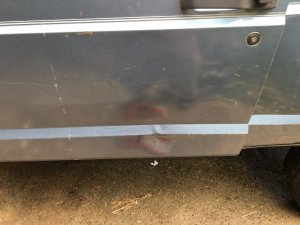
I have a spare 2 door driver side door in good shape. I’m going to replace the hinge pins and door striker before I decide to change the door since I like the color and patina. Either way I will have a spare driver door for sale in a few weeks.
 
Decided to replace the entire passenger floor. Rock sliders with rub rails. Battery and cables, sensors like o2 and a molar crank sensor. Hoping to be on a trail in a month. Yj steering box resealed with ruffstuff 1 Ton pitman arm and junkyard steering shaft. Also found a 2 door smashed in the front at a junkyard. Got some good interior panels that were missing in mine.
 

Attachments

  • 330503E1-C80E-42E1-BF58-8EDA08ACA182.jpeg
    330503E1-C80E-42E1-BF58-8EDA08ACA182.jpeg
    126.6 KB · Views: 306
  • 84EAE690-51F8-4F06-B568-4C30865281C7.jpeg
    84EAE690-51F8-4F06-B568-4C30865281C7.jpeg
    165.2 KB · Views: 298
If you need any more interior pieces let me know. I may have what you need.
 
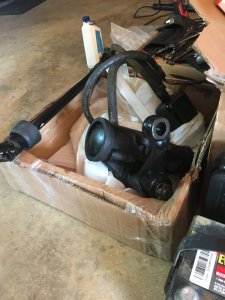
Do you have a working driver side window Manual regulator?
Lol, I do but I'm not ready too let them go yet. I just got mine running today and need to do window work. I have power windows that need work. If they aren't fixable I'll have too use the manual stuff. I most of the interior plastic of needed though.
 
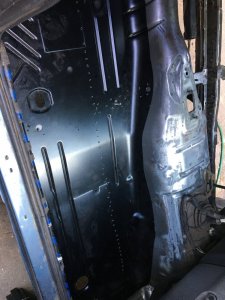
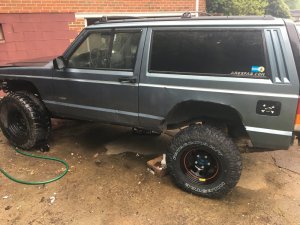
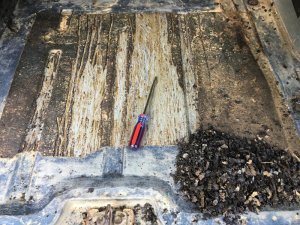
Been there, done that! Mine got to the point that I just gave up and bought a new body and swapped my stuff over. Looking good though. Did you bu buy pans or are you making them?
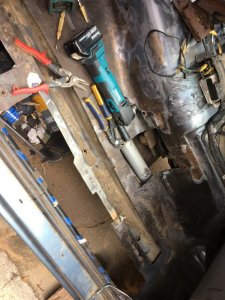
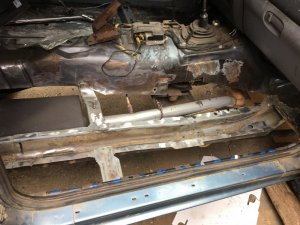
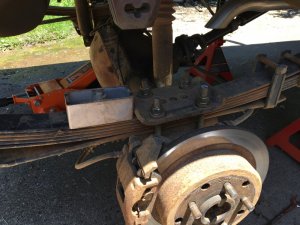
I got the key parts full length pans. Pretty incredible how close they are to factory. I’m also cutting the rocker out and replacing with 3x4 tubing and rub rails.
 
Drivers side out. If only I could figure out the trac bar situation. Custom bracket had non parallel sides and the heim joint wouldn’t fit snug. I tried to use a rough country, and weld a bed tab on the current bracket. I’m trying the Ironman fab since it’s designed for a stretch, and has a bolt on crossmember for support.

53F3F2AE-C091-454B-A786-428F24BF3862.jpeg
 
1F7E67A9-2AF3-49E1-A9FE-1DD77CD8ADBA.jpeg
Had to get another knuckle since the upper tie rod hole was drilled to 1.038” and then a nail wedges into it to make it tight . I thought I’d just buy a spacer, but ended up with a new knuckle and an X-Ecutioner reamer, she wallered her out pretty good.
 

Attachments

  • 4FE19728-29E3-4488-A204-59CB542AED74.jpeg
    4FE19728-29E3-4488-A204-59CB542AED74.jpeg
    96.4 KB · Views: 282
Finished the new passenger knuckle, chromium shafts, checked to verify new 4.10 gears were present in the d30. Welded in Barnes tube sleeves. Getting ready to install Ironman trac bar kit and tnt yj steeringg box conversion bracket with the rebuilt yj box I got from the swap meet here.
 

Attachments

  • 848824E7-63EA-490F-A76C-AB504F959156.jpeg
    848824E7-63EA-490F-A76C-AB504F959156.jpeg
    192.7 KB · Views: 288
  • 334A2BF9-E61D-4568-B1BE-43C60760CB92.jpeg
    334A2BF9-E61D-4568-B1BE-43C60760CB92.jpeg
    94.1 KB · Views: 281
  • 0496B0F4-0FB0-4687-BBBD-4E3CCBC99195.jpeg
    0496B0F4-0FB0-4687-BBBD-4E3CCBC99195.jpeg
    148.1 KB · Views: 309
  • 6BC77A5B-5A6C-4853-BB62-7FE46F2E1684.jpeg
    6BC77A5B-5A6C-4853-BB62-7FE46F2E1684.jpeg
    201 KB · Views: 274
Lots of work done, few pictures. Got it all back together and ready for a test drive, but I’ve run into a steering issue.

I have a yj 3.2:1 ratio steering box (xj stock is 2.4:1) and the steering wheel still only turns 2.4 lock to lock even with the intermediate shaft removed. This is giving me partial steering (a full inch shy of the stops).

does anyone know where the steering restriction is? Is it the clock spring?
 

Attachments

  • C859095C-69FC-4242-8B4A-82D1D80872F2.jpeg
    C859095C-69FC-4242-8B4A-82D1D80872F2.jpeg
    182.6 KB · Views: 180
  • A41D19A5-6B6B-445B-9E59-C39F98DC08B9.jpeg
    A41D19A5-6B6B-445B-9E59-C39F98DC08B9.jpeg
    182.6 KB · Views: 179
  • 3B6655E5-8004-4AA3-AD0A-29BA725CE8C3.jpeg
    3B6655E5-8004-4AA3-AD0A-29BA725CE8C3.jpeg
    122.1 KB · Views: 173
  • 2879C486-32B7-45D4-B90C-1E09F4C5B989.jpeg
    2879C486-32B7-45D4-B90C-1E09F4C5B989.jpeg
    188.4 KB · Views: 178
  • F024D80E-DCEC-41E4-A4ED-DFA46747C1DC.jpeg
    F024D80E-DCEC-41E4-A4ED-DFA46747C1DC.jpeg
    99.7 KB · Views: 182
  • 6EEB2FE7-8609-4E46-BA23-1AE4F3EA50FE.jpeg
    6EEB2FE7-8609-4E46-BA23-1AE4F3EA50FE.jpeg
    127.5 KB · Views: 183
  • DEA384BB-80A7-4B1D-AED5-03F4717BEC51.jpeg
    DEA384BB-80A7-4B1D-AED5-03F4717BEC51.jpeg
    140.2 KB · Views: 184
Turned out it was just air in the lines and I needed to jack up the front wheels to bleed it I’m gonna need a bigger jack, photo shown with 2-3 inches left till bump
 

Attachments

  • F4015E04-ADB5-4C4A-880B-250651F52EED.jpeg
    F4015E04-ADB5-4C4A-880B-250651F52EED.jpeg
    128 KB · Views: 165
Back
Top