Home-Made Cargo Netting

QCB_Preacher

New Member
Joined
Feb 25, 2009
Location
Charlotte, NC
I know I can't post pictures yet, but you can click the links for the photos.
First, let me say that I am certifiably insane, and that anyone else who tries this is also insane. It is easier to break out the credit card than it is to break your a** doing this stuff yourself, but I am in to pain so.... with that in mind, read on!
After seeing some of the cool cargo nets you can get online, and seeing the premium prices they get for those nets, I couldn't help but think that I could make my own.
This is my odyssey.
First comes the design. I wanted a net that covers the sides, the top and the back, but the back has to be able to open up so you can load and unload the cargo area. Seems easy enough.
Next, I had to source materials and, in keeping with the idea of doing it myself, I wanted to keep costs down.
After surfing around and comparing prices on numerous websites, I found some polypro webbing at a price I liked. I chose polypro over nylon becuase it is waterproof and mold resistant while Nylon is neither. Should last longer when exposed to the elements. The webbing I chose has a 550lb tensile strength which should be more than enough when made into a net.
100yds of Polypro webbing, 1" wide = $16.99 (Red was $4 cheaper than black)
ai49.photobucket.com_albums_f260_preacherspulpit_Jeep_Projects_PolyPro.jpg

Now, I have to have a way to attach the webbing to the roll cage and keep it taught so that it isn't flapping or coming loose at 70mph. I chose to use friction buckles attached at multiple spots.
50 friction buckles = $7.99
ai49.photobucket.com_albums_f260_preacherspulpit_Jeep_Projects_Frinction_Buckles.jpg

I also needed a way to open the rear of the net to load so I chose quick release buckles.
10 QR Buckles = $7.99
ai49.photobucket.com_albums_f260_preacherspulpit_Jeep_Projects_Buckles.jpg

Shipping for all of the above = $5.50
Last element will be a sewing maching capable of sewing together 2 or 3 layers of this Polypro webbing, and thread capable of withstanding the stress. To that end, I haunted my local fabric place and found upholstery thread and bought a spool.
Upholstery Thread = $4.99
Total cost (So Far) is $53.46

Now for the fun part.

______________________
Ok, so I laid out the basic lines and sewed the corners.
ai49.photobucket.com_albums_f260_preacherspulpit_Jeep_Projects_JLayout1.jpg

ai49.photobucket.com_albums_f260_preacherspulpit_Jeep_Projects_JLayout2.jpg

More measuring and began laying out the grid
ai49.photobucket.com_albums_f260_preacherspulpit_Jeep_Projects_GridLayout1.jpg
 
Almost done with the top part. What you see will be the roof the netting. The long strips at either end will become the sides.
ai49.photobucket.com_albums_f260_preacherspulpit_Jeep_Projects_GridLayout2.jpg

Once I have this sewn up, I can start working on the side panels.

ai49.photobucket.com_albums_f260_preacherspulpit_Jeep_Projects_Roof.jpg


As you can see, I decided to go ahead and weave the straps for a better look. Stronger? Who knows.... :)

I finished the initial stitching on the roof section. Tomorrow I will put it in place on the Jeep and mark the spots for the attachment points, and start measuring/cutting/sewing the side cross pieces.

Once the attachment points are are sewn on, I can put the reinforcements on the primary stress points and finish up the sewing on this bit.

Here are the straps that will hold the top and sides in place. 16 of them!

ai49.photobucket.com_albums_f260_preacherspulpit_Jeep_Projects_16_Straps.jpg


The Passenger side is done. There will be some final stitching done (reinforcements along the stress lines) but it is basically finished.

ai49.photobucket.com_albums_f260_preacherspulpit_Jeep_Projects_Side_Done.jpg


Here is the side and top, with the Bikini top just laid in place to show what it will looks like.

ai49.photobucket.com_albums_f260_preacherspulpit_Jeep_Projects_Bikini_Side_Done.jpg


Finishing the other side and the rear will allow me to tighten up the net a little more, get rid of the little bit of slack you see.

Tomorrow I will finish the driver's side and, hopefully, the rear with all the quick disconnect buckles to make it easy to load/unload.
 
Looks awesome. I was thinking of doing the same thing, glad to know I will not be the first
 
looks good.
I see the cost of good, but how much time do you have wrapped up in this?
Fred

About 14 hours so far.... Teaching myself how to use a sewing machine took up a couple of those hours...

Knowing what I know now, I probably wouldn't have started this in the first place, but I am determined to finish it :lol:
 
I would have at least spent $4 for black netting, JMHO
But for $2 you could buy some dye and color it later too
 
DONE!

Here is the rear. You can see the quick disconnect buckles to give me easy access. The bottom is to keep from having to attack it to the tailgate and to keep it from flapping in the breeze.

ai49.photobucket.com_albums_f260_preacherspulpit_Jeep_Projects_Tailgate.jpg


With the tailgate closed

ai49.photobucket.com_albums_f260_preacherspulpit_Jeep_Projects_Tail_Closed.jpg


Passenger side. It looks loose, but that is because my measuring skills are off. It is pretty tight....

ai49.photobucket.com_albums_f260_preacherspulpit_Jeep_Projects_Done1.jpg


Driver's side

ai49.photobucket.com_albums_f260_preacherspulpit_Jeep_Projects_Done2.jpg


LESSONS LEARNED: There is a reason the manufacturers charge so much for stuff like this. Not because they are the only source or even because their product cannot be reproduced by the end user.

It is because this kind of thing, when done by hand and without the tools, jigs and plans needed to make a first rate product.... SUCKS.

If I had to do it all over again, I wouldn't. :)
 
Lets say you used nylon straps...
Rather than spending 4000 hrs w/ a sewing machine, couldn't you use a soldering iron and just melt the seams together? Would that work? I dunno.

also - I wonder if you bought a soccer goal net, if you could just use that material?? I'm sure you looked into that.
 
Thats pretty cool Preacher. I Think since I met you at stewart farm in your new jeep you have definately gotten the four wheelin bug. Thats awesome. Maybe we'll meet again.
 
thats the first time i have seen the brown paint scheme on a jk or a tj for that matter. I like it alot!!! I would have to have a vinyl graphics company make me some orange and yellow decals like the old golden eagle package.
 
Thats pretty cool Preacher. I Think since I met you at stewart farm in your new jeep you have definately gotten the four wheelin bug. Thats awesome. Maybe we'll meet again.

Yeah, I think I have been infected... but not a lot of cash to spend on the good mods. I want a lift and better tires, but have to stick with the low dollar mods for now :rolleyes:

Sucks about Stewart Farm, it was cool having a place within spitting distance to go. Ah well, URE isn't that far away and I am heading there this weekend.
 
WOW...
 
I'm usually a very sketpical person. I could never use something like that but I will give credit where credit is due. That thing is appealing and I applaud your ingenuity and persistance. It's not unlike things I have done myself. I would have definately paid more for black though.
 
Yeah, I think I have been infected... but not a lot of cash to spend on the good mods. I want a lift and better tires, but have to stick with the low dollar mods for now :rolleyes:
Sucks about Stewart Farm, it was cool having a place within spitting distance to go. Ah well, URE isn't that far away and I am heading there this weekend.
Well I always think it's great to see more and more people getting envolved in the sport. You've definately gotten the bug and I'm sure just like me you'll find a way to get the lift and stuff over time but you've gotta start some where. Joe Miles and myself will also be at Uwharrie this weekend Maybe we'll meet again and you can take some good pics of us for the site.
 
You're not the first (& likely won't be the last) to jump in well over your head!

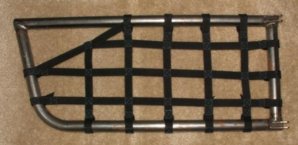
A little something I did a year or so ago... not as large a project, but just as big a PITA! I'd consider doing more if'n I had access to larger (heavy duty) machine...
 

Attachments

  • doornet_sm.jpg
    doornet_sm.jpg
    32.2 KB · Views: 313
You're not the first (& likely won't be the last) to jump in well over your head!
A little something I did a year or so ago... not as large a project, but just as big a PITA! I'd consider doing more if'n I had access to larger (heavy duty) machine...

That looks pretty cool!

I want a set of tube doors for the Jeep... would make my wife feel a lot better about riding without doors (besides, they look good as well as being functional.)
 
Awesome addition

Where did you get the materials for your netting?, straps and buckles. Great work man.
_Robb
 
Back
Top