Porkchop buggy

DirkaDirka875

Ima need 'bout tree fitty...
Joined
May 16, 2010
Location
Bear Creek, NC
So long story short, I took the plunge and got married 3 years ago and picked up a stepson in the deal. I told him one day soon after we got married that we would build him a Samurai to piddle around the farm in. The original plans where to yota swap it and leave it on leaves front and rear but as time went on and with the aggravation of trying to keep up with the family when we took the buggy out due to not having enough seats for everyone to ride and trying to cram the sxs in places it probably shouldnt go, i decided to up the Samurai build to a little more that originally intended so that he could atleast follow through most of the trails and also as he gets more comfortable behind the wheel, capable of trying some of the more difficult stuff. One wrinkle that was thrown into the plan is that the wife really wants to build a house (as well as i do just because we've outgrown the redneck mansion single wide) so I've done my best to try and keep the cost down as much as possible without having to sacrifice reliability. It's been tough but here goes...

Build specs:

-1.3l motor w/ toyota 3k carb
-stock samurai trans
-samurai tcase w/ 6.5 gears
-Solid front axle on YJ springs hi-pinion w/5.28 and spool
-E-locker rear w/5.28
-14" air shocks in the rear
-37ish" dig tars (old set that was originally ran on my buggy)
-106" wheel base
-PSC hydraulic assit w/ toyota ifs steering box

IMG_3129.jpeg

So first thing we did was ditch the old stock frame and rolled it out to pasture and just as luck would have had it, I had a friend who was cleaning out his old metal rack and was selling everything for free fitty. Among the free treasures was some 2x4x.120 wall stock that would just happen to be perfect for the chassis. I layed out the chassis table and got the frame layed out and started to chunk some of the parts I had scored over the years at it. Mounted the front axle then it was time to throw the body on and see how all my measurements worked out...

IMG_3204.jpeg

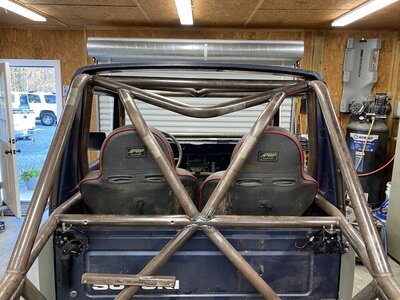
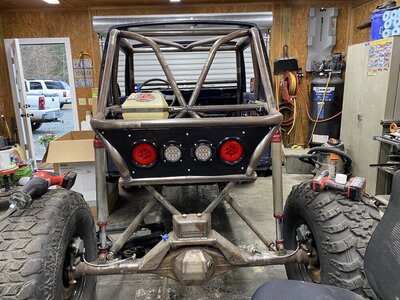
They worked. I cut down the rockers to get the body a little lower on the chassis and started to mount up the drivetrain. Started running tubework for the cab which made a cramped space in the beginning worse but I still think it will suffice for its going to be used as. I knew that the stock bed wasnt going to stay on the buggy just because I didnt feel like having to run tube around it, mount the air shocks, and all the headache that was going to be caused just to keep it so I did like most others do and went crazy with the sawzall...

IMG_3451.jpg

Threw the back on it to get a feel for what i wanted to do next.

IMG_3452.jpgIMG_3453.jpg

With the rear off, I knew how i wanted to make the cab look complete ,as well as to help keep the cab to where it can be enclosed all the way in the winter. Again I broke the sawzall back out and grabbed the donor out of the scrap pile...

IMG_3455.jpgIMG_3456.jpg
 
Last edited:
On most of our trips, it always seems to be rainy and cold so he wanted to keep the cab to where it can be dry and warm in such conditions so the original dash and heater are going to go back in when its finished. Next on the list is to start the rear tubework so that i can get this thing off of the jackstands and on its own weight. Pic montage incoming....

IMG_3459.jpgIMG_3460.jpg
IMG_3461.jpgIMG_3463.jpg
IMG_3464.jpgIMG_3468.jpg
IMG_3469.jpg

Decided to steal @untchabl 's idea and mounted a natural color 5 gal cell in the rear for the same reasons as him.

IMG_3472.jpg

Game plan for the rear will be just to have an action packer in the rear for now because the younin' dont need a cooler at 13... Atleast i hope not lol.
 
Last edited:
Shock mounts were next

IMG_3475.jpgIMG_3476.jpg

Mounted the seats and made up some easy in and out door bars. These seats may look familiar to someone on here...

IMG_3473.jpg

Next was the front tubework and mounting the shocks (not pictured yet)

IMG_3470.jpgIMG_3471.jpg

Decided to roll it outside last sunday and check the clearances on everything. Pic dump.

IMG_3477.jpgIMG_3478.jpg

IMG_3479.jpgIMG_3480.jpg

IMG_3481.jpgIMG_3482.jpg

IMG_3483.jpg

Everything clears like its supposed to so now on to the little stuff before its ready for paint

To be continued....
 
Last edited:
Good lawd this is sweet. Giving me some expensive ideas 🤦‍♂️
 
I've found your builds very satisfying. Nosey question, what the daytime gig? you certainly have a talent toward fabrication.
 
I've found your builds very satisfying. Nosey question, what the daytime gig? you certainly have a talent toward fabrication.
Yea I work at a major pharma company (we dont make blue pills here just vaccines and not that vaccine) as a process mechanic. I do alot of stainless work there also whether it be sanitary pipe welding or whatever needs to be made up to keep production going. I also appreciate the comment. Between work being as busy as ever and a family, all this progress you see has been over a 6month period with most of the progress being made in the last 5 weeks just due to being off from where I had ear surgery.
 
Not sure what kind of surgery you had but hope you recover well and the pain wasn't to bad. Mine had me drugged and laid up a few weeks. They went behind my ear drum and removed a big cist pushing on my nerves in that region. Ear still gets a bit messed up and that ear canal is now a big ol hole up in thar'.
 
Not sure what kind of surgery you had but hope you recover well and the pain wasn't to bad. Mine had me drugged and laid up a few weeks. They went behind my ear drum and removed a big cist pushing on my nerves in that region. Ear still gets a bit messed up and that ear canal is now a big ol hole up in thar'.

This was surgery #4 with #5 due sometime next year for reconstruction. Ive been dealing with the aftermath of a cholosteatoma for a few years now and hopefully surgery #5 will end the saga. As far as pain, I've honestly had none for any of the surgeries. They've prescribed oxycoton pretty much everytime and I have never had it filled.
 
Been some progress over the past couple of months. Finished the body work on the cab( I am in no way, shape, or form a body man). Got the winch, headlights, battery, airbox, washer fluid tank, power steering reservoir, and the dash all mounted up in their rightful homes.

CE8B9EB9-839D-449E-85A1-EFA207BC7F2F.jpeg
E7478F29-A74A-4C18-938F-63BEC71D99CE.jpeg
 
Picture of the engine bay I forgot to post last time

IMG-3655.jpg

Finally finished up a few more things.

Mounted the taillights/backup lights as well as the SWAG offroad action packer mount. Kids going to be the fly-est on the trail with his halos front and rear.

IMG-3802.jpg

Also had to steal the seats out of my SXS because of how tight it is in the cab. So got those all mounted up and they sit pretty daggone good.

Also finished up the rocker guards to help protect the sheet metal as best as possible.

IMG-3828.jpgIMG-3834.jpgIMG-3835.jpg

With all this being done, the last thing to do is finish seat belt mounts and then its tear down time for paint!
 

Attachments

  • IMG-3760.jpg
    IMG-3760.jpg
    196.4 KB · Views: 117
  • IMG-3740.jpg
    IMG-3740.jpg
    227.2 KB · Views: 112
Been awhile since an update but in the past couple of months, I’ve managed to get the cage painted and got everything reassembled.

Tcase ready to go back in

D62E2FB3-8A5A-4C6F-80DA-7B1862AFC254.jpeg


Finished plumbing it and pulled it out into the sunlight.

36A739C4-4C69-45EC-9E6B-DC8E34E0BFD9.jpeg


Shortly after scored a newish set of the finest 37” lakesea dog tars

53996FCD-4F69-462B-8059-4C3FD6B893C8.jpeg


Started working on finishing all the wiring in the front. Got the head lights going and not gonna lie, the halos are kinda neat.

49ADDA27-A889-47F9-9A16-ECCA7F75ECCA.jpeg

03A6FAEA-9567-464F-874E-FA0FE10E6C86.jpeg


Been busy on other projects so really haven’t gotten a lot done on it. Did take a couple more pictures though.

F2EA8BA4-43DD-426D-937F-AD191AE54410.jpeg

C87518EA-8A20-4A4E-B068-30AAB78AAA58.jpeg
 
Had some interferance issues with the pitman arm on the steering getting too close to the leaf spring so had to redesign it for just a touch more clearance.

Started with this
IMG-3985.jpg

Ended up with this
IMG-3987.jpg

Not perfect by any means but gained about an 1" to 1.5" clearance from redesigning


With all that done, we took the buggy out for the first time about two weekends ago. Everything worked like it should and I didnt even get behind the steering wheel all day. Wife drove my buggy all day and I rode with the youngin to coach him about what to do.

Obligatory poser rock photos at the end of the day....
IMG-4004.jpgIMG-4007.jpgIMG-4008.jpgIMG-4006.jpg


Wife has been on my case about getting it painted so that it can be "done" so i broke down and got it all the same color finally. Tried our best to match the factory paint with some Rustoleum Royal Blue and Rustoleum Gloss black. We didnt match it perfectly but got it close enough for our liking.
67495346507--53FF6CAC-9085-4FC1-AF0E-B5C68C743E4E.jpg67495347533--0A57F703-AE05-4D2D-AAB2-8DF2EC882B6C.jpgIMG-4028.jpg

Just gotta drop the dime on a daggone windshield now...
 

Attachments

  • IMG-4005.jpg
    IMG-4005.jpg
    286.2 KB · Views: 109
The Samurai buggy looks awesome! Is that a custom TC mount or does someone sell that? I like that design. It looks super strong. Got any pictures of the TC mounted in the rig? You should do the twin sticks on the TC. With a lock right in the front, that was one of my favorite bang for the buck mods since it allowed for super tight steering with the TC in 2-low.
 
The Samurai buggy looks awesome! Is that a custom TC mount or does someone sell that? I like that design. It looks super strong. Got any pictures of the TC mounted in the rig? You should do the twin sticks on the TC. With a lock right in the front, that was one of my favorite bang for the buck mods since it allowed for super tight steering with the TC in 2-low.

I made the TC mount and added a TC spine from Zukparts.com. We may do twin sticks eventually but im just trying to keep it as simple as possible until he gets used to everything. He is waaaaaaayyy off from being comfortable in even the slightest off-camber spots and hes got alot of growing to do with learning to drive the 5spd. The clutch was hating life at one point during the day
 
We went to GER back in April and the 3k carb kept acting up. So after a brief talk with MulishaJoe, I decided to make my own homebrew CV40 kit for the 1.3. I just finally got that to start acting right.

MicrosoftTeams-image (34).jpg


After that, I had some issues with the leaf spring shackle angle. At ride height, they were at about 38deg so that needed to be adjusted. Added about 1-1/4" of space on the shackle bushing mount and checked the angle again... 50deg. I think i can live with that. I also installed full hydro steering on it so now he can enjoy that easy steering life like the rest of us.

MicrosoftTeams-image (35).jpg
MicrosoftTeams-image (36).jpg
MicrosoftTeams-image (33).jpg
 
Back
Top