Tonkurai
Well-Known Member
- Joined
- Dec 15, 2010
- Location
- MID STATE NC
I am in no way trying to spam or sell any particular thing or item. (I got banned for this post on RZR forum still don't know why!) If there is a problem let me know I will take it down and edit it.
Hi guys! I have had a hard time finding information for my sons SSR SRU170. I have had to engineer a lot of "upgrades" and repairs for the side by side. Before you poo poo this thing, it has been a fairly decent machine. SSR basically buys a machine and puts their name on it and stitches it in the seats. At least there is a network of dealers for SSR. Yes I have had issues with it. Yes it’s off brand but if you take the time to research you will find there is probably more support for these things for parts than the other dealers offer and is A LOT cheaper.
First off the drive train is NOT the same as the RZR youth. The engine is mounted straight in the machine (front to back) versus transverse (side to side). Reduces a lot of drag and less likelihood of issues. This is a GY6 Honda clone engine with Kawasaki style final drive parts.
The machine is larger than the RZR youth. I am 6'4 and 270 and I can shoe horn into it. It has a better roll cage system and an actual bed. Plus it has a spare tire and LED lights. (for the cool factor)
ISSUES SO FAR.
1. Muffler blew out baffles within 10 hours
2. Headlight reflector loose in housing (not really an issue)
3. Chain SUPER tight from factory
4. Sputter and die issue (FED's and CARB issue solved)
5. Where the heck is all that gas coming from!!! (fuel bowl drain)
6. If its bolted its gonna come loose (bad bolts, no Loctite)
7. Fuel cap won't seal
8. Dead battery after night ride.
Muffler
The muffler lost its baffles on the first ride. It sounded so bad we thought the bearing where bad in the transmission. They thing is also mounted so close to the frame you can’t even fit a flathead screwdriver between it and the frame. We simply put some spacers to move it out and dealer replaced the bad muffler under warranty. We are going to upgrade this soon anyway so no big deal.
Headlight
Self-explained. It’s still loose doesn't affect anything somewhat annoying at night.
Chain SUPER tight.
This may be the only thing that was tightened beyond spec. Right now we have a nice medium with some slack on the pull side and tight on the push side. (Upgraded)
Sputter and Die issue.
During break-in we noticed it would run fine until it got hot then it would DIE. It would turn over but not fire. After we towed it back 3 times we sprayed starting fluid around the carb and hoses and found there was a cracked hose. They use just enough hose to make connections for fuel and vacuum on this thing and they are stressed anyway so when it went thru a few heat cycles it split the vacuum line for the fuel pump. We replaced the lines (less than $5.00 and 2 hours labor). We took it to Windrock Park in Tenn. We noticed it ran fine until it got a load placed on it. Come to find out the fuel jet screw is covered by a brass plug and can't be adjusted. This thing was running WAYYY lean (thanks EPA) So after removing the plug and adjusting the fuel/air ratio to richen it up it runs WAY better and much cooler.
WHERE THE HECK IS ALL THAT GAS COMING FROM!!
On a ride down the road we noticed a little line of gas on the pavement. We pulled him over and all you smelled was gas. After it cooled down we looked around and found this weird looking hose with a metal screw housing on the end. Turns out this is the drain for the fuel bowl. The screw has backed itself out and was POURING fuel. We removed it and put pipe tape (yellow kind) and really tightened it. We also turned the hose upward to prevent this again.
This one is somewhat of an issue. Everything on this machine needs to be retightened or have creeping Loctite put on it. The roll cage and bumpers where the worst but just for good measure we did everything. The steering we took apart and coated it with blue Loctite so those don't come loose. The a-arms and other suspension parts we put green Loctite on so it creeps down the threads. Calipers and drive sprockets where done as well but upgrades where coming so we didn't over do it. Works well so far.
Fuel Cap won't seal.
This took some looking but I finally found a cap that would work. Its tight and has a rubber seal that keeps stuff from going in or out. (its not vented so you have to periodically take it off to prevent vapor lock or remove rubber gasket) Will update with NAPA part number
Dead battery after night ride.
We rode for about 2 hours on a local trail in the dark. My son ran his LED's the whole time. When we got back to load he left it idling so we could see to load. Once we had it on the trailer the machine wouldn't start. We thought oh well battery took a dump. We jumped it and idled it for a while (no lights). It started right up! The stator on this engine is not big enough to charge the battery, run the machine and all the lights at idle. It's fine while going but once you shut down its done.
UPGRADES
Skid plate
We knew where we ride the kiddo’s would be bashing across rocks and mud. After looking under the machine for way to mount something I came up with an idea. I took a large piece of cardboard and pressed it up against the chassis to get a fingerprint of what it looked like. We then called our local plastics supply house and got a sheet of 4x8x¼” UHMW (ultra-high molecular weight). This stuff is tought as nails and slick as hell. Tracing the cut out I had, I got pretty close and trimmed what I didn’t need. The tough part was keeping it on the chassis without it slipping off so I could mark the holes. This was tedious because I had to measure the distance to the center bars because they are angled and getting it right was curcial because once you drill its done. Another trick I used was taking a bright shop light and placing it in the chassis and using the shadows of the bars to mark them. I then drilled holes in the skid and the LARGE chassis rails along the side and center of the machine being careful not to go all the way thru. I then got HD jack nuts and hammered in the holes on the chassis. I used a router to make the holes on the skid longer sideways on some and up and down on others so I could adjust the mounting if needed or I measured incorrectly. When I was confident I had it I bolted it all up and marked where drain holes needed to be. I used a 1.5in hole saw and put them in the predetermined locations. This project took some time and effort so this may be above the skill level of some folks but it can be done if you take your time and don’t rush. The rear swing box was difficult because of the curved angles on the bearing carriers and low clearance of the brake and drive sprockets. I overcame this by measuring the overall length and width and cutting a bit long both ways. I then bolted the front of the plate up using the same technique as before but going all the way thru as to have more hold power because this is the piece that take the most abuse. I then used a propane torch to heat the material up enough to bend it. I eventually took it off and bent it in between two vise and 2x4’s. Heating the material slowly and applying pressure worked best because if you heat it to fast it melts and burns. This was tedious as you had to bend it then check it, bend more then check. Once it cools it will hold its shape. When I got to the brake and sprockets I used a router to cut oblong holes wide enough for them to pass thru. I still didn’t like the sprockets exposed so I cut another piece and used the factor plastic guard as a guide and shaped one to bolt up where the factory plate was and made it longer. This way if they hit something it will move and hit the sprocket and just slide off or the sprocket can rub on it without causing damage. I finally got everything shaped and bolted it up. It’s been the best upgrade yet.
Gear Reduction
This particular unit has a lot similar to Kawasaki in this department anyhow. The front sprocket is a JTF 569 and the rear is a JTR 1845 with 530 drive chain. Since I could not find EITHER one the same way I wanted it I opted to just use 520 chain instead. It’s more popular and has the same tensile strength. The gearing I choose was a 12 tooth front and a 37 tooth rear. This will give you a 3.08 to 1 ratio versus the 2.56 to 1 factory or about a 16% increase in torque. Maybe you can find a 569-11 tooth sprocket with 530 chain but I opted for more adjustability. I can put a 13 tooth on and have a 9% torque increase over factory or a 14 tooth for a bit more speed. The tires make me want to keep it a bit slower for the kids anyway because they are 2 ply and bouncy as heck.
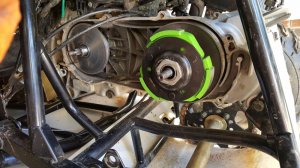
Rear bearings
You have to take the bearings off to change the sprocket so might as well. There are also to extra seals in the carrier caps that you can choose to replace.
Bearing # NAPA 6206-2RSJ Double sealed bearing (rubber)
Cap seals 66630 x2 and 66639 x2
New belt
I chose Gates. There are other options to choose from as well but name and quality mean a lot
NAPA# PL30707
Variator rollers
This machine uses 18x14 Rollers that are 14g factory. Best to measure yours before you adjust them. Check youtube for all kinds of information on these. I am going to try a mix of 12g and 8g rollers to help kick the belt out and get the tires moving. I should have reduced the gearing enough to help with this. I will update post after our first ride.
(UPDATE)
Machine did very well at CAW in SC. Still have clutch slip issue on large hills. Overall the throttle is better and front pulley is working better. Have a "performance" clutch ordered.
FUTURE UPGRADES
Clutch spring (drive pulley on the way will update after install 6/2/18)
Depending on how the rollers do I may go with a 2000lb spring
New tires and wheels I like the factory wheels might just get tires.
New shocks (still searching)
This machine has double a arms so none of the shocks I have seen in others forums will work.
I hope some of this information has helped. Again I’m not here to bash the other youth SXS i'm just putting information out there so people can make a decision or get an idea on how to do something. Thanks and happy wheeling.
PS I will post pictures if there is an interest. Thanks!!
Hi guys! I have had a hard time finding information for my sons SSR SRU170. I have had to engineer a lot of "upgrades" and repairs for the side by side. Before you poo poo this thing, it has been a fairly decent machine. SSR basically buys a machine and puts their name on it and stitches it in the seats. At least there is a network of dealers for SSR. Yes I have had issues with it. Yes it’s off brand but if you take the time to research you will find there is probably more support for these things for parts than the other dealers offer and is A LOT cheaper.
First off the drive train is NOT the same as the RZR youth. The engine is mounted straight in the machine (front to back) versus transverse (side to side). Reduces a lot of drag and less likelihood of issues. This is a GY6 Honda clone engine with Kawasaki style final drive parts.
The machine is larger than the RZR youth. I am 6'4 and 270 and I can shoe horn into it. It has a better roll cage system and an actual bed. Plus it has a spare tire and LED lights. (for the cool factor)
ISSUES SO FAR.
1. Muffler blew out baffles within 10 hours
2. Headlight reflector loose in housing (not really an issue)
3. Chain SUPER tight from factory
4. Sputter and die issue (FED's and CARB issue solved)
5. Where the heck is all that gas coming from!!! (fuel bowl drain)
6. If its bolted its gonna come loose (bad bolts, no Loctite)
7. Fuel cap won't seal
8. Dead battery after night ride.
Muffler
The muffler lost its baffles on the first ride. It sounded so bad we thought the bearing where bad in the transmission. They thing is also mounted so close to the frame you can’t even fit a flathead screwdriver between it and the frame. We simply put some spacers to move it out and dealer replaced the bad muffler under warranty. We are going to upgrade this soon anyway so no big deal.
Headlight
Self-explained. It’s still loose doesn't affect anything somewhat annoying at night.
Chain SUPER tight.
This may be the only thing that was tightened beyond spec. Right now we have a nice medium with some slack on the pull side and tight on the push side. (Upgraded)
Sputter and Die issue.
During break-in we noticed it would run fine until it got hot then it would DIE. It would turn over but not fire. After we towed it back 3 times we sprayed starting fluid around the carb and hoses and found there was a cracked hose. They use just enough hose to make connections for fuel and vacuum on this thing and they are stressed anyway so when it went thru a few heat cycles it split the vacuum line for the fuel pump. We replaced the lines (less than $5.00 and 2 hours labor). We took it to Windrock Park in Tenn. We noticed it ran fine until it got a load placed on it. Come to find out the fuel jet screw is covered by a brass plug and can't be adjusted. This thing was running WAYYY lean (thanks EPA) So after removing the plug and adjusting the fuel/air ratio to richen it up it runs WAY better and much cooler.
WHERE THE HECK IS ALL THAT GAS COMING FROM!!
On a ride down the road we noticed a little line of gas on the pavement. We pulled him over and all you smelled was gas. After it cooled down we looked around and found this weird looking hose with a metal screw housing on the end. Turns out this is the drain for the fuel bowl. The screw has backed itself out and was POURING fuel. We removed it and put pipe tape (yellow kind) and really tightened it. We also turned the hose upward to prevent this again.
This one is somewhat of an issue. Everything on this machine needs to be retightened or have creeping Loctite put on it. The roll cage and bumpers where the worst but just for good measure we did everything. The steering we took apart and coated it with blue Loctite so those don't come loose. The a-arms and other suspension parts we put green Loctite on so it creeps down the threads. Calipers and drive sprockets where done as well but upgrades where coming so we didn't over do it. Works well so far.
Fuel Cap won't seal.
This took some looking but I finally found a cap that would work. Its tight and has a rubber seal that keeps stuff from going in or out. (its not vented so you have to periodically take it off to prevent vapor lock or remove rubber gasket) Will update with NAPA part number
Dead battery after night ride.
We rode for about 2 hours on a local trail in the dark. My son ran his LED's the whole time. When we got back to load he left it idling so we could see to load. Once we had it on the trailer the machine wouldn't start. We thought oh well battery took a dump. We jumped it and idled it for a while (no lights). It started right up! The stator on this engine is not big enough to charge the battery, run the machine and all the lights at idle. It's fine while going but once you shut down its done.
UPGRADES
Skid plate
We knew where we ride the kiddo’s would be bashing across rocks and mud. After looking under the machine for way to mount something I came up with an idea. I took a large piece of cardboard and pressed it up against the chassis to get a fingerprint of what it looked like. We then called our local plastics supply house and got a sheet of 4x8x¼” UHMW (ultra-high molecular weight). This stuff is tought as nails and slick as hell. Tracing the cut out I had, I got pretty close and trimmed what I didn’t need. The tough part was keeping it on the chassis without it slipping off so I could mark the holes. This was tedious because I had to measure the distance to the center bars because they are angled and getting it right was curcial because once you drill its done. Another trick I used was taking a bright shop light and placing it in the chassis and using the shadows of the bars to mark them. I then drilled holes in the skid and the LARGE chassis rails along the side and center of the machine being careful not to go all the way thru. I then got HD jack nuts and hammered in the holes on the chassis. I used a router to make the holes on the skid longer sideways on some and up and down on others so I could adjust the mounting if needed or I measured incorrectly. When I was confident I had it I bolted it all up and marked where drain holes needed to be. I used a 1.5in hole saw and put them in the predetermined locations. This project took some time and effort so this may be above the skill level of some folks but it can be done if you take your time and don’t rush. The rear swing box was difficult because of the curved angles on the bearing carriers and low clearance of the brake and drive sprockets. I overcame this by measuring the overall length and width and cutting a bit long both ways. I then bolted the front of the plate up using the same technique as before but going all the way thru as to have more hold power because this is the piece that take the most abuse. I then used a propane torch to heat the material up enough to bend it. I eventually took it off and bent it in between two vise and 2x4’s. Heating the material slowly and applying pressure worked best because if you heat it to fast it melts and burns. This was tedious as you had to bend it then check it, bend more then check. Once it cools it will hold its shape. When I got to the brake and sprockets I used a router to cut oblong holes wide enough for them to pass thru. I still didn’t like the sprockets exposed so I cut another piece and used the factor plastic guard as a guide and shaped one to bolt up where the factory plate was and made it longer. This way if they hit something it will move and hit the sprocket and just slide off or the sprocket can rub on it without causing damage. I finally got everything shaped and bolted it up. It’s been the best upgrade yet.
Gear Reduction
This particular unit has a lot similar to Kawasaki in this department anyhow. The front sprocket is a JTF 569 and the rear is a JTR 1845 with 530 drive chain. Since I could not find EITHER one the same way I wanted it I opted to just use 520 chain instead. It’s more popular and has the same tensile strength. The gearing I choose was a 12 tooth front and a 37 tooth rear. This will give you a 3.08 to 1 ratio versus the 2.56 to 1 factory or about a 16% increase in torque. Maybe you can find a 569-11 tooth sprocket with 530 chain but I opted for more adjustability. I can put a 13 tooth on and have a 9% torque increase over factory or a 14 tooth for a bit more speed. The tires make me want to keep it a bit slower for the kids anyway because they are 2 ply and bouncy as heck.
Rear bearings
You have to take the bearings off to change the sprocket so might as well. There are also to extra seals in the carrier caps that you can choose to replace.
Bearing # NAPA 6206-2RSJ Double sealed bearing (rubber)
Cap seals 66630 x2 and 66639 x2
New belt
I chose Gates. There are other options to choose from as well but name and quality mean a lot
NAPA# PL30707
Variator rollers
This machine uses 18x14 Rollers that are 14g factory. Best to measure yours before you adjust them. Check youtube for all kinds of information on these. I am going to try a mix of 12g and 8g rollers to help kick the belt out and get the tires moving. I should have reduced the gearing enough to help with this. I will update post after our first ride.
(UPDATE)
Machine did very well at CAW in SC. Still have clutch slip issue on large hills. Overall the throttle is better and front pulley is working better. Have a "performance" clutch ordered.
FUTURE UPGRADES
Clutch spring (drive pulley on the way will update after install 6/2/18)
Depending on how the rollers do I may go with a 2000lb spring
New tires and wheels I like the factory wheels might just get tires.
New shocks (still searching)
This machine has double a arms so none of the shocks I have seen in others forums will work.
I hope some of this information has helped. Again I’m not here to bash the other youth SXS i'm just putting information out there so people can make a decision or get an idea on how to do something. Thanks and happy wheeling.
PS I will post pictures if there is an interest. Thanks!!