Ford 8.8 for a TJ build....well probably just a bunch of questions

benmack1

Well-Known Member
Joined
Oct 13, 2010
Location
USA
I wanted to try my hand at building my own axle to upgrade my 99 TJ D35 to something more robust. The other goal is to then move up to 33 in tires and re-gear to 4.88's while I am at it. Also, going to put in an SYE and double cardan drive shaft. I would appreciate any advice folks have along the way, this is my first venture into setting up a differential and other than sleeping at a holiday inn express I am totally unqualified to do this.

I got a ford 8.8 out of a 99 explorer. It had 4.10 gears and an open diff which I looked around for a bit in case I wimped out on the re-gear but it's a moot point, I went ahead and got a set of 4.88's right away. The explorer had 240K on the clock anyway and the diff had been opened at some point from the gasket RTV I suspect.

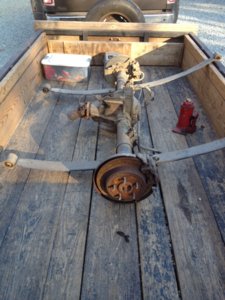
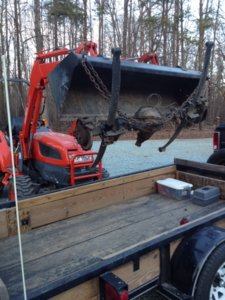
Here is where it began. $100 bucks and I was on my way.


photo 1.JPG
photo 2.JPG
photo 3.JPG


Got it home

photo 1b.JPG
photo 2b.JPG


Axle tag. 4.10, 8.8 and built April 9, 1999.
photo 4b.JPG
 

Attachments

  • photo 1b.JPG
    photo 1b.JPG
    176.3 KB · Views: 512
  • photo 2b.JPG
    photo 2b.JPG
    184.4 KB · Views: 398
Started the tear down.

IMG_3706.JPG
IMG_3707.JPG
IMG_3708.JPG
IMG_3709.JPG
IMG_3710.JPG
IMG_3711.JPG


I did some quick measurements before I disassembled the carrier. It seemed to have almost no pinion preload on it (maybe 3 in lbs at best). It wasn't wobbly but is either warn or not set up right if it had been tampered with along the way. Again 240K so maybe just warn down.

IMG_3712.JPG


OK, first question. The left drivers side carrier bearing seat has this pit in it. Doesn't look marred up or anything but has defintely got a pit there. I assume this is not a big deal as this is where the race sits so nothing should be moving here. The race seems to sit in there fine by my untrained eyeball when I drop it in and put the cap back on. Is this any problem to be concerned with?
IMG_3713.JPG

Here is the passenger side bearing seat.
IMG_3714.JPG
 
Here is the pinion head. I can see 'Ford' and some numbers and an X 7. I thought I should be seeing some kind of + or - .002 or some number on the amount of difference it has from zero shims hand scribed on the end of the pinion head. From my reading I was understanding that I would adjust the new pinion accordingly using those numbers and whatever may be on the new one. I don't see any markings. Does this X 7 mean anything?
IMG_3715.JPG
 
Sounds like a cool build. I wouldn't sweat the pinion preload...that thing has got some miles on it. As long as the pit has nothing sticking out you are fine. Want to make sure the carrier bearing race sits in all the way. Not sure about the pinion marking. Only Dana writes a pinion offset measurement on the head. Couldn't tell you what x7 means. If nothing, I would use the existing pinion shim stack measurement as a starting point.
 
Measurements are key to a reliable build. Pinion has crush sleeve, they make a crush sleeve eliminator kit. Also make sure to keep the carrier caps on same side and same orientation. I built my 8.8 a few months back, so any questions let me know. I started with a 3.55 open diff 8.8. Installed a spartan locker, artec truss, artec bridge, new seals and bearings, flipped the calipers to the front and installed a BTF diff cover.

10552373_10152240328686581_982158076126766967_n.jpg
 
I recently did an 8.8 in my tj as well. Went with 4.10 gears, Detroit, c clip eliminator and chromoly shafts, artec truss and all new seals and bearings. I bought a crush sleeve eliminator kit for mine but I didn't want to cooperate so I didn't use it. I'll be glad to answer any questions as well. Did everything with the help of a friend.
 
http://eastcoastgearsupply.com/c-130046-axle-swap-parts-ford-8-8-parts.html this section has every part you need for the swap. And we can answer any question you may have. We will beat any advertised price on any of the components you need and all of it is in stock in Raleigh.

On your carrier bearing journal make sure there is not a lip in the machined area for the race to sit, this would indicate that the race has spun and the Cap will not compress the race as material has been removed.


Thanks! I got all my stuff from your shop this past Monday. Yukon gears, install kits (for both the 8.8 and the D30), SYE kit, artec truss, brake rebuild components, double cardan DS and some other small stuff. Having you guys close by is great and I have to say I set out to piece meal the entire package and each time I compared you guys were either the same or lower cost. I also got to take advantage of your 10% sale so that made it an easy decision and I could drive over and pick up the stuff in person. I think I need a couple wheel bearings yet but that's about it other than to hopefully assemble all this crap without screwing it up.
 
I made some more progress. The worst part of these projects is the clean up of the old crap. I got the brake backing plates and e-brake shoes disassembled, rented a slide hammer and bearing removal attachment and got the wheel bearings and seals out.

Tube view after removal of brakes and bearings
IMG_3724.JPG


wheel bearing and seal
IMG_3728.JPG


I then removed the carrier bearings. Boy was this a circus. I got one with a 2-jaw puller I rented (POS). The other one I gave up and cut the cage and then the seat almost through and was then able to get a better grasp with the puller and had weakened the bearing seat and it popped off. I was nervous about scoring the carrier but I didn't ever touch it.

One carrier bearing in tact and one not so in tact

IMG_3725.JPG


I removed the 4.10 ring gear from the carrier. I removed the bolts and used a punch in the holes and tapped it off without any trouble. Here is the carrier, still has the abs tone ring on it in these pics.

IMG_3721.JPG
IMG_3723.JPG
IMG_3722.JPG
 
Here's the 4.10 ring gear. If anyone needs an 8.8 4.10 ring and pinion let me know. They seem fine to me. I see a chip off one tooth end on the pinion and the pinion threads on the end look a little goofy but I think it's just fine.
IMG_3726.JPG


I popped off the ABS tone ring. No need for that in there anymore.
IMG_3738.JPG
IMG_3739.JPG

I put the cover back on the pumpkin and power washed it as best I could. Then I went at the bracket removal. I've seen alot of folks using cut off wheels. Screw that, I used a torch and cut conservatively (read way too damn far away). I am not good enough to blow the weld out so I did have some grinding to do. I hate grinding.
IMG_3731.JPG
IMG_3732.JPG


After grinding the remnants off and wire wheeling the rest of the rust and finally a flapper disk to make it shiny.

IMG_3734.JPG


I then removed the ABS sensor and cut the ears off the casting that protects that sensor. From my reading, that has to go in order to clear the TJ sway bar. We'll see but it's cut off. Just did this with a sawzall and metal blade. That went better than I expected.
IMG_3743.JPG
 
I then welded the axle tubes. There are a ton of opinions out there on this. I don't know what is right or wrong to do. This is welding steel to cast steel (not cast iron, which is a big difference as I understand it). Questions on pre-heating, not pre-heating, tig, mig, arc with a special rod. Well, I don't have a tig (not do I know how to tig), I have an arc welder but totally suck at that and don't have the fancy rod. I do have a mig welder and am reasonbly confident in my mig abilities (I took a class a couple years ago and stayed at the holiday inn express so I am good to go). So I just stitch welded the tubes, didn't really do anything special other than went slow, welded 1-2 inches at a time, alternated top to bottom, side to side and back-stepped the welds (at least I think I did as i understand it, meaning I welded toward the prior weld rather than starting at the end of the last bead and continuing). Anyway, it seems fine. I have no way to tell if I warped anything other than by eyeball. Honestly I probably didn't need to do this as I don't wheel that hard and I will have a truss system on this thing. But this is meant to be a learning experience and you can't learn without trying things I guess.

IMG_3747.JPG
IMG_3748.JPG


I then removed the pinion. I had left it in there to this point just to try and keep some crud out while I was grinding. I made a bolt on breaker bar out of some angle to hold the flange and then backed off the nut with a 1/2 drive breaker bar. Worked fine. I then pulled the flange with a 3-jaw puller (same POS I used as a 2 jaw earlier, Advance auto one size fits all chinese pile of shit tool, but all I had). I then pounded out the pinion. It was quite stuck in there. Then I drove out the old races.

Here is the pinion and all it's 'stuff'

From bottom (pinion head) to top (nut) in this picture is as follows. Pinion depth shim (by my measure with a micrometer, I get 0.027", inside bearing (Koyo, P/N M802048-N), inside race (koyo P/N M802011N), crush sleeve, outside race (Timken P/N M88010, outer bearing (timken P/N M88048), slinger (not sure if that is the right term, 0.018" but I don't think that thickness matters here using a crush sleeve), oil seal, dust shield and finally the flange. Also the teeth on this fawker are sharp as knives.
IMG_3737.JPG


Now I had an empty case, cleaned it up with brake cleaner and also the tubes. Was like cleaning a bazooka with a broom handle and rags.

IMG_3741.JPG


IMG_3742.JPG
 
Now back to the carrier bearing journals. @Cperry, you've got me nervous now. I went out and looked again. I don't feel any lip on the carrier housing on either side. I feel a very slight 'edge' on the drivers side bearing cap. The edge is on the outside and if I had to guess it is way less than a thousandth (hell I don't really know, I can feel it with my thumbnail). I don't see wear or scoring but now I am a bit worried about this. I don't want to weld a $350 bracket on this thing to find it's fuct. :eek: I tied to get a meaningful picture if it but it was futile, my camera isn't good enough to focus at that level of detail. This 'edge' is right where the smooth part meets the unmachined part of the cap edge. It's probably at the point where the shim is sitting that far out. I did notice when I disassembled that the shim on that side seemed to have some wear pattern (this was the OEM cast big ass thick shim). I don't know if any of this means anything to anyone reading this. happy to hear opinions. Maybe it need to go get another donor before I proceed??
 
I didn't know there were any 8.8's left in NC that ECGS hadn't scarfed up yet. ;)

(For the record, I had ECGS build mine about 4 years ago, and I've enjoyed it since.)

I've got to do some axle work on my AMC 20 for the J10 - so I'm following with interest. :popcorn:
 
Back
Top