

You are using an out of date browser. It may not display this or other websites correctly.
You should upgrade or use an alternative browser.
You should upgrade or use an alternative browser.
Grand Wagoneer on RAM 2500 chassis frame swap
- Thread starter crisd
- Start date

paradisePWoffrd
Recovering Project Junkie
- Joined
- Nov 5, 2005
- Location
- Newton, NC
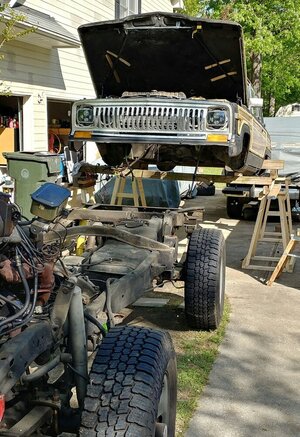
Pulling the harness, lifting the body off and setting it on the Ram frame.
Very nice, although pulling that front bumper might make life easier.
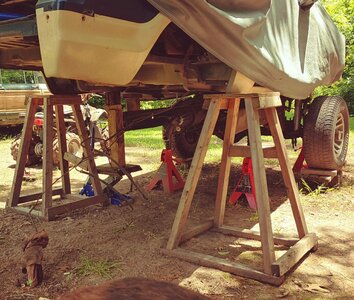
For what you spent on wood to pick that up, you could have bought a 2 post lift.

skyhighZJ
Gov retirement < needs to live
- Joined
- May 31, 2012
- Location
- Aberdeen, NC.
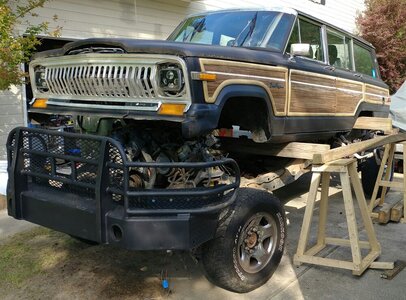
Post it up on FB marketplace. Some bro dozer will scoop it up quick because “kauwboi”Ha! I'd love to install a two lift post but I'm moving soon so wood it is... and I had the wood laying around to it was kind of free.
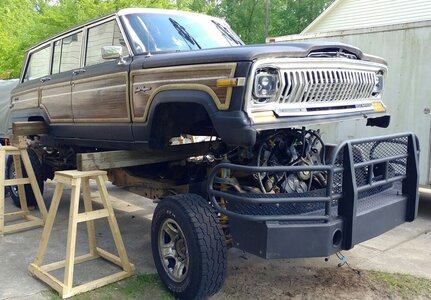
The bumper is off now... and I almost broke my feet when it dropped.... it was a tad bit heavier than I anticipated, lol.
Not all the pictures are in order but basically I knocked out all the rivets out of the front leaf spring mount and off the top and bottom of the frame in that location then the frame drops into two sections. I cut off 25 and a half inches, pulled the back up to the front and slid the two pieces together over lapping, clamped and drilled new holes then bolted everything back together.
Some pictures show fresh black paint over where I just took a disc and cleaned the rust off. I painted it right away because I didn't want flash rust to form.
Last edited:
The Ford Explorer tank hit the Ram cross brace and needed to be trimmed. After trimming cross-brace, the tank itself needed to be trimmed to fit in the narrower space of the Ram. I wanted to use the Ram fuel tank straps because I knew if I fit the tank to the straps that the tank would fit with out hitting anything. This turned into what has become to be referred to as an abortion by my friends. Its a freaking mess. In the future I may build a new tank from scratch, in retrospect, it would have been easier and much cleaner looking. After welding and pressure checking I had some pin hole leaks. I kept chasing holes to I decided to braze all the welds to close up all the pinholes. Then for good measure I used an apoxy tank sealer (the silver stuff you see). The left over sealer after dumping the mixture out was used to paint the exterior of the tank. The pic with the bolt in it was my drain hole that I drilled and welded a nut on, it was needed to drain the etching solution and the epoxy. After cutting out the triangle sections from the tank I used a press to close the gap.
A new Ford fuel sender and pump assembly will be used in the tank after it dries. I have the


A new Ford fuel sender and pump assembly will be used in the tank after it dries. I have the
ghost
Well-Known Member
- Joined
- May 25, 2006
- Location
- Hartsville/Camden,SC
We just had to do some suspension work on one of our Freightliners. I had never heard of Huck Bolts until then.
It seemed much easier when I thought about it in my head, lol.Dat tank tho
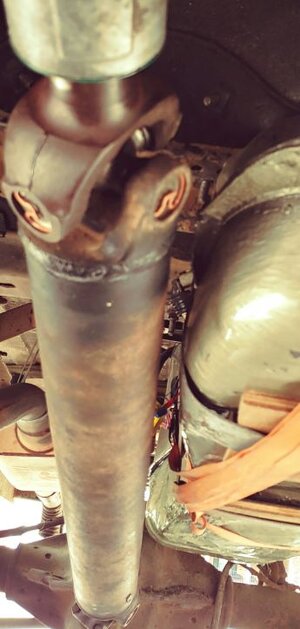
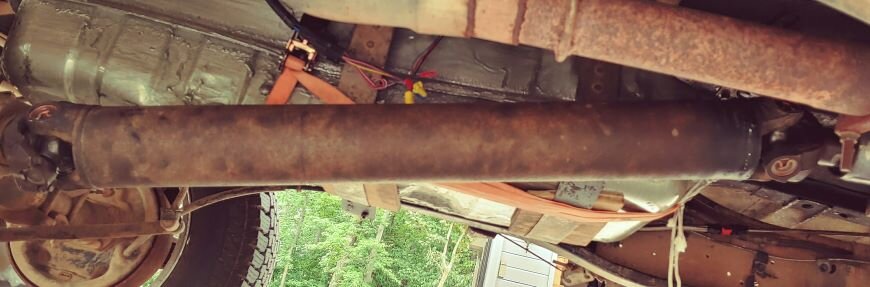
When installing the headers the left header came down and pointed right into the transmission mount cross-member and I didn't like any of the options that kept the exhaust on the left so I cut the header up and turned it 90 degrees about 3/4th of the way down. Once turned the 3" exhaust runs through the saddle between the transmission and the transfer case then makes a 90 degree turn and follows UNDER the right side exhaust down to the muffler (two in/two out) placed in front of the drive shaft rotated 90 degrees so the inlets are not side by side but over/under. Out of the muffler the bottom turns 45 degrees up and to the side of the top outlet and then side by side out the back.


orange150
Well-Known Member
- Joined
- Mar 20, 2005
- Location
- Fairfax City, VA
you know we want to see the rest of it.Mostly done. It drives. If anyone wants to see the rest of how I did it, let me know.
But I'm lazy and need a nap...you know we want to see the rest of it.
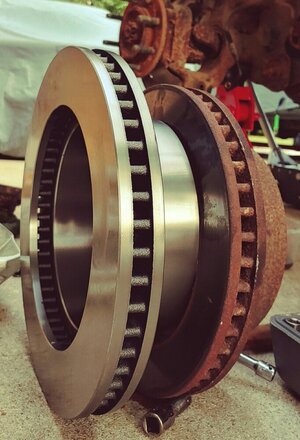
I also did the Gen 3 brake upgrade, does anyone want to buy used rotors and calipers for a Gen 2 Dodge Ram? Also, does anyone know much about doing the hydro-boost conversion? From what I can tell, the hydro-boost came on the diesel models, all I need to do is strip one off a wrecking yard Ram and put it on mine.
Attachments
I'm shortening the Wagoneer frame and putting a Bronco 2 on top of it.That was the quickest build thread I’ve ever seen, love it!
Just to ask, what are your plans for the stock waggy engine if it’s working well?
Attachments
Some general thoughts on the build. Label MF Everything. Spend the money and get factory manuals. Ratchet straps are your best friends. The Shop-Vac is your second best friend. Using cutting oil when drilling is essential, slow the speed down don't burn out your tips. There are a lot of tools you can go cheap on, a tap and die set is not one of them! McMaster-Carr has every bolt You'll Ever Need. Yogurt containers make awesome bolt storage containers. When stripping out your donor vehicle do not throw away anything! Most of all my bolts came from the donor vehicle as well as cutting up sheet metal and frame pieces to make brackets. A cheap amazon.com thread finder set was extremely useful. Count all the cutting discs you think you'll need then multiply that times by about 20 if you buy them at Home Depot etc. My advise, buy the thin expensive ones at AirGas or another welding-specific supply store, they last a long time, don't make nearly as much dust, and cut faster. Do not try to use a wood hole saw bit, buy one specifically for cutting steel, don't ask me how I know that. Don't waste your time trying to modify an existing gas tank, just spend the money and have one custom-made.... unless you are a great welder that can ensure it will not leak. If you're going to do a project, take the time to make a complete plan with goals to accomplish each day. Be determined to accomplish each daily goal no matter how long it takes (build into your plan an entire day just to fix your screw-ups. Depending on your confidence, you may have to schedule more than one of those).
Last edited:
I'm not sure how a Gen 3 Ram will work but the Gen 2 conversion almost threw itself together. I was amazed at how everything just kind of fell into place as if it was designed to go there. Then again, a plasma cutter, torch, and welder can make anything go anywhere, LOLI’ve been “planning” (read wishing and hoping) to do this at some point with my 04 Ram and 90 Waggy. Hurry up and figure everything out so I can live my dream through you.
paradisePWoffrd
Recovering Project Junkie
- Joined
- Nov 5, 2005
- Location
- Newton, NC
I also did the Gen 3 brake upgrade, does anyone want to buy used rotors and calipers for a Gen 2 Dodge Ram? Also, does anyone know much about doing the hydro-boost conversion? From what I can tell, the hydro-boost came on the diesel models, all I need to do is strip one off a wrecking yard Ram and put it on mine.
I would love to see more about all of it... but I really would like to hear more about the 3rd gen brake upgrade.
paradisePWoffrd
Recovering Project Junkie
- Joined
- Nov 5, 2005
- Location
- Newton, NC
You need to start a build thread on that too. Im sure others would agree that we love seeing different stuff.I'm shortening the Wagoneer frame and putting a Bronco 2 on top of it.
Its actually really a simple zero talent procedure. I just bought Gen 3 calipers and rotors and bolted them on. I'd have to look at the receipt to see what year I used, but I think I used 2004. I just went to RockAuto and bought the calipers and rotor/pad kit along with GM 1 ton rear drum cylinders. Putting on the drum wheel cylinders was a more difficult task but still overall easy.I would love to see more about all of it... but I really would like to hear more about the 3rd gen brake upgrade.