Rusty frame crossbar repair

RatLabGuy

You look like a monkey and smell like one too
Joined
May 18, 2005
Location
Churchville, MD
I posted about this in the random pic thread at a while ago, but figured it was about time I actually did something about it.

My 93 Toyota pickup has some serious rust. Well duh, it's a standard factory feature.
A couple months ago the back end got randomly really bouncy. I went to look under it to discover that both of the rear shocks have broken off at the mount... From rust. In the process of replacing them I discovered that there was just a, um, wee bit of rust deterioration at the crossbar the 2nd mid frame crossbar where it attaches to the frame.

IMG_20250315_124035156_HDR.jpg

It wasn't even connected on the passenger side. Driver side is only marginally better.

So I of course fixed it properly...
IMG_20250315_174409838.jpg
IMG_20250315_175107493_HDR.jpg


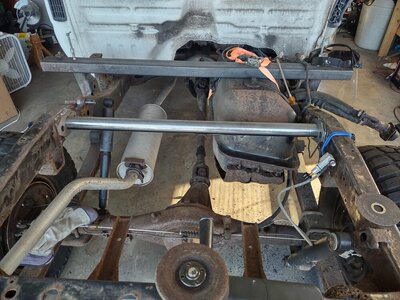
Decided it was about time to fix it properly, so I pulled the bed off to get a better inspection.
IMG_20250714_201129162_HDR.jpg

The driver side is connected, but only holding on by hopes and dreams reminiscent of a Democrat's economic plan
IMG_20250714_201145393_HDR.jpg
IMG_20250714_201155973_HDR.jpg


Passenger side is just gone
IMG_20250714_201307193_PORTRAIT.jpg
IMG_20250714_201253251_PORTRAIT.jpg

Currently have it held up with a jack stand under the gas tank.

Luckily the only thing this bar seems to do is to hold up the back end of the gas tank, but I find it a small miracle it didn't fall completely. I find myself extremely thankful that the shocks broke!

My plan is to go ahead and cut this sucker off and clean up the frame inside of it as much as possible. Only time will tell how much there will be left to weld to. I assume I will need to weld in some fish plates for a new crossbar to attach to. Luckily I have a good friend who is a TIG master that's offered to do it... With the entertaining part being that I'm going to have to get it to his garage.

Right off the only immediate question I have is how to handle the gas tank bracket. It appears to be welded onto the crossbar, which obviously will all just go away. So I'm not real sure if there is an ideal way to cut it so that any part can still be reused, or how I will reattach when the time comes. At the moment I'm thinking I will probably leave part of the original bracket on the tank, drill some holes, and fabricate a bracket for the new crossbar that it can bolt to.
 
Welcome to my life. I don't know how the gas tank mounts on those, but since you are starting from a clean slate, you can do whatever you want. When I backhalfed my Tacoma due to rust, I attached the strap using the factory pin to a shock tab I had laying around, worked well, knowing Toyota it should be pretty similar as they don't change things up that often. Check out my build thread, should be a few pages in when I cut the truck in half and installed new frame rails and raised the fuel tank.

I just looked closer at the pics, looks like how the front of my tank is attached to the cross member. What I did was I took some angle iron and drilled out holes and welded nuts to them to recreate the bracket. Attached that to the new cross member with some plate and you should be good to go.
I'm really trying to listen to not become a major ordeal like that. This is just a normal weekend feeder truck and I don't really want to get into a whole frame replacement LOL.
But we'll see!
Here's a better view of the tank mount
IMG_20250719_125250048_HDR.jpg

The tank is attached to it by three bolts that are on part of a lip on the bottom of the bracket, about halfway up the side of the tank. Theoretically I could unfold those and then take it all off together, then fabricate a whole new mount using those holes as attachment points.

But the bracket also holds an adapter bracket that transfers the brake line from hard to soft line so I'd have to somehow incorporate that also... And it isn't the kind of joint that you can just slip off of the bracket, the joint is in fact part of the same part.
Plus those bolts are 80% rust and I give it about 20% chance of being able to get them off without the heads just snapping.

I think what I might do is to just slice the bracket right across the top just below the bar, then later fabricate a new bracket that uses those two holes and maybe one or two others that I drill to attach the top of the bracket to the new bar.
 
Woah - I just found out this exists

Kinda pricy, but I like that it's designed to slip the tube all the way through teh frane and comes with the plates to tack onto both sides. Also comes with the tank hangar. Probably gonna just order that. Wish I'd known earlier or would have already had it on hand
 
Pull the cross tube and you can “surgically” remove the upper welded tank bracket then just “wrap” it back around the replacement cross tube. I’ve seent me do it. Not really that hard at all.
 
This is only a the beginning. In all seriousness what does the rest of the fram look like?
Your buddy is gonna have a real fun time trying to find clean enough metal to Tig weld that cleanly. It can be done but it sure wouldn't be my first choice in welding process.
 
This is only a the beginning. In all seriousness what does the rest of the fram look like?
Your buddy is gonna have a real fun time trying to find clean enough metal to Tig weld that cleanly. It can be done but it sure wouldn't be my first choice in welding process.
Yeah, what^^ said. I “cleaned” the best I could and burnt it up with some flux core wire. Didn’t even waste the gas. That kit you linked is the bees knees but about like throwing the ornamental lip color on swine.
 
This is only a the beginning. In all seriousness what does the rest of the fram look like?
Your buddy is gonna have a real fun time trying to find clean enough metal to Tig weld that cleanly. It can be done but it sure wouldn't be my first choice in welding process.
yeah as I was getting into it tonight I started to realized the same. We have access to MIG & flux core too.

I've only cleaned up the outside, as I need to move it first and drain the tank before I remove the brake lines and such, but thus far at least thats suprisingly solid. Nothing on the frame itself is rotten (yet, still very possible).
 
That kit you linked is the bees knees but about like throwing the ornamental lip color on swine.
I went ahead and ordered it. Yes, I could probably have made the plates etc myself or designed but I'm limited in metal fab tools on hand. Considered designing and ordering from SendCutSend but then it becomes a time/effort tradeoff thats not worth it.
Really curious to see the kit quality.
 
More fun, I went to go remove the LSPV to get it out of the way, and realize that the bracket that attaches it to the frame is... Only about 60% there
IMG_20250719_163511019_HDR.jpg

As far as I know the unit itself works, but it is completely seized on to that bracket, and after a lot of digging it looks like that thing is not something that I can just buy.
So I think I'm going to take this opportunity to just take that all off and minimize the system a little bit and just replace it with a manual Wildwood adjustable prop valve and a braided line just going directly to the axle. That also removes something else that I have to worry about reattaching to the gas tank mount.
 
Got a standard Wildwood adjustable prop valve.
Quickly designed and 3d printed a bracket in PCTG, which is pretty strong and heat and chemical resistant
IMG_20250726_164549171_HDR.jpg

Mocked it up to ensure fit
IMG_20250726_165532775_HDR.jpg

Then cleaned up the frame there and bolted on
IMG_20250726_225958644_HDR.jpg

It's going to have to come off again later after everything is welded so I can repaint the frame.
I blocked off the return line up at the front passenger side wheel well, so now it's just a typical split system with a line from the master going to the front and the back.

Unfortunately for some reason I don't quite understand the incoming line to the wilwood wouldn't see quite right and was weeping slightly from around the hard line interface with the fitting. It was starting to strip off the hex head so I had to stop. Threading into a different fitting that had bolts in it to act as a stopper worked fine.... I'm guessing that that the rusty threads were just not working well with the new female threads of the wilwood. Tomorrow I'm going to cut the tip off and refit with a new male end fitting.
 
you should look into rust converters like naval jelly for while you've got it apart. $30 and an hour of brushing would go a long way. I source mine from total boat for stuff like that
 
you should look into rust converters like naval jelly for while you've got it apart. $30 and an hour of brushing would go a long way. I source mine from total boat for stuff like that
yup, already on the docket.
I heard a rumor that every title transfer from an old toyota comes with a coupon for rust converter in the mail...
 
I gave my spare truck carcass to my brother in law. I’ll ask if he is really ever going to use it.

It’s a 94 extra cab in perfect shape. The electrical wiring is still there too. I just did a cab swap into a 92 that was already SAS.

I recommend some probing with a screw driver on that frame to get the big picture. Hopefully that rust is isolated, but judging my the pics it might be terminal.

Or just back half it…
 
I got the passenger side all ground down and cleaned up. Really took a lot to grind down the inner side.
IMG_20250802_105608995.jpg

IMG_20250802_113230435_HDR.jpg
IMG_20250803_174220549.jpg

I didn't realize that the tube was originally sleeved so that it went all the way through. That became a huge pain in the butt because I had to ground down the outer edge enough to be able to get the old tube bits out so there's room for the new one.
IMG_20250802_134132050_HDR.jpg

IMG_20250802_135223961_HDR.jpg

It left a much bigger hole in the outer side than I like, but it walk all be covered w a new plate.
IMG_20250802_141553775_HDR.jpg
 
I got the passenger side all ground down and cleaned up. Really took a lot to grind down the inner side.
View attachment 443136
View attachment 443137View attachment 443138
I didn't realize that the tube was originally sleeved so that it went all the way through. That became a huge pain in the butt because I had to ground down the outer edge enough to be able to get the old tube bits out so there's room for the new one.
View attachment 443139
View attachment 443140
It left a much bigger hole in the outer side than I like, but it walk all be covered w a new plate.
View attachment 443141
That's is an impressive ditch you made in the frame :flipoff2:
 
Lot of good progress. men want a pain in the butt project this is tough.

Got the other side ground down, inner sleeve cut out. By the time I did the outer edge I'd finally worked a good technique to grind out the end of the inner sleeve so the hole wasn't so ridiculous
IMG_20250830_144924525_HDR.jpg

IMG_20250830_161824554_HDR.jpg

The three bolts holding the gas tank to the original vertical bracket were of course rusted in place so I had to cut the bracket down to get to the top the cut them off at the welded nut.
Then repaited that part to try and slow down the future rust from my grinding
IMG_20250830_161840479_HDR.jpg
 
Everything mocked up
IMG_20250830_163421981_HDR.jpg
IMG_20250830_163429975_HDR.jpg
IMG_20250830_163439647_HDR.jpg
IMG_20250830_163553919_HDR.jpg
 

Attachments

  • IMG_20250830_163414564_HDR.jpg
    IMG_20250830_163414564_HDR.jpg
    186.4 KB · Views: 147
I wasn't fully confident my little 110 welder was up to the task, so I took I took it over to a buddy's.

Which means I got to drive this booty-fabbed contraption across town

IMG_20250831_165700935.jpg

IMG_20250831_165737602_HDR.jpg


Yes, gas tank is rat-shit strapped to steel beam that'sc clamped to the frame, and yes the tail lights are taped in place.
He said, "hey it's not stupid if it works!"
 
And voila! Solid frame again.
Not exactly pretty but way better than before. Now just needs some touch up and paint and get back together
IMG_20250901_000436796_HDR.jpg
IMG_20250901_000456782_HDR.jpg
IMG_20250901_000538603_HDR.jpg
 
Back
Top