Spare Change

skyhighZJ

Gov retirement < needs to live
Joined
May 31, 2012
Location
Aberdeen, NC.
Back story: So I was living at Fort Bragg had a ‘97 XJ about 3/4 the way through a won ton swap and Uncle Sam says move to Louisiana. I go, jeep goes too. Get down there, finish the Jeep, sell the Jeep (dumb!) buy two 1st gen Toyota pickups for $500 to sooth “the itch”. One is a 1980 short bed, one is a 1981 LWB. Diddle around with them and realize the short bed frame is good. Long bed frame is not. Long bed has good axles, gears and lockers, SWB axles not so much. All the sheet metal is crap. Weed through everything and come up with a rolling chassis of the parts I had between the two. 5.29 F&R, spool out back, Spartan up front. I trussed both and did a complete seals, bearings, and brakes rebuild. Did 63” out back and RUF swap. In the mean time I made a couple trips back here to N.C. to visit friends and scout houses for the inevitable retirement property for the wife and i after the Army. One trip I met @ProbablyBroke and scored a nice 5spd trans. Also scored a top shift case along the way. Nov 2018, time to move back to N.C. or so I thought, moved everything the house, the wife, the farm stuff and animals! Also, the collection of parts only to get told I have to stay in La. for another year. So it all sat here. On a couple different trips to visit the wife and house I wasn’t living in I bought a cab, frame and running 22r from @Coleprice1993. Traded a 8274 to @rcalexander105 for a forward shift case and BudBuilt dual case cross member. And there it has sat since it got here. Now I’m officially back as of November 2019. And I have been checking off Honey-do things but this weekend I said that’s it! I’m working on my collection of parts.
SO! Here we go. New battery terminals, hooked up the batt to my sweet daily (thanks @Lizooki ) Jumped it off with some ether and it fired right off!
Pictars along the way
2FB37888-06DB-4194-BC39-4D64129427C7.jpeg

Starting off
284C3032-E335-4EFF-8C1B-F7635F9E6EB9.jpeg

Stripped and painted the SWB frame
47A04653-BEFA-4B68-84B7-E2A1FDEFF524.jpeg
got the rear axle set with the 63” chebbies.
B18D820F-BE4F-4B16-A33C-0AD7A2B05148.jpeg

rebuilding the front axle
9B6500F9-3D15-4342-9337-714486B89A45.jpeg
the holy fuck of moving all of our shit!
AF1B11F8-A86A-4D02-BE02-A561A586A91C.jpeg
stuck in La. for a year living in my camper
3622DB4A-9A86-4E41-8B46-AB0327FA36AA.jpeg

Another trip to visit the wife! I-20 is forever long!
002E3171-0DCD-4880-B40C-884C062CF05B.jpeg
Started messing around cleaning up the cab. Gutted the seats and carpet. Pretty good shape in the sheet metal so it’ll roll for now.
22D99DB8-AF63-4E98-A11B-C9F1D503B8EC.jpeg
Striped the factory intake off
C9B9E167-DF91-464A-A8FC-5ACCD24A8898.jpeg
my rolling chassis
B98BD7B4-6FD4-462A-B8C9-956ACCF9B017.jpeg
”new” manifold with full LCE delete and Weber for now. Would like to go propane eventually!

well here we are. This will be a slow process but for the most part I have everything to at least get it moving.
Big tickets are: doubler adapter, driveshafts, tires. Oh, and a good name for her.
 
Got all new fuel lines (rubber hose). New fuel filter. Used a vacuum pump to pull full up to the engine bay. Poured a bit down the carb and went to cranking. She runs! Idles smooth as can be too. But, it smokes a bit at idle and when you hit the throttle it puffs smoke pretty good. Blue = oil=:(. Let it sit and idle and the oil pressure is good, doesn’t get hot so there’s that bit of good news. Timing is right on and it is very responsive to throttle input. Now to see why the blue smoke. Rings or cylinder head issues?? I have a rebuilt cylinder head in the garage but it may need to get a set of rings thrown in?? Also didn’t really take any pictures except the pressure regulator I installed.
8342F88E-8257-435A-AA51-DF2489BC0EE3.jpeg
 
What year was that XJ? What was the time fr\am on those URE Pictures?
 
Now to see why the blue smoke. Rings or cylinder head issues?? I have a rebuilt cylinder head in the garage but it may need to get a set of rings thrown in??

I'd run it. If it's been sitting a few years, the rings might be locked up on the pistons, maybe the valve stem seals have dried up a bit, etc. In other words, it might get better. It probably won't, but it won't hurt anything in the meantime to leave it alone.
 
I'd run it. If it's been sitting a few years, the rings might be locked up on the pistons, maybe the valve stem seals have dried up a bit, etc. In other words, it might get better. It probably won't, but it won't hurt anything in the meantime to leave it alone.
I guess if anything I can charge for insect fogging where ever I go wheel.
 
No time like the present for a dove tail...
 
Well, some property adjacent had come available so it’s time to make some moves. Part of this is selling my dually to free up some doll hairs. Also, I’m getting the chance to finish my Toyota cause I may be DDing it for a bit until the dust settles and I can find something more permanent. The cab floor needed some fixing so I worked on that today. Slowly but surely it’s coming together.

note: this isn’t pretty like cutler or MarsFab or.... it’s just keep the cab solid.
45E67DAA-4636-4B3E-BD07-1822975B2A67.jpeg
1D24C108-0FFC-411B-8B0C-E55F3280AFB8.jpeg
gonna get some seam sealer and fill in the small gaps before I coat everything in Hurculiner. 1st gen Toyota cabs are a pain in the ass because they are made with 3 layers of floor board depending on the location. All of those layers come equipped form the factory with rust lol. The biggest issue is the body mount under the drivers and passengers feet because it is recessed into the floor where the bolt goes through to the frame which means it’s a bowl for water and sorts to collect. Either way I cut out and patched the “cab support” (1st pic) then layered the “floor” over it and did some rosettes between the 2 layers. Ground down and doused with rust inhibitor. Maybe it’ll last another 40 years??
 
Last edited:
So back in high school some friends and I bought a Tri-toon party barge. It had a blown Ford inline 6 connected to a C4 to a I/O. We had just yanked a 351 to swap in a 460 in my buddys Bronco and after several beers the 351 found it’s way into the boat. Long tubes got small ports for water inlets straight piped out the back. Fresh cold water from northern Michigan kept it happy and the water coming out the back with dual straight pipes had a pseudo Donzi/cigarette boat sound. We thought we were the shit. That boats name was Spare Change. I think I’ll reach back to that and dub this turd the same handle. Spare Change the 1979-1983 collection of parts I have bartered my way through to this point and only bought stuff with, you guessed it, spare change.

oh, and pictars
1A74BA70-86B0-4009-B8F7-5A2C4130A5CC.jpeg
New grill, headlight bezels and headlight buckets, thanks Taiwan. Also got some LED high/low beams with the relays and wiring harness. These things are bright in the day time. Hope they are decent and hold up.
84076B8A-51A2-4255-A245-3E853676BA2A.jpeg
B5B2A494-E0E4-475F-B6B7-E4FB078D9621.jpeg
Fixing the rear passenger side cab corner
E9F743DA-1A58-4570-808A-913DD48B6F58.jpeg
 
Got the spots in the can floor buttoned up. Hosed everything with rust preventer/primer. Buddy came over yesterday evening and we did a thing
0E1C6A41-5B89-4443-BE81-A65D581B183E.jpeg
I think once the engine/trans/tcase is set in it should settle down a bit and get rid of the squat to piss look. Hopefully.

also, now that the cab is on I’m thinking 37” something round and black will be the selection for tars.
 
Man, You need a cage in that thing!!!!


oh wait, youre waiting on me...
 
D89F5C4F-BC15-4732-B534-8DF1B49C1878.jpeg
New Tail lights
3481E9AC-62F4-41C4-9971-4499EC228425.jpeg
I cut the windshield out because the gasket was dried out and cracked at all the corners I have one small spot to fix in the passengers lower corner
2C1F7F33-8D56-4671-9CDF-6B3DDD52B7C3.jpeg
so I moved the truck to the driveway. Got the engine on the stand for a day. I swapped a rebuilt head, new timing chain/tensioner w/ metal guides. Also put a new t-cover, water pump, oil pump on the front. Pulled the oil pan to clean it all out and the underside didn’t look horrible pan had sludge in it but no chunks of metal so it got put in its hole!
456FA3A5-9220-4D93-B3DC-A5F2F219D323.jpeg
01FA047A-9E35-49CB-A5A7-6AA4B1E3378E.jpeg
67138D40-A77A-4CA0-89C7-B69984E7DC3B.jpeg
Got everything hooked back up and the hood back on last night. It still sits a bit high in the front. My question is, I did a RUF when I first put the chassis together and I honestly have no idea if they were “stock” or lifted springs. It seems like the front is real damn stiff now that it has all of its weight on it (no trans or tcase yet).
40CBFC82-3DF3-4725-BAE7-39AD0034C623.jpeg
9403B68A-CFFB-4C08-AE2B-5DADA448117C.jpeg
Besides the fact I need to power wash things cause they have 2 yrs of funk growing. Would you pull on of the leaves from the front end? I can get better pics but it was dark when I took these.
 
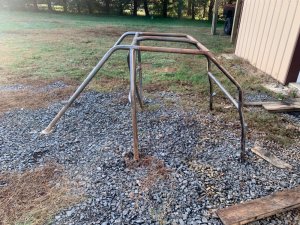
Picked up this cage from @DannyH today. Gonna have to do some mods to the front door hoops but the b pillar hoop and X should work out just fine! Pretty stoked. This shit box may just be something some day.

Or, it may just get red line sends till it goes out in a blaze of glory..... idk.
 

Attachments

  • FC4E445E-C24A-42F4-8E49-B802026C8503.jpeg
    FC4E445E-C24A-42F4-8E49-B802026C8503.jpeg
    326.1 KB · Views: 214
The back corner pads are at the angle they are because I ran the rear cab mounting bolts through them so it’s tied to the frame. Good idea or no? If so I will also try to tie in the front legs (A-pillar) to the mounting bolts by the front floorboards.
 
Back
Top