Tin Can Rebuild V2.0

Yeah man! Are you going to be wheelin the shop next month?
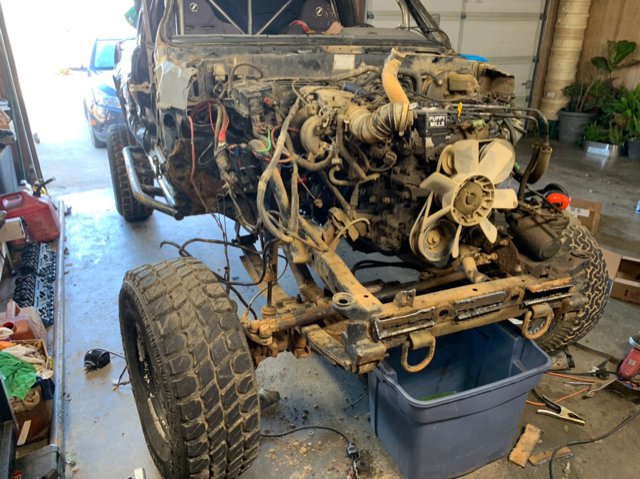
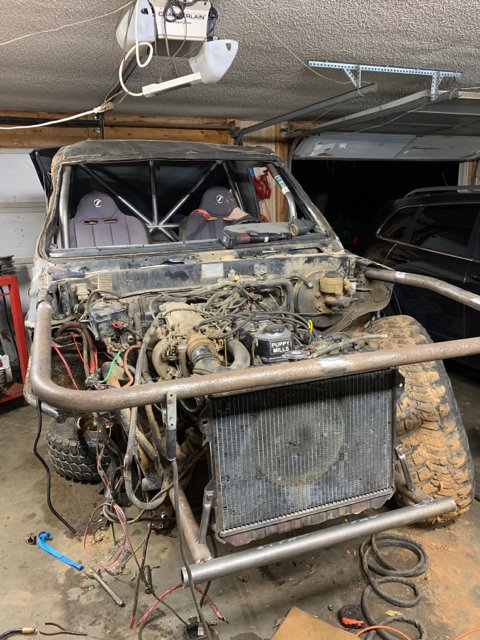
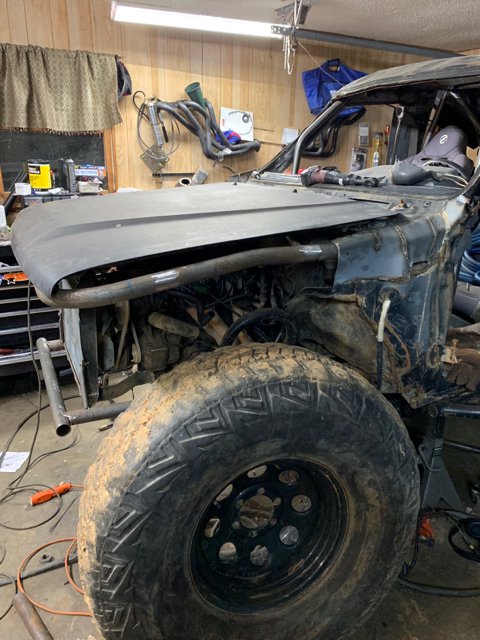
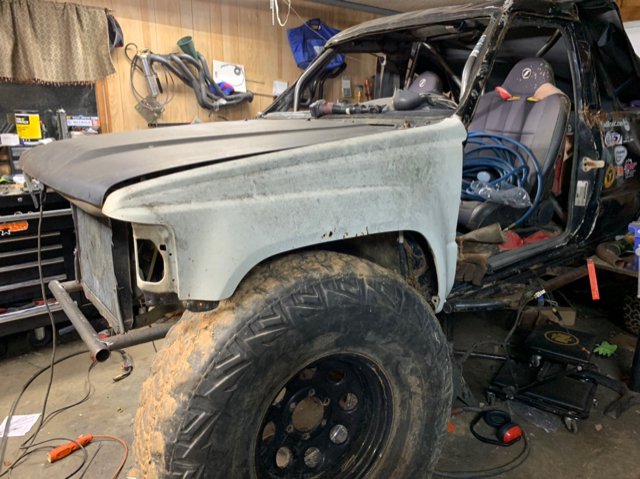
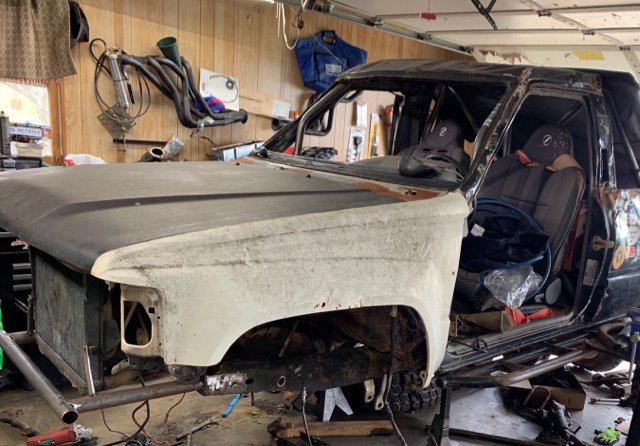
I'm not necessarily going for a stock look. In the end it'll probably be a firewall buggy.

Right on, didn't know if you wanted a hood that functioned like stock or things like that.

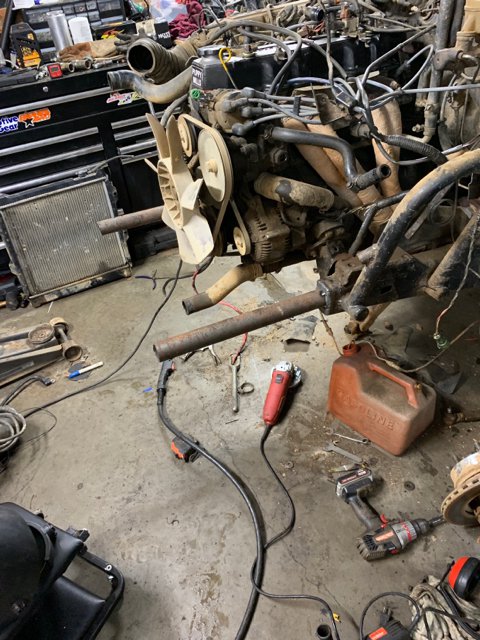
I want to go on the SHOP ride but I probably won't get out until Gulches in Sept. I was done with my motor swap but couldn't get it to stop smoking - tons of blow by, etc, so I did a comp test and it is going to need rings at least. Hopefully it doesn't need more than a quick ball hone and rings and be back in business. Otherwise I might push it into a ravine haha.
 
Well got the runner out today.. made a few updates in the past month which includes:
Flipping the fuel cell around so the sump is in the rear and then rerouting lines.
Resiliconing the the leaky doubler.
And rolling it. (Sunroof removal)

57ab22c6024149d9be2cb53abbc26cd0.jpg


b296957868415028a8ae1c8e2086fd79.jpg


Took a bad hop when I was slightly sending it at the shop on carnage.

Sunroof was busted on the roll sadly. Will be getting a fresh plexiglass sunroof soon. Nothing was broke and luckily I was the only one in it and come out safe! We pulled the sheet metal out with the winch and went on to run a couple more trails.


Sent from my iPhone using Tapatalk
 
Haven't posted about the twisted tin can in a while as it has been getting severely neglected. I have been back and forth about what I was doing build wise and what rig to finish up. Finally decided to ditch the buggy I was building and continue on this build.

Not much has happened with the rig besides a few trips to URE, half busted and leaking all kinds of fluid (mostly gear oil).

Last ride was in the latest snow where I lost brakes and began hearing a strange noise from front the front axle.
IMG_1607_zpstfmlikst.jpg


The front leafs are pretty well trashed from last wheeling season's beat-down, so the most reasonable action is 4 linking the front and rear. With the 4 link it will be getting chopped just forward of the fire wall and "go fast" tubed out. I will start by linking the rear and then move on to the front. Sadly, I think it will be down for the better part of the wheeling season. I picked up a trailgear rear 4 link crossmember from @ProbablyBroke and 16 ballistic joints from @untchabl along with the Swayaway coilovers that I have had around for a while. Hopefully within the next few weeks I can have the rear done and move on to the front. I will try and keep up with the build better than I have in the past..

IMG_1681_zps3kbch7dr.jpg
 
Nothing sucks like being stuck in the garage all wheelin' season! Hope it goes together smooth. It'll be ready to go when it's done!
 
Looks good man. Sometimes I miss old Toyotas....
 
It has been a while since I’ve updated this thread. 2018 was the year of nothing for me, when it comes to rock crawling. I hit uwharrie once.

2019 is starting off right.

By tearing the tired & beat Tin Can apart. It all started with a plan to add some tubes and fenders and a hood on to the front clip.

Starts like this:

77db162f65f1cd668f8aa23ebe0e61ba.jpg


Proceeds to this:

7f84bad17a7490eeaa98fd96687f4a40.jpg


Somehow we finally have this...:

81e4c94d216d8cc0ff0d8e3a89f2112a.jpg


I have been collecting parts for single ended full hydro for a while now so that will be added on to the axle.
3 link suspension.
And don’t worry a lot more tubes tied into those protruding from the frame.

As much as I hate to, I’m ditching the 8274 and going to a m8000, just for size restraints.

Shooting for a square ish U4 style front end but will be hanging some fenders and a hood on it. Stretching the front axle a few inches forward.

Ruff stuff order is placed. Tube will be ordered soon. Hopefully more progress will come next weekend..


Sent from my iPhone using Tapatalk
 
Small update:

After much struggle I managed to get the tubes through the fire wall. It proved to be harder than I thought, but I am happy with the end result.

5eb7ac9f44b06e500ce1de5b674ba82a.jpg


Had to cut this to enlarge a hole on the inside and put it back on once finished with that.

009449685744b907223da69cfbbf7d80.jpg


I bent up the main hoop, mounted the radiator and added on to the tubes from the frame (No pictures yet). Slow progress is all I’ve got currently, as school takes up the majority of my time.

Started cleaning old brackets from the front axle. I received my shipment from ruff-stuff. One end of my links will be heim joint and the other will be weld in ballistic joint (Was posted earlier with TG crossmember). Same with the upper, but the Panhard will be all heims. This is my first link suspension build so hopefully all work out.

As for steering, I ordered the offset heims from Barnes4wd to give myself a bit more room for the Panhard when building the track bar. This adds a lot of beef compared to the Toyota tie rod ends and tiny track bar. Pushing that around will be a single ended 2.5bore x 1.5 shaft x 6 inch throw ram I will be installing. I bought a cheapo ram to get me going but will probably be upgrading to the PSC single ended ram.

Mounting the orbital outside and having hoses made by a friend once most everything is in place.

Maybe I can push this build along some this weekend and snap better update pictures.


Sent from my iPhone using Tapatalk
 
Finished upper bar, radiator mounted. That angle out of the fire wall on the tube looks very odd in this picture, but it comes out level on both sides.

180f58570e023150139036c2ea6b7266.jpg


Hood test fit....

d2dc7ec71091a6313b138ef198457f4b.jpg


It fits decent. The passenger hinge is bent badly. It is going to need some reworking, unless anyone happens to have a set of Toyota hinges laying around.

I need to cut out the original latch so this it will sit flush in the front. But the length is nearly perfect for the hood to sit down over the tube in the front.

29838013750a199aa978a0987d1f4032.jpg


Also test fit the fenders. They will be making a return.

14a743d3afc52813d12f57d97679418b.jpg


Ride height is coming down a few inches, but will be taller than shown here. The 16inch coil overs will probably have to go through the hood.


Sent from my iPhone using Tapatalk
 
I picked up a little momentum this weekend and was able to knock a couple of items off the todo list, beginning with getting the hood somewhat straight. The bodywork fits up surprisingly well. Once I get back on full size tires the fenders will receive some heavy trimming.

0e2217228597b5a4ecb1a412ccc53d9a.jpg


Next on the list was boxing the tubes to the frame. After considering a few iterations this is what I went with:

dd0bb80b8e339cd00a44b11520b482be.jpg


a11147951c07ba84cb2b6daaea6c024e.jpg


Finally:

5878b520b378684a89552cc6320b4ebe.jpg


I basically tied the existing boxes for the motor mounts into the frame and into the tube. I was happy with how it turned out and I don’t believe I will have any issue once everything is tied in.

Also you can see the Panhard mount there on the tube in the previous picture. It’s one from ruff stuff, but I modified it by simply notching it to fit around the tube.

Finished up grinding the leaf spring brackets from the axle and tacked on the axle end Panhard mount and the upper link mount.

c68fa3d53a55018dc1ee11c472f6a105.jpg


Lastly, I slid the axle under the truck to get an idea of the wheel base that fits my build. It looks like it’s going to be 114”. That is the best length for my build constraints while keeping the tires in front of the frame. I wanted to go longer from what it was before because on steep inclines it tended to get light in the front.
 
Cool to see easy E still getting out of the hood.

Sorry for the mess

How's the puppy mill running these days?

The puppy mill runs great, it commonly finds the rev limiter.

Did change the valve cover gasket the other day and got a laugh out of this one.

bf17d93d59d7d68f9d3dae4a703f5df7.jpg


Sent from my iPhone using Tapatalk
 
The puppy mill runs great, it commonly finds the rev limiter.

Did change the valve cover gasket the other day and got a laugh out of this one.

bf17d93d59d7d68f9d3dae4a703f5df7.jpg


Sent from my iPhone using Tapatalk


Robert left a few hidden notes on that motor.

Glad to see it's still screaming. Haha
 
You are a welder with no fear of failure! :D:D:D Great progress, hope to see it out soon.

I’m tying more into the tube frame rails. I hope that after everything is tied in I won’t have to worry about shearing them, but time will tell...


Sent from my iPhone using Tapatalk
 
PS, sorry about some of the booty fab. Haha... :rolleyes:

The booty fab has been working for a couple years of me wheelin it. I’m cool with it haha


Sent from my iPhone using Tapatalk
 
It may have rained endlessly, but the tin can came a good ways this weekend.

First, I got the holes drilled out on the steering arms (Forgot to order the 3/4 misalignment spacers so no more progress could be made on the steering). While drilling the steering arms out a bolt came loose in my drill press and it wasn’t working. Troubleshooting that set me back a good bit.

Finally, I moved on to setting my links up. Tacked the lower link mounts on to the axle and slid it into place. After taking countless measurements, I was ready to start placing the frame mounts.

I remembered my hate for grinding off undercoating for a short but seemingly long period of time.

Tacked the rest of the mounts on and began making links, and at about midnight last night I called it quits. The lowers are 2” .25 wall and Panhard/ upper is 1.75” .25 wall. Sadly, I didn’t get too many in between photos but here’s current point.

f5ccae88ada305341fcd04fdb161c110.jpg


c95dfb67aff9da636145ed03bdaae58f.jpg


0a911c722f0fe2a24e79252adc4eea88.jpg


Next weekend I’ll finish notching that upper link, cycle the suspension, finish weld everything, and maybe get started on the steering.
Better pictures of the frame mounts will come.
 
Finished the upper link today and cycled the suspension, had one minor issue during up travel of the driver side.

Rookie mistake: The Panhard was catching the upper link mount with only maybe 2” of up travel.

3fcb0ef933270f1e0e340f45bb697a43.jpg


Plan A: (preferred) simply tilt this mount forward to clear the mount/ more of the housing and remedy this issue. I do have offset heims from Barnes4wd that will provide me with a little more space to work with than the original tie rod.

Plan B: (not preferred) cut another section of tube and put a bend in it to clear the mount...

Should have misalignment spacers in this week and the problem solved this weekend.

Pinion angle and everything else looked great.

Gears are turning in my head on bumpstop locations. To start I’m going to get some cans... bump stop cans that is. Mount those and install poly stops mounted to tube to begin with as I regroup funds from this linking process and eventually move on to air bumps.
 
Last edited:
Which plan did I end up going with?
The answer is yes.

Really, I had to laugh at myself for the enormous amount of over thinking I was doing on this Panhard problem..
I simply moved the frame mount side up to the top hole and gained roughly 2 inches. For good measure, I put a 5 degree bend in the tube to make damn sure it clears that upper mount. Just like that my suspension compresses completely to the frame and I feel like a dummy. It only took some built in features that I totally overlooked.

I’m waiting on the misalignment spacers to come in so I can finish up the steering. Tomorrow i will be making my shock hoops and beginning the process of tying everything together.

The todo list is growing shorter and it’s nice to see things coming together.

Here’s some pics:

2b7be6f1caaf5fc9ec23965ddcbc66ed.jpg


91d30fe0ca1867c96e4e514125010278.jpg


fe8c64d48faa52ba8a9fb1940a02bd09.jpg


In the last picture you can see the slight 5* bend in the pan hard.

Soon I’ll stop over loading this thread with pictures of links and tack welds...


Sent from my iPhone using Tapatalk
 
Back
Top