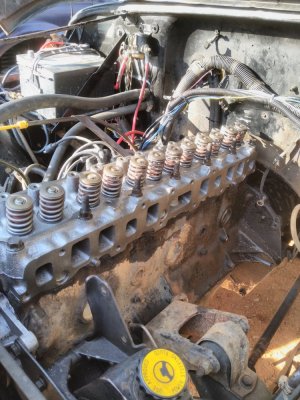
Crack in head

I never did on the blue one. The copper spray is the high heat silicone. After you spray it on, let it tack up a little before putting the gasket on. It'll help hold it in place. Be careful with that stuff, it floats around and gets on everything.lol
Ok thanks. Will do.
 
I’ve been keeping an eye on this thread and you’ve got some solid advice. I’m not reading through everything right now but my advice is, instead of getting gaskets individually, buy a head set. Get good shit, felpro something like that. It’ll be everything you need and some and cheaper. I promise. Your local advance/Napa/whatever will have them or can get them next day. If you need some diagrams or torque specs, let me know. I can walk you through this over the phone if needed. It’s a breeze.
 
I’ve been keeping an eye on this thread and you’ve got some solid advice. I’m not reading through everything right now but my advice is, instead of getting gaskets individually, buy a head set. Get good shit, felpro something like that. It’ll be everything you need and some and cheaper. I promise. Your local advance/Napa/whatever will have them or can get them next day. If you need some diagrams or torque specs, let me know. I can walk you through this over the phone if needed. It’s a breeze.
Good advice on the gasket set. It truly is a breeze. It's really not something you need to over think.
 
FWIW, @Drunktaco posted everything I needed to know when I did mine a few months ago. It's like 2 pages deep on my phone in this sub forum. I was unsure of what I was getting into at the time and in hindsight it was about as easy as it gets.
 
Head arrived a minute ago. Don't have time to start yet. Hopefully can get on it this coming week when misc. parts arrive. I think I will order in a kit and just store extras. I'm sure I can do it with all the help from this forum and reading other sites.
Thanks all. I'll update when I get started with maybe a few pics.
 
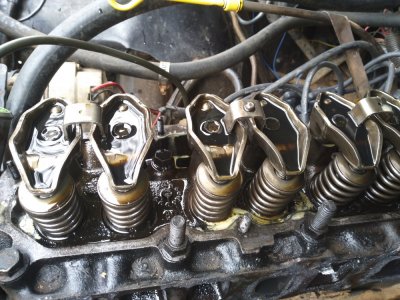
Thinking about re using the rockers,bridges,pivots and rods. Rods are shiny and not worn flat. All same length. Rockers are worn a little but still have dark unworn area around bottom of cup.
Also planned to re use head bolts. New refurbd head is identical thickness as old head which leads.me to believe that they are both replacements. I'm guessing that they were used at factory and again on current head. Can I use them again? I can't figure out if they are TTY bolts or not and new ones seem to be hard to find in 7/16" size.
 
I'm guessing that they were used at factory and again on current head. Can I use them again?
Yes, these are not torque to yield. The fsm says can re use twice. However I have reused the head bolts on my stroker several timed swapping cams with no issues.
 
I didn't change rockers, bridges or pushrods so no help there. Gaskets were rock auto. Liquid ptfe was at napa. Most parts houses will have it. Thermostat and gasket was autozone. Sucks about the valve cover. I still fight with mine since its plastic and leaks like its not there. Ive tried all different gaskets on it except the felpro permadry. Cork gaskets are about useless. Head bolts were all in good shape (except the actually broken ones in the the replacement engine. I reused all of the good ones and borrowed from the bad engine for the broken ones. It worked for me.They are not torque to yield bolts on the 258. I cleaned them, chased the threads in the block and torqued them down with no issues. YMMV. Fluids were all walmart.

Thinking about re using the rockers,bridges,pivots and rods. Rods are shiny and not worn flat. All same length. Rockers are worn a little but still have dark unworn area around bottom of cup.
Also planned to re use head bolts. New refurbd head is identical thickness as old head which leads.me to believe that they are both replacements. I'm guessing that they were used at factory and again on current head. Can I use them again? I can't figure out if they are TTY bolts or not and new ones seem to be hard to find in 7/16" size.
Clean the threads on the bolts, chase the holes in the heads with a bottom tap and rock on.
 
Ok, took a leap of faith and installed my head gasket today. I had planned on just cleaning the block up, pistons... After cleaning everything and degreasing I decided if I left it til tomorrow then it would probably get a coating of rust with no oil on it.
So, I installed the gasket and now for the head. I had to carry the head from the house to the jeep then find a way to get in the engine bay with the head. Being careful not to hit the head surface on anything...I held the head over the block. 2 fingers in the rear freeze plug and 2-3 fingers in the thermo housing. I lowered it down like it was attaching to the space station. I looked in the holes and I was 3/16" to far forward. Again lifted head by finger tips and placed back down. God is good...I was able to get the front right bolt in easily. Now for the rear left. Lifted it one more time and walla! It was perfect. Put all the head bolts in and did the torque sequence following the pattern of center to outer ends in a clockwise spiral.
I did 20-20-40-40-60-60-85-85 and 75 for #11 with the hard to find loctite 592.
Tomorrow is rockers, rods, plugs and so on.
Thanks for everybody's help on this thread.

I had planned on 110 torque but after some reading it requires 85 on all head bolts except #11 is 75. I guess it's due to 7/16" bolts instead of the 1/2" in others.
If I'm wrong please let me know. I could always continue to 110???

Also, I am using the felpro perma torque blue gasket. It's a couple layers thick and from what I've read on many threads and Felpros instructions.....I used no copper spray. I saw one thread that was a survey. A guy had same question about same gasket. I think the vote tally was 9 to 5 in favor of no copper spray. I guess I'll find out soon enough. Again if someone has loads of experience and thinks I must use sealer please explain. It' would be easier to correct now vs after it's all back together.

Much thanks to willness33. I got an end tap and spent about 2 hrs getting all the crap out of the block's head bolt holes. If I hadn't done that I bet one or more would have snapped or just reached torque max before it should have.
 

Attachments

  • IMG_20210406_180119.jpg
    IMG_20210406_180119.jpg
    193 KB · Views: 122
Last edited:
Ok, took a leap of faith and installed my head gasket today. I had planned on just cleaning the block up, pistons... After cleaning everything and degreasing I decided if I left it til tomorrow then it would probably get a coating of rust with no oil on it.
So, I installed the gasket and now for the head. I had to carry the head from the house to the jeep then find a way to get in the engine bay with the head. Being careful not to hit the head surface on anything...I held the head over the block. 2 fingers in the rear freeze plug and 2-3 fingers in the thermo housing. I lowered it down like it was attaching to the space station. I looked in the holes and I was 3/16" to far forward. Again lifted head by finger tips and placed back down. God is good...I was able to get the front right bolt in easily. Now for the rest left. Lifted it one more time and walla! It was perfect. Put all the head bolts in and did the torque sequence following the pattern of center to outer ends in a clockwise spiral.
I did 20-20-40-40-60-60-85-85 and 75 for #11 with the hard to find loctite 592.
Tomorrow is rockers, rods, plugs and so on.
Thanks for everybodys help on this thread.

I had planned on 110 torque but after some reading it requires 85 on all head bolts except #11 is 75. I guess it's due to 7/16" bolts instead of the 1/2" in others.
If I'm wrong please let me know. I could always continue to 110???

Also, I am using the felpro perma torque blue gasket. It's a couple layers thick and from what I've read on many threads and Felpros instructions.....I used no copper spray. I saw one thread that was a survey. A guy had same question about same gasket. I think the vote tally was 9 to 5 in favor of no copper spray. I guess I'll find out soon enough. Again if someone has loads of experience and thinks I must use sealer please explain. It' would be easier to correct know vs after it's all back together.

Much thanks to willness33. I got an end tap and spent about 2 hrs getting all the crap out of the block's head bolt holes. If I hadn't done that I bet one or more would have snapped or just reached torque max before it should have.
Perfect. Torque numbers are right and never copper spray on the head gasket. It goes on dry.
 
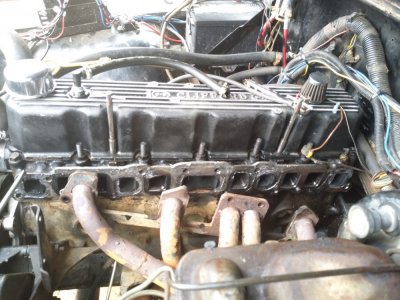
While I'm at it, how does your valve cover attach? I'm seeing no threads in the 2 holes on the header side. I only ask because I'm currently putting on an aluminum valve cover where mine was plastic. I think you're in the same boat as me but I have the answers to that.
 
While I'm at it, how does your valve cover attach? I'm seeing no threads in the 2 holes on the header side. I only ask because I'm currently putting on an aluminum valve cover where mine was plastic. I think you're in the same boat as me but I have the answers to that.
Hey man, thanks again.
Previous owner Jb welded a threaded bushing into the hole, Jb welded threaded bolts to the bushing. Then used those long T type. Valve cover things that screw on to the bolt.
What's your plan?
 

Attachments

  • IMG_20210314_141100.jpg
    IMG_20210314_141100.jpg
    197.6 KB · Views: 110
  • IMG_20210314_135003.jpg
    IMG_20210314_135003.jpg
    158.8 KB · Views: 145
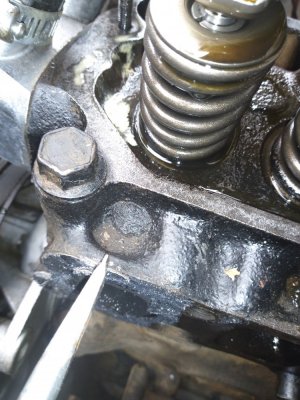
Had deja vu today when installing new head. In the dip just to right of front head bolt #11 this head has very similar glob that my old head had. I assumed the 3 globs on my old head were from PO welding cracks. This head doesn't have 3 but that 1 it has is strangely similar. This one just has glob but old head has glob and a bead above it and down into it. I'm guessing that every head with same casting # is going to have that glob from the factory. I hope this one doesn't have an issue there. I'll be watching my temp gauge like a hawk.
Maybe companies take cores that are cracked, nickel weld them and refurb like it's fine? If that's the case then...dang

Here's the old heads blob. I'll add close-up of new heads blob tomorrow.
 

Attachments

  • IMG_20210314_141701.jpg
    IMG_20210314_141701.jpg
    171.8 KB · Views: 118
Last edited:
Hey man, thanks again.
Previous owner Jb welded a threaded bushing into the hole, Jb welded threaded bolts to the bushing. Then used those long T type. Valve cover things that screw on to the bolt.
What's your plan?
I tapped the 2 holes with a 5/16 18 tap for my valve cover bolts. Yours may vary depending on what you have already.
 
Just googled some new to me info. Turns out my 83 engine had a plastic valve cover. The holes with no threads in head were made for a pin on the valve cover. On driver's side there were umbrella looking things that screwed on to top of head bolts and put pressure on VC. 3 screws on passenger side and 2 nuts in center of valve cover. I wondered why two rocker bridges have a threaded stud on them.
My new head is set up for the plastic VC so I guess I'll be drilling and tapping some holes.Arghhh!
I figured you'd run into this. I remembered you had an AL cover and noticed the holes in your head weren't threaded. You dont have to drill anything. Just tap threads into the holes where the plastic dowels went. It only takes 3 min per hole. Super easy with GOOD taps. Thanks @jeepinmatt for letting me borrow taps yesterday.
 
I figured you'd run into this. I remembered you had an AL cover and noticed the holes in your head weren't threaded. You dont have to drill anything. Just tap threads into the holes where the plastic dowels went. It only takes 3 min per hole. Super easy with GOOD taps. Thanks @jeepinmatt for letting me borrow taps yesterday.
My original head had two extra screws 1 on each end. I guess clifford valve cover had the extra holes so PO drilled and tapped ends of head. New head ( same casting) has no holes on the end....

I've been fighting turning the crank to find TDC on the intakes compression stroke. Took a break and see that many say if it's just rockers and rods to install rods, rockers and bridges and just torque to 20 lbs. Have I busted up my knuckles for.nothing?
Hmm. Any head I've dealt with has the smaller 1/4" hole in the front and back. Both of my original plastic covers used them. Drilling a hole for that back bolt will be a whore with the head installed.

I'll be honest, I didn't find tdc on every cylinder when I did my head gasket. I just cranked the rocker bolts down to spec. They open valves as they tighten on and pretty much bottom out before you hit the torque spec.
Just tightened all of them to 19lbs. When I try to spin them they do spin with some friction unless they are pushing up on the rocker. There is a point when both will lightly spin. I'm guessing all's well with bridges at 19 lbs. From some searching if it's only the rods and rockers they are just put back with correct torque. When doing it after lifters some suggest TDC for each cylinder on intake compression stroke. Crossing my fingers.
As far as the no holes at head ends....yeah I don't know how I would tap the rear one. Maybe with a drill and a rigged pivot?
I may just buy a good felpro gasket and think of another way to put pressure at rear of head....Hmm baby vice grip and a piece of flat bar jb welded to the cover😎
Get the felpro permadry and hope for the best. Do you have a head stud or bolt at that header side at the rear?
 
If it's a stud you can put a large washer with a bend on it on the bolt and tighten down a nut on top. The washer will clamp the edge of the cover. Hard to explain it but I've done it with success.
 
Get the felpro permadry and hope for the best. Do you have a head stud or bolt at that header side at the rear?
No It doesn't have a threaded stud on that head bolt. I believe I can drill and tap it either with a 90 degree air tool or maybe coming through the cowl by removing the grate. Where there's a will...
 
Back
Top