Project MyCorona

The late GM version is fairly though, apparently. It hasn't skipped a beat and I'm not easy on it!
 
Today’s fun is brought to you by copious amounts of undercoating on the frame rails. My propane torch did a great job loosening it up enough to scrape off.

ea7721c0ce6a434ca51d90882600d918.jpeg


17516e34e347446ca2b99c72277d8a07.jpeg


Yesterday I sand blasted the track bar mount because it was rusty and beat to crap and primed it. Today I gave it a good coat of chassis paint.

2bdb2962c48e44c1a97ed3be2761d249.jpeg


e28ea92d0de0473caf19a94cd1c21722.jpeg


cf5bdc86a60641ae96224785c10a2e2a.jpeg


ca7d4c05e3444ec18a401ba336d10f07.jpeg
 
I took a night off from scraping and grinding undercoating to install the Novak engine mounts and brake booster. The mounts are definitely beefy being made out of 3/16” plate and 8 bolts to secure it.

f28a012b8f834f3d983d5f11c4946b60.jpeg


17ce2f07c71b46d8a0efe7ccbd0a0b58.jpeg


And to update on the engine, looks like I am now going to get that 10 week wait. Well 8 1/2 at this point. Hope to start welding on the frame stiffeners this weekend.
 
Hit a milestone today. Got the engine and trans mocked up together and set into the Jeep. Have to do some modifications to the trans mount but nothing over the top. I am using a fabricated trans cross member that I think is throwing things off a bit. Should be able fix it by modifying the Novak trans mount. May also adjust the motor back a touch. The Novak engine mounts have 3 positions and they recommend using the middle position but I'm thinking I will go with the position to move the engine back another 3/8".

I got the engine unpacked and did the most unmanly thing possible and read the instructions. Had I done this earlier in the week it would have saved me some headache as they listed all the part numbers for the sensors I would need to install the motor. So I guess you can say I didn't REALLY read them.

a3ee2c09e54544d8b00aac88c6fee875.jpeg


Another GM performance item, I went with this one because of its height or lack there of. It is complete with Z06 fuel injectors and 90 MM throttle body.

272c0dbde5574009bfbe4ec331116b0e.jpeg


The very beefy fabricated trans cross member. I am going to have to slot the mounting holes more to get it to line up.

ff207d7cb26049a189946e5e365a9cd6.jpeg


It was a pain in the ass to get this installed. Had to remove the passenger side frame mount to give it enough room to drop in. Also had to re-think how I was lifting the motor. Eventually we got it to drop in place and very pleased with how it looks.

5095c555cd06438cbbd193f813fb66ca.jpeg


039df366be1e4ae9a57af8720bfe58e1.jpeg


I made the right choice on the intake! The stock hood closes with room to spare. I will probably put some hood vents on it later to help get the heat out of the engine bay.

4638f3803c5b42bb9abef23ec306abb3.jpeg


22dbb4fe7182440291471dce62e731d6.jpeg
 
Almost forgot to mention all the wonderful time I've had welding in my frame stiffeners. Quite the undertaking if I do say so. Like the meme says "overhead welding... because my balls aren't gonna burn themselves". Pretty much have the main rails and rear pieces welded in place. I will plate the front sections when I remove the the "stock" axles for the Treadway specials and BDS 4.5" lift. :D

Quick tech question.... when plating the front how does this affect the track bar mount? was thinking about this and it seems like it would move the bottom bolt location. I am assuming there is a remedy.
 
Me texting @JodyTreadway about picking my new and improved axles......

Me: Hey I'm off on Friday was thinking on swinging by and getting them
Jody: What time? We end around 3:00
Me: First thing!!! yahoo... new axles here i come
Jody: Sweet here's my address
Me: Opens google maps and...... 3 1/2 hours.... WTF......
Me: Hey Jody dont think I will be making it..... back to plan A :lol:

Apparently Jody is not as close as I thought he was! LOL
 
Thought I'd post a quick update. I've been stuck over the last week or so fighting with the engine placement. The issue I've run into is the engine is biased too far over to the driver side resulting in the engine being diagonal in the trans tunnel and the driver side of the engine being lower than the passenger side. The clutch arm is hitting the transmission tunnel and the bell housing is about 1/16 from touching. The passenger has enough room to run my arm up through. I've been having daily conversations with Novak and have sent them more pictures than a Japanese tourist in New York City. They are scratching the heads at this point and have not offered any suggestions as of yet but are pondering. I am hoping to get something from them this week. I am going to start mocking some things up to see what I can figure out on my own maybe put some spacers on the engine that will move the engine to the passenger side say 1/2 inch and see what that gets me. Thus far they seem interested in figuring something out and I hope they do. I paid a substantial amount of money to purchase their entire conversion package and for the money was expecting at least the engine to sit in the correct location. the other area of modification is I am looking to either relocate the trans cross member or remake the trans mount. Again the instructions indicate the only thing I should have to do is drill 2 new holes and lot cut up and reweld back together.

Its been a game of 1/2 inches..... well without the laughing and pointing. :lol:

More to come.....
 
Another update.... after removing all the slave cylinder brackets I was able to get to motor to install perfectly. However the clutch fork still hits the trans tunnel. Outside of that everything fits amazingly well, transfer case looks great with good clearance, lots of room around the engine, shifter comes up in the trans hole very well. I was planning on "massaging" the trans tunnel with a BFH but Novak came back with a better solution. They suggested using a camaro/corvette style internal hydraulic throw-out bearing. They provided me all the part numbers I need to make the swap thus eliminating all my clearance issues. They are also going to make me a custom trans mount at no charge. The guys a Novak have been very helpful and committed to finding a solution to my issues.
 
Another update.... after removing all the slave cylinder brackets I was able to get to motor to install perfectly. However the clutch fork still hits the trans tunnel. Outside of that everything fits amazingly well, transfer case looks great with good clearance, lots of room around the engine, shifter comes up in the trans hole very well. I was planning on "massaging" the trans tunnel with a BFH but Novak came back with a better solution. They suggested using a camaro/corvette style internal hydraulic throw-out bearing. They provided me all the part numbers I need to make the swap thus eliminating all my clearance issues. They are also going to make me a custom trans mount at no charge. The guys a Novak have been very helpful and committed to finding a solution to my issues.

Im hoping you are going to list out all the part numbers/sources that you are using, so that one of us might be able to replicate it in the future?
 
Im hoping you are going to list out all the part numbers/sources that you are using, so that one of us might be able to replicate it in the future?

Absolutely, I am keeping a detailed spreadsheet of all the part numbers and prices of everything. I will be providing this info to my insurance company to establish an insurable value. This was suggested by my agent.

bonus tip for the day is the TJ manual trans tunnel cover is the same as the XJ. The only difference is there is a bracket you need to remove that is used for the TJ console.
 
Had a great day in the shop today. We actually made some forward progress after being sidelined with the clutch clearances. Sent Novak back all their stuff and ordered all new parts from Ram Clutches as per Novak's suggested parts. We got the Holley mid-mount front accessory drive mounted. The throw-out bearing shimmed to spec and the motor and trans put together for the final time!

This is the new internal throw-out bearing suggested by Novak. I ordered the heavy duty version as it has a larger o-ring and a secondary scraper ring to keep it from leaking.

df470caf8ca54fcbb2e809fa7f94dfb0.jpeg


I also ordered their pedal adjuster. My understanding is internal bearings tend to catch at the top of the pedal movement and this little device lets to adjust the pedal to catch wherever you want.it It works just like a fuel pressure regulator.

20f1c031147b41838a49f190cd39f36d.jpeg


It's a good thing a paid attention in math class. I was on the verge of taking my shoes off at one point... LOL

1f55cb54ffc44695bc1dbaf021ac4222.jpeg


Here everything is properly spaced and lines installed...

fc1e325bf8a14f9cb249a8410b365e5c.jpeg
 
Now on the the accessory drive install. I will say installing the kit was super easy. The only item that needed persuasion was the power steering high pressure steel line. Other than that it was a super simple and clean install.

Here is everything laid out on the table..

46aaa4bee461467d8721875093a713ac.jpeg


I was not expecting the multi step process of getting the new balancer on the engine. And yes the kit included a brand new OEM bolt.

0ccbf1dc65d945b3bea2f1d9f21a2b8c.jpeg


First thing we installed was the main water pump housing which everything else is mounted to. The instructions want you to mount all the accessories to this first then install but I opted to install first and build out from there since I was working on an engine stand.

198d3dd9193948aca04bee9a0934aaaf.jpeg


The cool part about this kit is it has provisions for the steam port built into the back of the housing. I purchased the upgrade kit to used braided nylon hoses and AN fittings. Looks really nice.

b1c440179c73492fbdcc31eb370dc89d.jpeg


f0cb7aeb870c4eacafbfb6acad75d816.jpeg


The kit uses the cartridge style water pump like the corvette. I think they used several corvette parts on this thing.

ec51972388604b1191c35daeec287525.jpeg


And here is the finished product!

5ffeda82ddb5440ab749956e0c746120.jpeg


4cac512c153e4eab94b1b20e42f24dfb.jpeg


Motor and trans are mated together for the final time! Now I need to get on the stick and order my SYE kit.

84741244f7da4aecbd58773551003ba6.jpeg
 
I had the day off and spent it working on the Jeep. I FINALLY finished with the frame stiffeners. I can say I learned several things doing this:
1. I will not ever do this again!
2. The holes to bolt the emergency brake bracket back on the Jeep are not there, ask me how I know.... :lol:
3. No holes are allotted for with these plates, fortunately I figured this out before I got to the front!
4. I don't ever want to do this again!

Before calling it a day I got a good coat of rust encapsulator paint on the bare metal.

Weld through primer after getting to bare metal..

88514660260b4d10970510b4295c43a8.jpeg


All the front plates tacked in..

a18b3d4cd3984ee39402bbc897a248bb.jpeg


A few feet of wire burned for the cause. THe sharp eye will notice I cut the frame plate to go around the track bar mount, I did this because had I ran it under it would have caused some alignment issues with the Novak engine mounts. I really didnt want to go back into that.

2450308b5a8e4422941ed9196381c1a1.jpeg


837b99ac016548f088de42d5a6a37eef.jpeg


Ground all nice and smooth for priming..

f778dce4ec3e4700a48d342ed227dd97.jpeg


ed0f4abe07fe41699c943e4f783ad601.jpeg
 
Another day off and another adventure. Today's adventure was the wife and I road tripped out to meet Jody and pick up my axles. It was a nice drive and was given a warm welcome by the pups. Enjoyed my short visit with Jody and look forward to meeting him again soon, especially once the Jeep is done.

25c2e206282048d588444bb7edf52e10.jpeg


Axles at the shop, suspension is up next!

f707fb83d8914336a14c50aaa8957c6c.jpeg


SWAG!

e0f817ef884e40d78202fc3dde65c7e8.jpeg


Got the frame plates all painted and ready to go.

58a789059db94310825a288b3165dc5b.jpeg


and finally the parts fairy visited me and delivered my RedHead steering box.

5806e022f6884b9da4e02119b5d88cda.jpeg
 
Yesterday's fun was unpacking, unbending and straightening my new stainless brake line kit. Overall the lines were well made and only needed a small amount of convincing to line up with the soft lines. The braided lines came with the BDS kit. I will wait till I install the front axle to install the front lines.

74a0aa3bb98d4c838c7a85f83e519ebc.jpeg


6abf3364893849d0b81f94a952ff4f2e.jpeg
 
We set the engine back in the Jeep last night, hopefully for the last time. The big difference this go round is the front accessory bracket and starter are on the motor and I am getting a true idea of how much real estate I have to work with. notice some clearance issues around the power steering pump reservoir and some header clearance on the driver side. There is also some issues with the bell housing. There is a large boss on the side that is contacting the trans tunnel. It's time to get midevil with the sawzall and remove some of it and get some header clearance. I will post up some pictures of the steering box and trans tunnel stuff this evening. One good thing is the radiator fits great and it is about 3 times the size of the original. The only thing to figure out it the AC Condenser mounting and lines due to the thickness of the radiator. Anyone know of someplace that would custom build one? Now on to the pictures!!

The fit of the radiator to the Holley mid mount accessory kit, there was some concern from both Holley and Novack on the water pump to fan clearance. That clearance is fine but the clearance between the passenger side fan, which for some reason is much larger that the other, is very close to the belt tensioner.

2a6d6fc82f3b46938e235e1192117c90.jpeg


bc6444c806564ef2b162595ade00a16f.jpeg


The header fitment is very tight. The issue here is whether the much larger BDS lower control arms will cause issues the the exhaust. Novack says I may have to use stock lower control arms. I am hoping that with a 4.5" lift it wont be an issue. I will mock up the upper and lower arms hopefully by end of week and cycle the suspension to get an idea of what room I have and how big my exhaust can be in this area. I can already see the starter will need to get a heat shield and maybe wrap the header on the passenger side.

55020ab809894c94b829cf903140be04.jpeg


9d5ed5e64d7c40e8bdf0af61df93e394.jpeg


And finally here is the front view of the throttle body sticking above the core support. Building an air intake is going to be tight. I bought the kit from Novack but not sure how much of it I will be able to use. May send it back and do my own thing. I would have expected it to fit better than it does. It doesn't even get the air filter far enough over to the fender. To make it work I would have to add a longer tube to extend the filter other foot or so.

c2bef740fece4f9d83d3624568e340bc.jpeg
 
This thing should definitely be a heartbreaker out on the streets :D
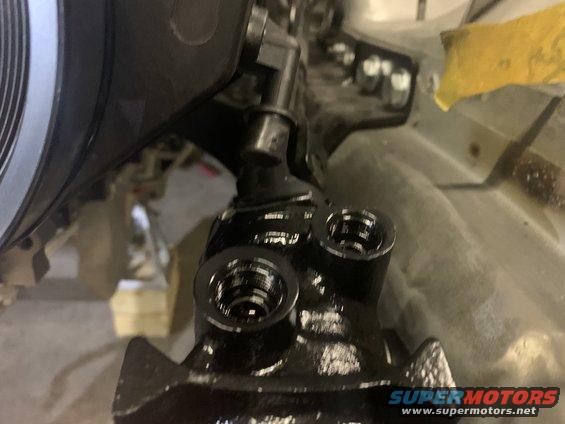
 
Making progress and really liking how things are going. Took care of the clearance issues with the bellhousing and header. I took some pictures of the steering box to show how close the power steering return line fitting is to the steering box. I think it will work if I get creative with the lines. There is not a lot of room between the two but I don't think the two would come in contact with each other. Holley does offer a remote reservoir kit for the kit.

Am I correct in thinking the fitting on the right is the low pressure side? Anyone know what fitting I can use to convert these two connections to AN?

3adf746fd5fb4c14ba4f040c37c24a75.jpeg


Here are some before and after shots of the bellhousing and header clearance issues

Before...

9af851dacc6d4239be12348ac7f45581.jpeg


9648b20030c94b93ae1fac8b27285cf3.jpeg


After...

f3e71e8ea8894652853c8394637c7da4.jpeg


ba9af32a885c4996b9bed7c32c17a87a.jpeg


Here you can see how close the header and starter are...

0474b79cd9e14b0c886088cca3370089.jpeg
 
Back
Top