Someday CYJ

My vote is a relocated YJ box
 
I say wait on a radiator and decide based on it. It'll have to go where it goes and the steering box and shaft will have to mold around it. There's really not that much room to play with when you're running a 3" thick 3-core.
 
My vote is a relocated YJ box

x2. I spent HOURS staring at mine, and I came to the conclusion that if I wanted the tie rod up high with some reasonable up travel, that the stock box moved forward was the best solution.
 
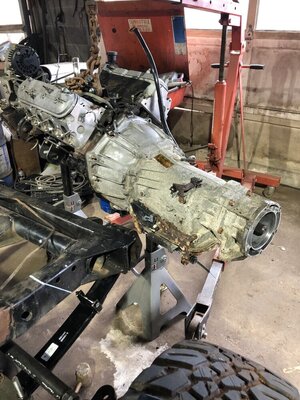
Got the engine and trans cleaned up after a few cans of degreaser, two hours with a brass brush, some rags and a trip to the carwash.

View attachment 334184

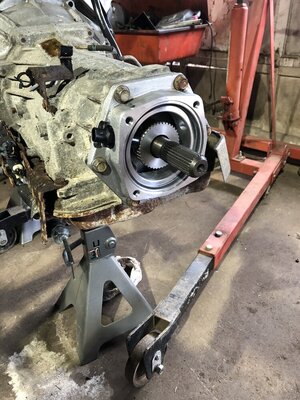
Swung the engine and trans into place.

View attachment 334181

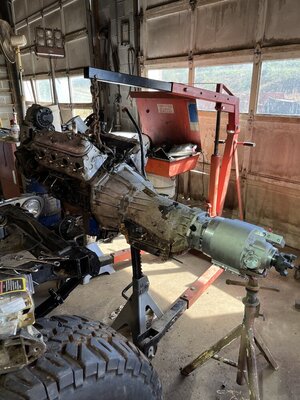
Bolted it all in and threw a jack stand under the trans to support the back end.

View attachment 334182
View attachment 334183

I have nothing constructive to add aside from kudos for taping off the water pump. God forbid any water gets in there :flipoff2:

Oh yeah, relocate the YJ box while you're at it
 
Picked up a YJ steering box on Friday, then proceeded to sit and stare at this thing for a few hours each night trying to make stuff work. Took @XJsavage 's advice and installed the grille with a Jegs Chevy V8 swap radiator in place. Its the shortest swap radiator I could get that would fit in the stock location, be sufficient for the 5.3 and not be custom. I can probably recess it a little further into the grille with some trimming, this might help the tie rod clear the back side of the radiator, but it will still be tight.

The front springs have settled some so I will probably add a leaf or two before continuing on with the frame notches and steering box mount. Right now the tie rod is 1/2" from contacting the frame, limiting me to about 3.5" of uptravel before getting into the radiator. I'll sacrifice some height to help things clear better.

Spent most of the weekend cleaning up the shop and making progress on that to make room for the lift I have had sitting around for a year.
 
That's probably the same exact radiator I have in mine.
Mine is made by Northern, but it's the same deminsions. They'll cool a 5.3 very well.
 
Everything on high steer. I have options, but that is the preferred setup. Essentially I will end up with a frame cut and steering layout very similar to how @drkelly did his. Then have to bumpstop everything to be safe.

If you have to clearance for the draglink, might as well keep the tierod up high also. @drkelly winch/PS mount and cut is a sweet setup for sure. I will need to do something similar on mine as well, to get it lower.
 
If you have to clearance for the draglink, might as well keep the tierod up high also. @drkelly winch/PS mount and cut is a sweet setup for sure. I will need to do something similar on mine as well, to get it lower.

I started my mock up with the drag link up high and the tie rod down low, but then figured if I was going to have to notch one frame rail, I might as well notch both and keep the tie rod up out of the rocks too. I'm pleased with how it all turned out, but obviously haven't driven it yet to see how it works.
 
Nothing picture worthy to note right now but I did manage to get some work done this weekend.

Frame cuts are marked. Grille/radiator is in its final spot and mounted. Templates for the frame mods and steering box mount are made. My spare springs are all taken apart and cleaned up to make some bastard packs for the front. I have chipped away at some small stuff on the engine like getting most of the broken exhaust bolts out and replaced with ARP studs.

The Atlas should be here sometime this month so I can button up the drivetrain mounts and bring this turd back to the house to finish it out and get all of the tube work done.
 
4.5 months from order to delivery, but the Atlas showed up yesterday. Still need to order a TMR support ring and some other small stuff to complete the driveline install, but we should at least have a heavy roller (finally) in a few weeks when I get a chance to get it all together.
Please have this together by September :D
 
Please have this together by September :D
Lofty goal at the pace I’m going haha. Hopefully once it’s a heavy roller I can bring it back to the house to knock out all the tube, plumbing and wiring. A little work each night will go a long way. Right now we are working toward starting our own herd at the farm so any time spent there is primarily focused on projects around there. That’s what has really slowed me up on this project.
 
Bringing this back up. I still suck at taking pictures of what I am working on.

Long story short: I got distracted with the CJ5, all of my fab tools got stolen out of the shop, said fuck it and put my efforts into other projects all summer. Just about everything I needed to do next on this required those tools and I was a salty sombitch about it. Refurb Hobarts started to come back in stock a few weeks ago like my old machine so I got motivated again and ordered one. That kind of got the fire going again on this. The other weekend I bastardized my front leaf packs and just didn't get what I was looking for. They were still very flat, just a leaf or two taller. I have gone ahead and ordered some RE1444's. Hindsight, I would have only raised the front hanger off the bumper OR frenched the rear mount. Doing both slammed it but the consequence was minimal uptravel even if I notched the frame. Now I will still have to notch the frame but have a little more clearance for everything underneath.

I did mess with a few sets of stock manifolds since some block huggers I had (didn't fit anyway) were part of what got stolen too. Something that dumps back near the firewall will work best so I'm on the hunt for some LS3 Camaro SS stock manifolds.

Next up I need to install the Atlas, finish the front suspension and set the rear pinion angle. Maybe by then, the price of tubing will have come down. :rolleyes: Not likely.
I ran some speed engineering ram horn swap headers. Under $200 and fit and cleared everything great when I had the ls and the np435. Glad to hear you are getting back on it though! Excited to see where you take it!
 
I ran some speed engineering ram horn swap headers. Under $200 and fit and cleared everything great when I had the ls and the np435. Glad to hear you are getting back on it though! Excited to see where you take it
Thanks! Those actually look exactly like what I need and are cheaper than factory takeoffs.

Dude. That absolutely sucks your shit got stolen. There is no lower life form than a thief.
Yeah it sucked big time. Welder, China plasma, cart, full tank, consumables, helmet, eBay headers and some other miscellaneous stuff. The guy I’m sure did it is a low life who I’ve been nothing but nice to and he still denies it to this day. Long story but I may eventually recoup some of the replacement cost off what he left when he moved out of the old farm house he stayed in.
 
Thanks! Those actually look exactly like what I need and are cheaper than factory takeoffs.


Yeah it sucked big time. Welder, China plasma, cart, full tank, consumables, helmet, eBay headers and some other miscellaneous stuff. The guy I’m sure did it is a low life who I’ve been nothing but nice to and he still denies it to this day. Long story but I may eventually recoup some of the replacement cost off what he left when he moved out of the old farm house he stayed in.
Know where he moved to? Could go “recoup” more.
 
Had a few minutes this afternoon and messed with the engine placement one last time before pulling it all to install the Atlas and adapters. Essentially just flipped the mounts 180* to the way they were meant to be from the get go. I can’t remember why I tried something else but this gives all kinds of room for fans and rad hose routing. This also allowed me to push the engine about an inch to the drivers side to make more room for the front drive shaft. Moral of the story, follow directions.

I will end up probably having to shave that drain plug for the radiator as it sits right above the tie rod. The white marks are a rough idea of the frame cut that will have to happen for the tie rod and drag link.

4E0332EB-1E56-4D7A-9B16-88E77F1866C3.jpeg
76D205F2-BB21-4322-85BB-5188069F4227.jpeg
22D42D67-5248-4704-B961-0CA40FA3F8B0.jpeg
C4046B4D-918F-46B4-B728-B4A2A11B2BCE.jpeg
 
Got the case installed and driveline set back in hopefully for the last time. It might have been aggressive to try and make the 1410 yoke work on the front with the way the pan sticks out in the 4L60, but I’ll punt if need be.

I need to clearance the floor a little then it should end up with an almost flat belly.
 

Attachments

  • 795B5EA9-69CD-4388-A872-18582DB26D14.jpeg
    795B5EA9-69CD-4388-A872-18582DB26D14.jpeg
    197.3 KB · Views: 139
  • 73BA366A-0869-4562-813E-03C5C669872C.jpeg
    73BA366A-0869-4562-813E-03C5C669872C.jpeg
    200.7 KB · Views: 149
  • 537CB24D-61FC-472E-86AC-42BF3E7B2FFB.jpeg
    537CB24D-61FC-472E-86AC-42BF3E7B2FFB.jpeg
    199.9 KB · Views: 145
  • 2066E7E0-5D65-4D67-934D-A815F5D4264F.jpeg
    2066E7E0-5D65-4D67-934D-A815F5D4264F.jpeg
    178.8 KB · Views: 148
  • 3D02406F-1242-4E3F-B90F-11E062077977.jpeg
    3D02406F-1242-4E3F-B90F-11E062077977.jpeg
    163.1 KB · Views: 143
Back
Top