Warrior's shop build....wiring and building my shop thread

And then.......
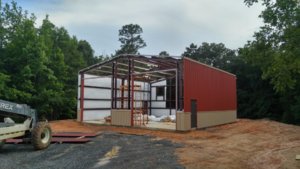
0701171830_HDR.jpg
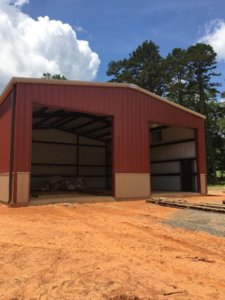
6788.jpeg
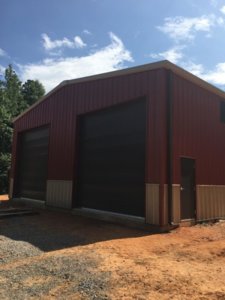
6786.jpeg
they where done. Did I say these guys hauled?
In less than 40 hrs, started at 7 am and they knocked off before 3 most days to beat the heat....finished.
We had to settle on door placement, and windows during the build. It was clearly on the prints but really glad the errector followed up as some changes needed to be made. Over all these guys whipped it. The insulation was spotless. I actually expected some damage going up. The over all is good....just not great. I'm detail anal and some panels just didn't square. A few oil canned. Directly from the red iron not being trued and dead square and flat across the height and length. Some trim showed the run out the worse.
After much debate I chose not to push the point. I did not like the idea of removal and adjusting. Just to many extra holes and room for a much worse end result. Over all I can live with it......just a small ulcer from my OCD.
Speaking of....me cleaning shavings off my trim for the wainscoat panel.
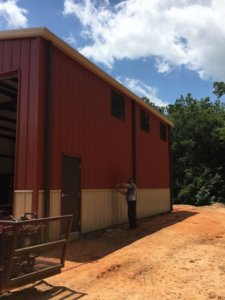
6787.jpeg
 
How big is the building?
Who did you buy it from?
What'd it cost?

Thanks :D
 
How big is the building?
Who did you buy it from?
What'd it cost?

Thanks :D
Red iron type engineered to comercial. 40 by 40. 17 foot at the eaves. Two 14 by 14 doors. 6 inch pad. Fully insulated. Gutters and trim. 3 windows. The little things add cost. Height was a big deal.
Champion Builders out of North Wilksboro.
Turn key. If weather would have held 5 weeks max on mine. Pad to finish.
Minus the grading on pad.....just north 48k. This includes 100 percent everything but the level pad. Fees taxes, concrete, labor the whole wash.
I keep telling myself all this because that price is huge for me......but on my own I'd still be digging footers.
Mine is 16'6". Every 6" extra ht added about $2500.

I have 2 14x14 doors also. Perspective makes the whole building look tiny in photos, until you notice the man door. Same in your pics.

Sent from my SM-G930V using Tapatalk
 
I know what you mean on the price....but it'll be worth it! I'm going to build a 40x60x16 and I'm afraid of what it's going to cost, but I'm going to do it big or not do it at all! That being said, I need to hurry up and pay off my truck, tractor, and focus on knocking down the mortgage so I can afford the shop payment!
 
The high bays are in the 300 dollar range. Lights are 80 CRI and 5000k color....best I understand. The lumens I can't recall. He assures me four is plenty.


From reading on GJ, I have been thinking about either of these for the high-bay: Diva Light LHB-160W-U-50K-D10 ($160@) or James High Bay ZY-H5-165W ($150@)

Using the lithonia calculator and .ies files for the above (James) lights, I'm looking at 6 in the 24x40 main shop area, and 4 in the 20x20 weld room, mounted at appx 17-20'. That meets my target of 100 foot-candle at counter height, and very even lighting. They have a 0-10 dimming circuit, so can fine-tune down from there.

I'll just use cheap 4' lights and LED retrofit tubes around the m/h and in the storage/mezzanine areas.

If you haven't go read up on the lighting threads on Garage Journal. Might take all weekend.
Thank you very much..this is next in line. Along with electrical install. When I get my thoughts collected I will post up some more questions and info.
Edit: @kaiser715. I didn't know you where going to establish another forum addiction...:eek::beer::beer:
 
Last edited:
Did you get the building through Champion Builders, or did they just do the install and you purchased it else where?
Turn key. They are the one source I used. They are not a manufacturer so they buy from a supplier. I honestly shopped and didn't see much difference. I really liked the one person communication process. They sent me engineered drawings and a contract for approval. Down payment and the ball was Rollin. A few draws along the way, finish payment upon completion. Over all really happy. Just some details and communication hiccups. Which I'm gathering are par for anything in construction. I worked with a man named Jim, very professional, polite, and on point. Most of the bumps where from my unusual financing plan and tranfer of money or delivery stuff bcause of the factory and trucking company.
 
Did you price a 4" pad also or just the 6". Curious the price difference.
I didn't price it. Wasn't on my radar. Compacted pad and the desire for a lift and the possibility of heavy equipment repairs. @rodney eppes your probably dead on. The guys that did the work laying out, digging the footers, and the whole pour also own their own trucks and batch plant. One stop concrete service.
 
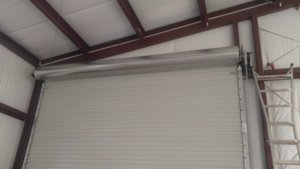
0909171653.jpg
Spent a lot of my Saturday reworking these guys. Building crew was to sloppy where it counts putting these up. Single sheet steel roll up don't like half hearted installs.

I spent the day figuring out how to hoist the weight and remount them to the right height and spacing. Ratchett straps and prybars, oh my! Reworking the whole bracket became out of the question so a lot of washers latter it's in the right position..farther down the road I'll make it right.

I also discovered the stops installed inside the track causing the guides to be damaged every opening. This was the biggest pain requiring to saw off the heads, and fishing out the bracket.

Aside from supporting the door by a rachet strap this presented the most dangerous situation. Had to roll the door within a half inch of no track to get new hardware in.

A 10pm in the dark I decided Sunday would be better to completely remove two door guides and remount to fit the opening....hopefully the last adjustment.
 
Ok peeps advice needed.

I posted most everything out of order. Originally this was about advice on contracting an electrician.

After a quote for more money than I can afford and spending a day fixing something someone else half did I am back track. I am also deeply committed to DIY or very trusted friends.

I pulled the electrical permit. I also need to finalize how to go about the interior.

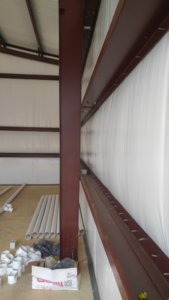
I want barn tin for the lower 8 or so feet. I know I need a toe plate. I want to run electrical, water, and air hidden in the walk.

I am not a construction guy....so I need best approach ideas.

Sheet and cover? Frame over with horrizontal boards for tin? Frame in side flush then cover? Extra insulation is also a thought.

Cost is a factor, but I consider this a one time do it right sorta approach.
What I am dealing with.
1505064836949-1583880209.jpg
 
I would do the galvanized tin, just as sheet rock is done in a home.

Stub out all electrical, air, etc attach tin, then terminate air and electric.

I would run everything in conduit and have the boxes either surface mounted on the tin,

Or surface mount the boxes to the perlins and trim the tin around the boxes.

The trouble I see with both of those, is that the 1/2 corrugated is a pain to trim out nicely around the box,

And surface mounting a box to the corrugated doesn't look any better.

Definitely room for more insulation, but there may be little ROA further insulating that area, depending on hvac.

Roof, definitely.

Low on a side wall, ehhh. A dead air space may accomplish same goal with less cost. But this would mean completely sealed dead air space with little air movement.

Is there a decent looking vinyl siding J trim, that wouldn't look terrible to trim out the edges of the tin, around electrical and air connection boxes, to make it look finished that isn't $$$$$.

Another option I did in part of the shop.

I laid a treated 2x6 on the floor and then set a 4x 8 sheet of 3/4 plywood and screwed this to the perlins.

This gave a sturdy place to attach shelves etc to the wall to hang things. You could then cover that with tin for fire resistance.

Too much $$$ to do everywhere, but not bad in critical areas.

The 2x6 on edge was enough to get the plywood to reach the upper edge to perlin.
 
How high is that middle perlin? If not 8ft, you're going to need to. frame between you mount the tim.

What type fixtures/fittings are you planning for elec/air/water? I think the approach is different if you are setting up for chord/hose reels vs wiring like you would a house.

Personally I would run EMT, airline, water all together/closely spaced right above the tin. This way it is easily acceptable for future adds. I also prefer the chord/hose reels mounted overhead with vertical drops or mounted to fixed equipment.

Sent from my SM-G955U using Tapatalk
 
@Mac5005. Your speaking my language. I like the vinyl trim idea. Going to look into that.

So mounting my electric and outlet boxes directly to the red iron will pass code??

One of My concerns was the approximate 4 foot vertical spacing of the iron. As for mounting shelves I got idea rolling around on that. Hopeful as a working display of some product/skills offering to potential clients. Hence the over board tin approach.

I also want all the extras clean and right behind the walls.

My other thoughts toward tin......dirty doesn't matter, patina just adds cool factor. And best of all: just unscrew fix repair replace.
 
Are you going with a corrugated tin, 3v, 5v? The latter 2 will make box/panel mounting easier. Can be done clean, cutting the holes with a plasma.

A friend had good luck ripping tin sheets with a circular saw. I think he used a smaller carbide tipped blade.
 
Are you going with a corrugated tin, 3v, 5v? The latter 2 will make box/panel mounting easier. Can be done clean, cutting the holes with a plasma.

A friend had good luck ripping tin sheets with a circular saw. I think he used a smaller carbide tipped blade.
Old school barn tin. I have metal saw that cuts like a skill saw in wood.
 
Not sure about the code issues. @UNBREAKABLE.

My guess which is completely non educated, running common ground back to panel, and securing metal boxes to red iron would be fiiiiinnnnnneee. Lol.

I seriously have no clue.

I don't see the logical difference securing surface mount boxes to the red iron, and having the emt clamped and secured to the red iron as it runs to panel.

Definitely 3v and 5v would be easier as more large flat area of no corrugated to trim out around the box. You could then put all terminations and boxes where the flat areas of tin would be.
 
I have gone back and forth on how to do my walls. Right now plan is to use 3/4 t&g up to the first purlin (shy of 8'), then 5v liner panels above. The t&g, either plywood or advantec isn't cheap, but makes it easy to hang stuff, workbenches sit flush to it, and won't get dented up like low steel panels will. I will have a large air gap behind the panels, but my figuring says it will cost too much to frame it inside the purlins, just to save 3 or 4 inches.

That dead air will help moderate temps. I figured adding insulation would screw up the relative position of the vapor barrier enough to cause issues.

Sent from my SM-G930V using Tapatalk
 
I thought for sure those would be panel shop doors and not roll ups!
 
Back
Top