Woodworking Projects

Playing around with the laser last night while doing some staining/painting on the bookshelf project...making some belated fathers day gifts for the BIL, FIL, and my dad. Cork engraves super easy, this is only at 20% power.

1624538199531.png


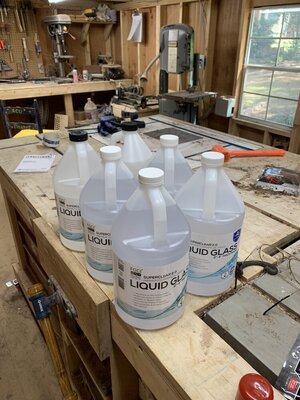
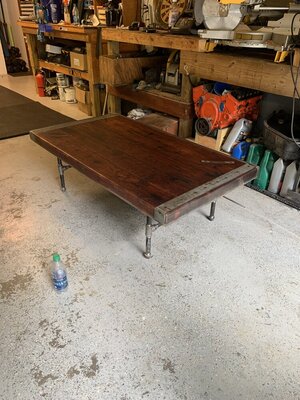
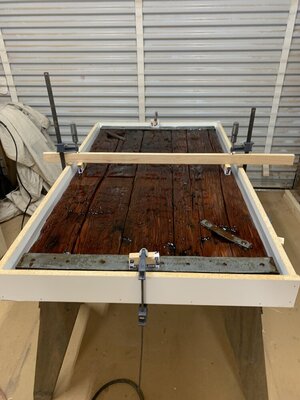
Had some epoxy issues with the bookshelf top. Specifically air bubbles. I want to believe its because I used walnut sawdust to color the epoxy and nothing specifically that I did. I used a deep pour epoxy(Ecopoxy) which I've had great results with in the past. I played around with digging out the bubbles with a soldering iron(terrible smell btw) and CA glue(thick and thin) and accelerator spray. Never got the right result I was looking for. I tried adding some black dye to get the white out but it never seemed to work. In the end, I drilled out all the air bubble pockets and poured some countertop epoxy/sawdust combo. This stuff sets up in about 8 hrs and not the usual 3 days of the Ecopoxy. Sanded everything down to 220, then wet sanded everything to 1200. It's the softest feeling wood I've ever produced(pun intended) :lol::lol:.

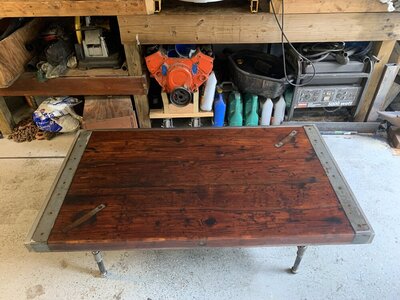
I stained it with a foam brush and minwax golden pecan(clients request). Also touched up some final paint on the bookshelf while everything was drying/engraving. In a very, very, correct lighting/angle you can very faintly see the outlines of the epoxy finishes. In the future, I'll mitigate this by repairing the bubbles after the epoxy has initially cured and use the same type of epoxy to correct. It's easier to blend the corrections in while its still "new". This stuff had been cured for a couple of weeks so it was a bit harder. I have a few more epoxy projects lined up so I will be able to practice new techniques and procedures. I like the way it came out, I might add another layer of stain later today after I wipe everything down with very fine steel wool. I'll also had a layer of clear paste wax to protect the top. This was originally supposed to be a walnut inlay onto the white oak. We used a new technique with the CNC and we didn't quite have it proportioned right, so I decided to go with epoxy.

1624539333799.png
 
Delivered the slab desk and shelves to the client last week. She loved everything. Did some epoxy repair work with Ecopoxy and it came out fantastic.

View attachment 344150View attachment 344151

She's already asking for a matching coffee table and I just so happen to have a matching 4' piece from the same slab. I also started a FB/IG page "Scrap Cuts Woodworking". Follow along if you like.


Would you be willing to make a 8 to 10 ft. Dining table like this and can you make some chairs to match? If so pm me a rough price to make this.
 
Upgraded some tooling in the last few weeks. A friend had a 3.25 hp Porter Cable router that was collecting dust, I made him an offer and it came home with me. Industry standard for cabinet making etc, however this is going to be my slab flattening monster. I put a 2" surfacing bit on it and built a jig. Still need to tweak it some but it works amazing. We were able to completely flatten a cedar/epoxy river coffee table in about 5 mins per side. I'm going to be building a 5'x10' flattening table that will live outside for all future slab work.

Poor man's CNC right here...

1625664990226.png


Been playing with lots of epoxy too. A friend wanted a epoxy river coffee table. So this is what we came up with. 6 pours alternating between blue/green/white etc. Looks amazing in person. He also added some glow in the dark powder randomly to the mix. It honestly looks like phytoplankton glowing in the ocean when the lights go out.

1625665141757.png


It's flat now, and sanded to120 grit. We are going to take it all the way to 320 and then wetsand to 1200 on the epoxy.

Got some more projects lined up that include a 6' round cedar table, refinishing a WW2 Navy ship hatch cover, a walnut mantle, and possibly a deck bar.
 
Lots of stuff done/in progress right now...

Built a 5'x10' flattening table for slab flattening etc.

1628034009638.png


Started work on a 6' round cedar table with custom legs.

1628034056832.png


1628034083319.png


Handhewn solid walnut mantle for a friends lake house(about 150lbs)

1628034185318.png


Made a charcuterie board for the wife...

1628034226156.png


Still need to finish welding/powdercoating the cedar table legs and start the sanding/staining process. I just picked up a WW2 Liberty ship Hatch cover that will be fully encased in clear epoxy and turned into a coffee table
1628034320560.png


Still need to pour my nephews countertop. Here's a few finished pictures of the coffee table/epoxy pour that has since been hung on my friends wall...

1628034376450.png


1628034402891.png


Lots of stuff going on....
 
Finished and delivered the round cedar table.

1630687662828.png


1630688040681.png


Also started on the ww2 hatch cover. It will be encased entirely in epoxy. First steps is to do a surface coat on all sides. This will help minimize any air bubbles from the wood as the epoxy cures.

1630687812073.png
 
Hatch cover is done and delivered. Pretty cool project, although time consuming and not really “woodworking”. Little under 6 gals of epoxy used. 3/4” pipe legs. Probably 15+hrs in sanding/finishing.
 

Attachments

  • D6ADFB8A-6DF7-475C-B963-0AE9785045E4.jpeg
    D6ADFB8A-6DF7-475C-B963-0AE9785045E4.jpeg
    159 KB · Views: 133
  • E7E65C6A-C3B1-4BF2-8D66-D887755797C1.jpeg
    E7E65C6A-C3B1-4BF2-8D66-D887755797C1.jpeg
    176 KB · Views: 138
  • FBBA0843-993D-497E-9663-7E05818ACEFF.jpeg
    FBBA0843-993D-497E-9663-7E05818ACEFF.jpeg
    210.3 KB · Views: 144
  • 71104F16-A715-48A4-AB80-78061E2F5F41.jpeg
    71104F16-A715-48A4-AB80-78061E2F5F41.jpeg
    121 KB · Views: 147
Doing some remodeling for family friends. Framed up over a full rock wall and cut out both sides of the rock hearth for these built ins my father-in-law built. I sprayed the finish and did the staining on them. I built the fire place surround on site to fit, removed it and sprayed it at my dad's shop. Finished all the install up yesterday.

KIMG0254.jpg
 
I've worked in the shop 2 days. And basically made a board in all that time. Needed a cabinet door, 16x43.5, so glued up some pine. Routed in some inset catches, couple strongbacks to keep it flat, etc. Really nice looking, built it to be stained...but now thinking it is gonna look better painted where it is going. One of those cases where I built a piano instead of a piano crate.
 
We lost an amazing woodworker this week...my father-in-law passed away Wednesday morning. His work bench as I found it Thursday, with parts for a walnut bench he was working on for his wife. He was a true craftsman but more importantly a godly man, loving husband, father and papa. Thankful for the 19 years I had to know him and for the times he let me in his shop to help him work.

20230810_131308.jpg
 
We lost an amazing woodworker this week...my father-in-law passed away Wednesday morning. His work bench as I found it Thursday, with parts for a walnut bench he was working on for his wife. He was a true craftsman but more importantly a godly man, loving husband, father and papa. Thankful for the 19 years I had to know him and for the times he let me in his shop to help him work.

View attachment 402018
I’m sorry for your loss. He sounds like one heck of a man.
 
We lost an amazing woodworker this week...my father-in-law passed away Wednesday morning. His work bench as I found it Thursday, with parts for a walnut bench he was working on for his wife. He was a true craftsman but more importantly a godly man, loving husband, father and papa. Thankful for the 19 years I had to know him and for the times he let me in his shop to help him work.

View attachment 402018
My thoughts and prayers are with you and your family. Based on your posts, you and him seemed close. It sounds like he knew the Lord and I hope it's a comfort to know that if you know Him you will see your father in law again.
 
Praying for the family.
 
Yes! Running a chainsaw mill is a lot of work.
 
Been working on a project for about 3 weeks now. Just finished yesterday.
Here’s a pic with dimensions if anyone wants to try it.

IMG_8092.jpeg
 
Been working on a project for about 3 weeks now. Just finished yesterday.
Here’s a pic with dimensions if anyone wants to try it.

View attachment 402647
Pro tip: If you switch grain directions, and shorten to 3.5", you can make em faster and have less waste, and they grip the door and floor better ;)
 
@justjeepin86 for the mantle. Go order some sheppard brackets


I had some custom made for a large walnut mantle I built for a customer. Super easy to install and they are rock solid.
 
regards to kiln drying, I know Carolina Urban lumber has a kiln and offers drying services.


This would be the quickest route. Depending on the oak species it varies on time. Red oak takes a while. Or you can build one and dry it yourself with a couple of heat lamps. Get a moisture meter and check it periodically
 
I’m no woodworker, but I have been making stuff out of wood to finish off my honey-do list for our house. No fancy joinery, exotic woods or even proper techniques, but I think it’s decent enough to fool the casual observer.

Mantle and surround for the fireplace. Built ins to eventually come on both sides.
IMG_4211_Original.jpeg

Hall trees for the mud room
IMG_4318_Original.jpeg


Folding station for the laundry room.

IMG_4475.jpeg


I asked @ramjo who is an actual craftsman if all the good furniture builders were using deck screws in their construction and he said it was short for deckoration so I could rock on.
 
Back
Top