Woodworking Projects

Made a crude trundle bed for moms attic room so all the grand kids can pile up at her house. Locust/oak barn wood from my place, some old door jambs I tore outta my house for the rails, and some chinesium Lowes plywood and 1x's for the panels. I used some bed rails brackets off Amazon that actually work really nice. All the painted pieces were sprayed with Sherwin William PreCatalyzed lacquer. I found a box of decorative headed cut nails hiding on grandpas old store so they got used to attach the caps on the headboard and footboard.


View attachment 332637 View attachment 332639
View attachment 332638
Nice work! How do yall decide who sleeps on the bottom?
 
Wife wanted a shelf above the sink so she could have a place for all her succulents/air plants. Put this together in a couple hours. 1" oak board. Bullnose on the front. I built and routed the shelf supports on the router table. Finished in tung oil. Perfect fit between the cabinets as well.

IctPLXZoHVUboRVDqk8rrJAghymGOaqtYCqHgAfwAN-rXBK-PdCgLY4qsGEn-YoUqVjv62JhP3EE0aWCoWuJy-wkcMhJG7MqYXKFL2noFiH_GJPe5kkxRV-bVbCaiPF_9T4kzPy1PAp9b99wocllAJINo1x2LUILgGQrTjX-UI0w5RBaPXdFxMQ-HPEM8NyTFvvehKpc4L1vYnIo6e70MreJuDO4jNlf0L7SnVyWjlZy2g5QBW4WRZv0JpuxyAAWyOPfg5jsdZXmVCUlBiAIonSy42iT3T36MrH5Zch-wKb6cphhjlSkTqfaFRsPs2DS4_kaNUZNBKf7flvFSCnBI0neR9ZsDjWUWIf_sLLig6cp6ZD8BfTPSetG-eHxx3t5mNQ0RtdAHydMoalhyhjUnMoGSLxU9brPF5pbhvk_Hl2HHRXNcecxt2mibqJmDNI2NMXlF5TB4Od6toI9tb7SrTW6r0hNKLV0WmYGwCls2DlvLmSi0ikSbWrOyc92vanHxcqUcUHy1uvSkWJ2eSnhLTf6j8aaa9tYT2f5Cfarw4jvnl9TUc6A-FP-dgVTHJ56_J3HZxZ5PGds49PYU55CfzYeoMHagxneyPt9U3_2I3PaRnbr6KCpInQ_3zl0sw3mSYmlttbchJYKttbm1q6s3QcrS3A5cY0ovREP_fuzVO9FZ22K0VZY4dR_cGmK1Q=w1110-h833-no
 
Nice work! How do yall decide who sleeps on the bottom?

The smallest or the slowest kids, of course! I actually just finished it a few nights ago and put it up there yesterday. We will see how it plays out in about 2 weeks. The trundle part is actually just gonna be storage for two more mattress....no need to waste good romp room space with useless bed frames.
 
Well, I've been busy. Got back into making sawdust pretty heavily the last few weeks. A buddy of mine and I went in on some 4/4 walnut and 6/4 ambrosia maple and made a desktop(for a built-in for me) and a bartop for him. I elected to do black epoxy on some of the bigger cracks, he didn't. I think they both turned out awesome.

1612483218102.png


We then decided we needed some shelves and he wanted a coffee table. Picked out some more walnut and got to work. He found a very nice crotched walnut slab for his table and I found a nice piece with some live edge.

1612483282701.png


We stained everything with Rubio Monocoat Oilplus 2c in a walnut finish. It's pricey, but its amazing. One coat and done, no issues with streaking etc.

Coffee table finished...

1612483342605.png


1612483354161.png


And his finished bartop and shelves. We are going to add another shelf in between his cigar humidor and beer fridge in the future. He likes his whiskey and bourbon....

1612483420120.png


Still waiting on some brackets to finish my shelves out and they will be complete.
 
Picked up a rainbow poplar slab on Thursday from Appalachian Walnut Company in Lincolnton. They are quickly becoming my go to place for big pieces as their prices are fair and they are just good people.

1616799542592.png


Hacked 4 feet off and loaded the 12' piece on the trailer and the 4' in the bed.


1616799595208.png


This is my first commissioned piece. I'm going to be making a slab desk and a few shelves plus the client is interested in the end piece for a coffee table for her business. Cut the slab into 6' sections and started last night on leveling the top. I put my 1.25 Bosch palm router to the test with a 3/4" bit and it handled it well. I'll be investing in a bigger router in the near future plus I'm looking at building my own CNC router to do stuff like this. First time working with poplar and its been easy so far. The desk is completely flat now so its on to sanding and then figuring out the stain. I'll be doing some very small epoxy repairs for knot holes but the desk is pretty much complete.

1616799751268.png


Stay tuned...
 
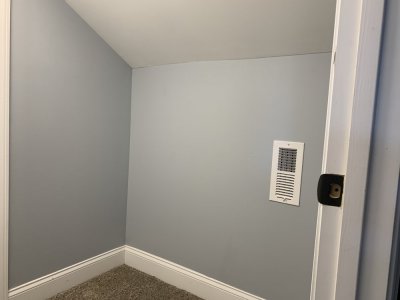
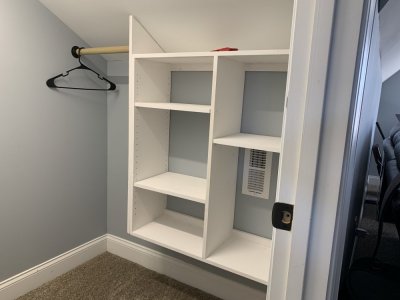
Y'all have skills, I just slap stuff together. We have a bonus room closet with a sloped roof I was tired of stuff being piled on the floor in so did this a couple weeks ago. Still need to put in some trim pieces.
 

Attachments

  • 9861DED6-8AC5-4D6F-9806-A8706C9B420F.jpeg
    9861DED6-8AC5-4D6F-9806-A8706C9B420F.jpeg
    53 KB · Views: 126
  • BB461C26-26E1-47BB-AF2E-32970E82E5E4.jpeg
    BB461C26-26E1-47BB-AF2E-32970E82E5E4.jpeg
    78.3 KB · Views: 115
Delivered the slab desk and shelves to the client last week. She loved everything. Did some epoxy repair work with Ecopoxy and it came out fantastic.

1618933296261.png
1618933304726.png


She's already asking for a matching coffee table and I just so happen to have a matching 4' piece from the same slab. I also started a FB/IG page "Scrap Cuts Woodworking". Follow along if you like.
 
Busier then ever. Had a new client reach out through IG and wanted an outdoor brewery table out of cedar. Specifically 4"x6" x 10' cedar:eek:

Table is together, still waiting on the call from the sawmill to pick up the lumber for the 4 matching benches. Legs are built out of 2x2x.083. I inset some C channel along the underside of the table to provide some mechanical strength to the glue joints. Table weighs in around 380 without the legs.

1622645548335.png


1622645561379.png


Waiting on some epoxy to finish curing, then its on to final sanding, staining, and spar varnish. Then hopefully I have time to build the benches. Table is supposed to be delivered by Fathers Day. If I can get the benches finished, that will be a bonus for her(and myself) since she added them last minute.
 
Leg's are bolted down. 12 2.5" lag bolts per leg, 2 lag bolts per board. It ain't going anywhere. Dropped the first coat of stain on the bottom this morning. To say it looks great is an understatement of the year. If the client hates it, I'll buy it back from her no questions asked. :lol:. Still waiting on a call from the mill to go get more lumber for matching benches.

1622742051695.png


I have also added a laser to my tool collection. Still learning it and the software but I think I'll get a ton of use out of it. It will be used a lot for burning my logo, cutting boards etc. I also have an attachment to engrave metal tumblers, wine glasses etc but I have not tried anything yet. I know it will also etch metal so custom engravings on guns etc is a future possibility

1622742167407.png
 
Laser took a dump last week. Motherboard went faulty so it burned at 100% constantly. A quick email to Ortur and they sent a brand new one and a grounding kit. Got it installed today and its running flawlessly. Just need to tweak some more settings and play around with speed/power settings.

1623264861257.png


Still planning on delivering the table and benches by the 19th. I water popped the table last night before sanding it to 320 for final. This thing is going to be amazing....and heavy as shit. There will also be 4 matching benches that measure 1.5'x5'. Legs are built and painted, all benches are joined together. Just need to sand, route, and finish.

1623264966777.png


My entire shop is covered in cedar shavings and I have piles and piles of cedar shavings outside from planing/sawing etc. :lol:
 
My entire shop is covered in cedar shavings and I have piles and piles of cedar shavings outside from planing/sawing etc. :lol:
Bag that stuff up and sell it!
 
Table is just about ready. Took 2 hours to handrub the stain in and then apply two coats of paste wax. I think I want to put one more coat of wax on it and then it will be 100% complete. I just got done staining the benches and they will receive the same treatment as the table.

Plopped the laser down on the table, took an hour centering everything and let the laser burn for close to 4 hours. Logo measures around 17" across and I think it came out great. Super nervous since if it messed up I would have had to resand the table.

Delivery is this Saturday. I potentially already have another order for a similar table lined up as some spy shots from a buddy got posted on FB.

1623690831403.png


1623690863802.png


1623690947106.png


I also got a rotary attachment for the laser and have been playing around with it. Lots more settings to configure to get the optimal burn and image. The laser isn't strong enough to engrave glass, however by painting the glass with flat black paint, the laser can be focused enough to etch. Lots of cheap glasses have already been sacrificed...

This one took about 8 mins to burn since its just the outline. As you can see the spacing is a bit off but I'm now burning a full filled image with correct spacing on a test glass. It should take about an hour and 15 mins.

1623691085429.png


I need to get some cheap yeti style tumblers to play around with as well. Lots more coming
 
Table is just about ready. Took 2 hours to handrub the stain in and then apply two coats of paste wax. I think I want to put one more coat of wax on it and then it will be 100% complete. I just got done staining the benches and they will receive the same treatment as the table.

Plopped the laser down on the table, took an hour centering everything and let the laser burn for close to 4 hours. Logo measures around 17" across and I think it came out great. Super nervous since if it messed up I would have had to resand the table.

Delivery is this Saturday. I potentially already have another order for a similar table lined up as some spy shots from a buddy got posted on FB.

View attachment 349485

View attachment 349486

View attachment 349487

I also got a rotary attachment for the laser and have been playing around with it. Lots more settings to configure to get the optimal burn and image. The laser isn't strong enough to engrave glass, however by painting the glass with flat black paint, the laser can be focused enough to etch. Lots of cheap glasses have already been sacrificed...

This one took about 8 mins to burn since its just the outline. As you can see the spacing is a bit off but I'm now burning a full filled image with correct spacing on a test glass. It should take about an hour and 15 mins.

View attachment 349488

I need to get some cheap yeti style tumblers to play around with as well. Lots more coming
Amazing work, no matter what the product is I always love seeing someone devoted to making a quality product.
 
@YJJPWrangler...glad you posted that you got a laser that wasn’t a glowforge. My wife wants one to add to her crafting tool inventory and < $400 sounds way more appealing than $4000. :eek:

Love seeing the work you’ve been doing...keep posting!
 
@jcramsey so far I've been really happy with the Ortur. Yes its a chinese based laser however they have exceptional customer service and stand behind their product. There is also a very active FB group for Ortur users that has answered almost all of my questions. I'm running Lightburn to control the laser and the program is amazing(and only $40 for a lifetime license).

Ortur just released their 20w Lasermaster 2 Pro which has higher stepper speeds than the one I have and has some additional addons to make the laser more user friendly. All for around $400. I've only had it a few weeks now and still getting the hang of it.
 
Table is just about ready. Took 2 hours to handrub the stain in and then apply two coats of paste wax. I think I want to put one more coat of wax on it and then it will be 100% complete. I just got done staining the benches and they will receive the same treatment as the table.

Plopped the laser down on the table, took an hour centering everything and let the laser burn for close to 4 hours. Logo measures around 17" across and I think it came out great. Super nervous since if it messed up I would have had to resand the table.

Delivery is this Saturday. I potentially already have another order for a similar table lined up as some spy shots from a buddy got posted on FB.

View attachment 349485

View attachment 349486

View attachment 349487

I also got a rotary attachment for the laser and have been playing around with it. Lots more settings to configure to get the optimal burn and image. The laser isn't strong enough to engrave glass, however by painting the glass with flat black paint, the laser can be focused enough to etch. Lots of cheap glasses have already been sacrificed...

This one took about 8 mins to burn since its just the outline. As you can see the spacing is a bit off but I'm now burning a full filled image with correct spacing on a test glass. It should take about an hour and 15 mins.

View attachment 349488

I need to get some cheap yeti style tumblers to play around with as well. Lots more coming

Is the glass etching only through the paint layer? IE, continual dishwasher use will likely peel/flake it over time?
 
@paradisePWoffrd I'm not entirely sure. I know the black paint "helps" the laser focus on the glass surface itself, instead of shining through. I did hand wash the glasses and nothing came off. I'm sure that repeated washings in the dishwasher might start flaking it off but this is the first glasses I've engraved so I don't have any history with them. This logo took around 20 mins to fully engrave. I still need to play around with dithering options to get the best look. A CO2 laser would be the ideal choice for stuff like this but then you are looking at $4k plus....

1623779106628.png
 
@paradisePWoffrd I'm not entirely sure. I know the black paint "helps" the laser focus on the glass surface itself, instead of shining through. I did hand wash the glasses and nothing came off. I'm sure that repeated washings in the dishwasher might start flaking it off but this is the first glasses I've engraved so I don't have any history with them. This logo took around 20 mins to fully engrave. I still need to play around with dithering options to get the best look. A CO2 laser would be the ideal choice for stuff like this but then you are looking at $4k plus....

View attachment 349631
very cool. Wonder if putting a black/dark paper or something inside the glass would help vs painting it? Just speculating as I dont really know what the laser needs to work well.
 
@paradisePWoffrd it might work, definitely something to play with. I usually put a small can of stain inside the glass to give it some extra weight on the rollers and that seems to work really well. Plus black spray paint is cheap and wipes off easily with acetone.
 
Delivered and installed. I used just about every strap I owned, every moving blanket(plus some blankets I stole from the wife), lots of cardboard, and even built corner guards for the straps.

1624285079129.png


Installed in its new home.

1624285089050.png


1624285100357.png


The husband was completely blown away and the wife was ecstatic. I have a feeling I will be building more of these.

Onto the next project now...
 
Delivered and installed. I used just about every strap I owned, every moving blanket(plus some blankets I stole from the wife), lots of cardboard, and even built corner guards for the straps.

View attachment 350108

Installed in its new home.

View attachment 350109

View attachment 350110

The husband was completely blown away and the wife was ecstatic. I have a feeling I will be building more of these.

Onto the next project now...
Are you using a router sled to flatten the slabs/tops?
 
Are you using a router sled to flatten the slabs/tops?
I have used a router sled in the past on slabs. I was able to buy this lumber roughly dimensioned at 4"x6". I ran all of them through a planer to get a uniform size and used a hand plane to square up joints etc. I am planning on building a much beefier router sled that uses roller bushings and metal pipe for the guides. I just need to get a higher powered router as my Bosch 1.25 hp isn't really up to the job. I'm looking at the 3.5hp porter cable and a 2" surfacing bit to do all my slab flattening work. I'm also in the market for a jointer as well which will greatly increase my productivity.
 
Back
Top