93 XJ build

Rear Tire Carrier
After stashing my spare in my trunk area behind that passenger seat since the beginning of time it was appropriate that I needed a tire carrier. With no real plans for this little project I spent a lot of time just thinking of mounting. The rest was easy. I never plan on ditching my trailer hitch so I mounted it on that. That carries all of the weight and it holds just fine. I did not have time to finish some mounts to keep it from wiggling front to rear, but it has held well so far. Pretty basic and will continue to add the finishing touches once I get back from school mid December. Best part is the metal was free!​
ai978.photobucket.com_albums_ae262_1tonoffun_7C20F9D6_265A_4A4C_A6AA_C2FAEAC23E3B_zpscclwoj20.jpg
ai978.photobucket.com_albums_ae262_1tonoffun_76CD534D_C220_4926_AD72_4D811B6ACD07_zps1ugkik8w.jpg
ai978.photobucket.com_albums_ae262_1tonoffun_C4AF93C8_6265_4CFA_BF78_F417FBB37F0F_zpsofsqmmvw.jpg
ai978.photobucket.com_albums_ae262_1tonoffun_B10C7C9D_59B9_4BA6_A1BF_1B6D69FDB6DC_zpsocizrala.jpg
ai978.photobucket.com_albums_ae262_1tonoffun_4C79B81F_BB58_4430_91A4_19AAF89B36C0_zpsrrjma4b6.jpg
ai978.photobucket.com_albums_ae262_1tonoffun_7BDD50A3_4445_4C67_A85F_876555B6C1D6_zpsxbcacf1k.jpg
ai978.photobucket.com_albums_ae262_1tonoffun_8DC50CF8_F778_43F3_A5E6_7398C973BC47_zps9wdrxlg6.jpg
 
Looks good, might wanna relocate the tag though to avoid getting pulled.
 
Looks good, might wanna relocate the tag though to avoid getting pulled.

In my opinion I am going to see how far it goes until then. From a drivers perspective the only part of the tag you cant see is the stickers on the top of the tag. I am too lazy to relocate a light over the tag so I may just see how low I can get the tag under the existing light. So far no problems hahah
 
Recent Shot of the rear tire carrier and new FireStik
ai978.photobucket.com_albums_ae262_1tonoffun_jeep_F0207719_DDE3beeed6e7b1dbe6cb163546bac035e74.jpg

Also got my new shift linkage installed. It came with a lot of nice hardware and special ordered it to have a lot of adjustability. Problem was the heims were wayyy to long and had to chop. I emailed the company about the heim problem but never herd back but I like it.

ai978.photobucket.com_albums_ae262_1tonoffun_jeep_2643DDA0_E02101af9bb17f0d9a7876d195885fce883.jpg

ai978.photobucket.com_albums_ae262_1tonoffun_jeep_D76C8929_20A93afabce84b036cec9d0a466a5589586.jpg

ai978.photobucket.com_albums_ae262_1tonoffun_jeep_C8845176_0741adcdddab918165a21d2dc839919658d.jpg
 
Last edited:
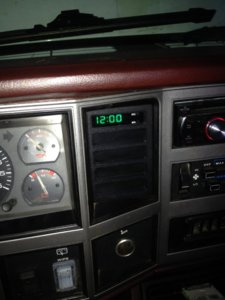
Not a lot has been happening to this jeep. Been really tight on money to do anything substantial. I did find a cool dash clock at the junkyard that I had wired in.

I discovered the idea from GoJeep. He has a lot of useful information that can be taken advantage of.

But I wish there were more displays on the right side of the dash.

IMG_1815.JPG
 
Polishing The Dana 30 (Just a Tad)
Well the dana 30 is officially staying for good now. I pulled it all out to give it a good refresh. Before it all goes back in it will be trussed, alloy axle seals, and new ball joints with a fresh coat of paint on it. The truss is probably overkill for a jeep that drives out to the trails but some day it may see 35s in the later future. Plus with 4.56 gears already installed I don't want to have to swap housings and set up gears again if this one goes all wet noodle on me (1 in a million).

Before I get into it I want to thank @stinkbomb for the advice and encouragement to tackle the truss welding with a 110v welder. I was definitely hesitant on trying to burn it all in and it fall apart after the first trip but I feel good about how it. Anyways some pictures.....classic messy single car garage floor

ai978.photobucket.com_albums_ae262_1tonoffun_mobile_88C34F5D_78c82ccfb7133f1661ac854bc305677b9.jpg

Test Fit

ai978.photobucket.com_albums_ae262_1tonoffun_mobile_C76EFE29_Dcb04df627c5469a205a29786d3968b9e.jpg

Trying to slow cool the cast section with some aluminum foil and old towels

ai978.photobucket.com_albums_ae262_1tonoffun_mobile_78D54FE4_9a2fef0acbb71daa03804940b34cb1ce8.jpg

ai978.photobucket.com_albums_ae262_1tonoffun_mobile_E2D617F2_63c897df8e78ac12a2af300e4457d7093.jpg

Upper control arm mount reattached and entire axle primed

ai978.photobucket.com_albums_ae262_1tonoffun_mobile_7FEDDCED_483d5cc4497d84c015c4df2e913b79405.jpg

And finally some actual bling :cool:

Fingers crossed the axle did not warp. I spread the welding across two days so I am pretty sure it is still strait as an arrow. Hopefully it will be under the XJ in a few days before I go back for my last semester of college. Post more later.

 
Finish & Install
The axle was finally finished with pressing in ball joints and upper bushings. The alloy axle seals were sealed in with gasket maker and greased. Anyways I am happy with the results and artec making a truss affordable for someone with a welder. I will be cycling the suspension well before I hit the trails. I may need to extend my bumpstops if the truss tries to get into the oil pan.

My bushings in the lower RE control arms are pretty well used up so it won't be too much longer until I see get around to fabing up some new control arms. Hopefully some mid arms since I don't plan on lifting the jeep any higher. Anyways it turned out great.

upload_2015-1-10_18-12-32.png


upload_2015-1-10_18-12-44.png


upload_2015-1-10_18-12-58.png


upload_2015-1-10_18-13-15.png


upload_2015-1-10_18-13-27.png
 
Rear Suspension Upgrade
So after about five years the rear springs and add a leaf are beginning to look a little worn out; especially after the rear tire carrier was added. After lots of research on NAXJA I found a lot of possibilities for a rear spring pack without breaking the bank. Before heading to the junk yard I discovered that early 90s dodge ram vans have the same measurement from front eye to centering pin as the stock xj leafs. Also the measurement from the center pin to rear eye is a inch or so longer than stock giving me a better shackle angle hopefully. Paired with that I grabbed some rear shackles from a mid 90s 1/2 ton chevy.

Lastly were some better larger bumpstops. Searching around the yard I spotted some pretty cool rear bump stops from a late 90s izuzu rodeo that look like they will perform great. For the front bumpstops I grabbed some off of a KIA minivan.

Step one will be getting all of the rust off of the van leafs. Hopefully a wire wheel will be enough then clean and repaint them. The anti friction pads look pretty good so those will hopefully be salvaged. Then staging what I think what combo will provide the best lift. I don't know if the AAL will be used or not. I will not mind a little bit stiffer spring since I have accumulated a lot of weight in the rear with the spare parts and tire carrier. Based on the thickness of the van leafs compared to the xj leaf I don't think it will take too many leafs to get the weight bearing capacity I want.

Heading off to my last semester of college in a day so this task will have to wait for a little while.

upload_2015-1-11_22-40-34.png


upload_2015-1-11_22-40-48.png


upload_2015-1-11_22-41-6.png

Chevy Half Ton Shackle, Good for 1.5" of lift
upload_2015-1-11_22-41-19.png


Front Eye
upload_2015-1-11_22-41-33.png
 
Crossmember Build

After doing a lot of searching online for some good ideas for some skid protection I decided to build a crossmember that can take a beating and help me mount my tcase mounted parking brake(more on that later). The main member is 2x5x3/16 metal. I had to notch out the area for the front ds yoke and a little for the exhaust pipe. I did not remember to measure the clearance before and after but I think it pulled the mount and tcase up an inch or so. Thanks to @spraypaintman for lending me a hand with the bender and making my life a little easier with the skid plates. I will have to get some more pictures of it skinned with some metal and mounted later but this is it so far.

IMG_2179.JPG
IMG_2177.jpg
IMG_2178.JPG
 
Damn. Not how I wanted to start summer. Already have a replacement except I could only find an internal slave setup trans.
ai978.photobucket.com_albums_ae262_1tonoffun_jeep_5C544E92_6509e83a80bd12f3cc2b2d594f93a736bf1.jpg

However the new leaf pack I made in the back works great. I used a dodge 3/4 van main to make the spring longer in the back. Research it if your shackle angle is bad and do not want to buy relocation boxes. Also paired that spring with a 1/2 ton chevy shackle. Raised the shock mounts to the axle tube and added a small truss to the 8.25 while it was out.
ai978.photobucket.com_albums_ae262_1tonoffun_jeep_053825CB_339730b00673e4e46ef9e5e7f38a29f4ea1.jpg
ai978.photobucket.com_albums_ae262_1tonoffun_jeep_2D568259_8BAdb04c071c023cbe5213d5c1cc5f83e3f.jpg
ai978.photobucket.com_albums_ae262_1tonoffun_jeep_9B6406CC_E914c1d2a0310e1fdeaa086ef5e97bd2615.jpg
 

Attachments

  • IMG_0111.JPG
    IMG_0111.JPG
    118.7 KB · Views: 426
Last edited:
Trans Replacement
internal Slave replacement trans with 90k on it. Filled it with pennzoil syncromesh and it shifts like butter. My old trans was in terrible shape now that I have this one installed. Also this replacement came out of a wrangler I assume because now the transfer case is clocked higher in between the rails of the unibody :driver:

ai978.photobucket.com_albums_ae262_1tonoffun_jeep_06B7B0CD_4E5dc5de2130cd2101b714c248ef73df55b.jpg

ai978.photobucket.com_albums_ae262_1tonoffun_jeep_CE5C61FD_7C2fb0a5ee66dada54599e5ec8cd17a1b06.jpg

ai978.photobucket.com_albums_ae262_1tonoffun_jeep_5731B267_030aa70e8fa8b6789e9338945f6fa76e7d3.jpg
 
nice build and love the crossmember with the added skids. ? for that crossmember...i have one just for my long arms but thought to make another for the trans and i used 2x4x3/16 as well...does your stock tranny mount bolt through top of the 2x4 or is it notched and bolted through in the bottom...can't tell from picture.
 
oh yeah, kick ass work on the D30 too!!!
 
Jeep Storage

For a while I had just thrown stuff in the back like spares and tools along with a 40mm can filled with loose stuff. After riding harlan for a weekend all of the bumping and steep hills made a mess out of the back of the jeep. I picked up another 40mm can and a 50 cal can to help keep the mess down. They are impossible to keep from rolling around so I picked up some metal to make something to keep them in place.

One 40mm can is for loose items and the second an is to fit all of the trail fix fluids I may need. The 50 cal is for my air compressor which fits in there nicely. It is nice that all cans are sealed with a rubber gasket to keep any spills of smells contained. It fits in the back nicely and I need to decide how I want to secure the entire set up to the floor.

ai978.photobucket.com_albums_ae262_1tonoffun_jeep_8E1AFADD_298e854de0fedf514b44fe11dc55bcbc0ed.jpg

ai978.photobucket.com_albums_ae262_1tonoffun_jeep_32A930EE_322d7f0999ae4cd3281357c86307568e3ac.jpg

ai978.photobucket.com_albums_ae262_1tonoffun_jeep_CA3AFADC_524c47d5089de8275e2a3b3b2d7c6688abe.jpg

ai978.photobucket.com_albums_ae262_1tonoffun_jeep_BC11EFC2_71B26da278090d9aad8ecc565010d8eb32f.jpg
 
Got to travel out to Harlan for my second time there. This time there wasn't a drop of rain which was nice but man was it dusty. Also brought my Dad's Disco II for its maiden voyage after some 33s and more lift. Was more of a adventuring time out in the mountain there since the first time I went there I was mainly in one area of the park the whole time. Next time I go back I want to try railbed and a few other trails. Of course I will be be trying those when I upgrade to 35s. Also doing the entire lower rock garden would be another goal of mine.

Here are a few good shots
ai978.photobucket.com_albums_ae262_1tonoffun_Harlan_DSC02669_zpsejuuie41.jpg

ai978.photobucket.com_albums_ae262_1tonoffun_Harlan_DSC02666_zpsviqcbzba.jpg

ai978.photobucket.com_albums_ae262_1tonoffun_Harlan_DSC02661_zpsidwod6eb.jpg

Goldfish Pond
ai978.photobucket.com_albums_ae262_1tonoffun_Harlan_DSC02700_zpsdbkehpiz.jpg

ai978.photobucket.com_albums_ae262_1tonoffun_Harlan_DSC02681_zpsnnetqkxw.jpg
 
Yes Lawd!
Finally have some updates for the XJ.

After two consecutive trips to Harlan with another trip to URE my original trac bar that had been on there for over 22 years gave in. I had the scariest moment of death wobble at 55 mph when I thought the axle was going to break out from under me.

Now that I have a full paying job the upgrades are incoming. First was a RE double shear trac bar and bracket with a homemade brace from rail to rail.

To get closer to the 35s I will be eventually mounting I picked up (5) 17" Moab wheels from some craigslist for a bargain. Some G2 lug adapters also found their way to my doorstep shortly after.

ai978.photobucket.com_albums_ae262_1tonoffun_Mobile_20Uploads_e1ec0fda280bb64130db0df0766a2333.jpg

ai978.photobucket.com_albums_ae262_1tonoffun_Mobile_20Uploads_9c5ebf5ddc79f0992cf53c2bd4f211d7.jpg

I was still fighting a shimy/death wobble and figured some of the TREs may be shot or the steering shaft was loose somewhere. As expected the TREs on the original drag link were loose and the steering shaft had a lot of slop in the rubber bushing.

Ordered a new steering shaft from 4WheelParts because they just opened a store front here in Virginia Beach. And for black friday I ordered a 1 ton steering over the knuckle set up from RuffStuff.

ai978.photobucket.com_albums_ae262_1tonoffun_Mobile_20Uploads_39bf84b5b3b9fa8ed76d0ba41e576ff2.jpg

ai978.photobucket.com_albums_ae262_1tonoffun_Mobile_20Uploads_5fe8d43f1ee33962e4731c688cbae096.jpg
 
OTK STEERING
I have all of the parts ready for my over the knuckle steering conversion using ruffstuff steering 1 ton kit and an artec industries raised trac bar bracket with a modified rubicon express trac bar. This will be the last modification before I start saving up for 35s.

Tie rod is welded, sway bar brackets cut, and coil buckets trimmed. I messed up with one of my bungs and had to cut it off so another one is on the way from ruff stuff.

ai978.photobucket.com_albums_ae262_1tonoffun_Mobile_20Uploads_c33a6ab6c2d6aaaaa7fb2d55452b91af.jpg

I will be welding with my stick welder for the first time to attach the trac bar bracket and shorten my trac bar. Fingers crossed it turns out decent.

Stay tuned....​
 
Back
Top