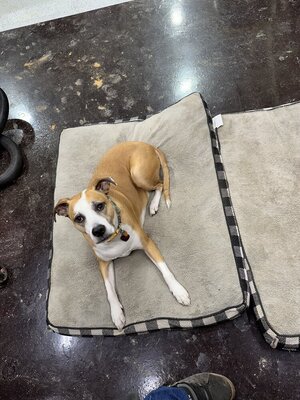
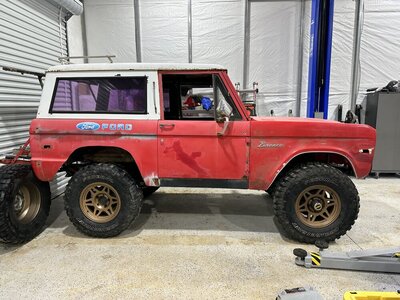
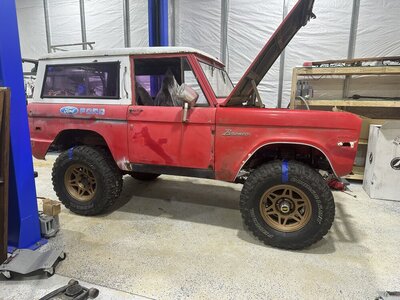
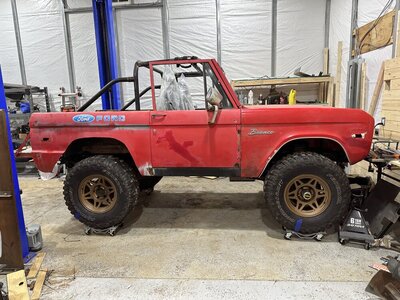
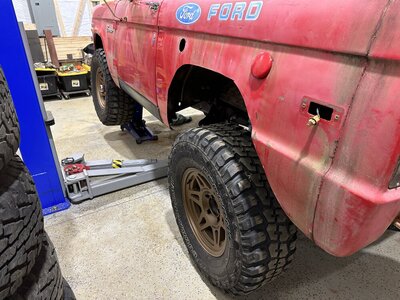
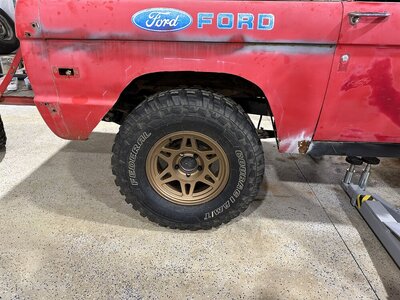
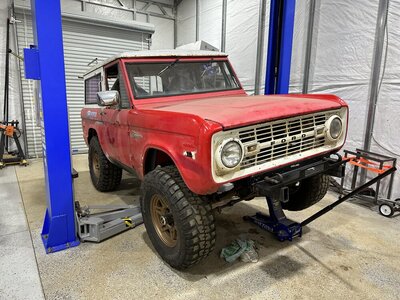
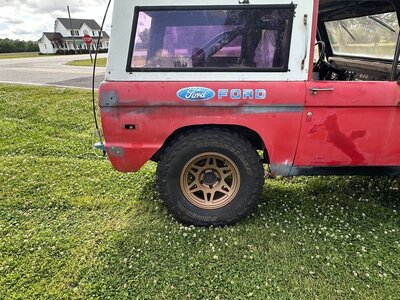
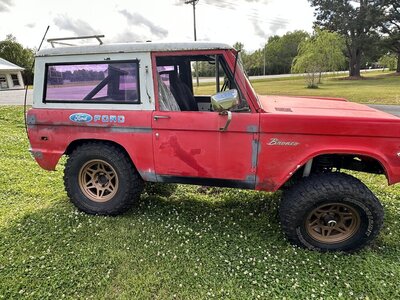
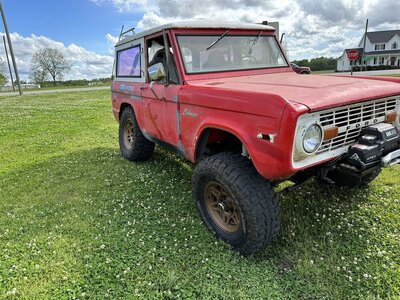
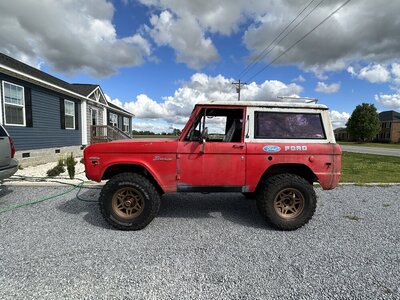
Out in the shop with the shop pup. Got the tires seated with the help of a friend. Finally got them mounted so I could get a better look. Front fenders need to be trimmed for the flares but it’s good to see how things are looking clearance-wise. Got some work to do in the shop finishing more of the walls and wiring in the welder plug and an air compressor plug. Coming along slowly though.


You are using an out of date browser. It may not display this or other websites correctly.
You should upgrade or use an alternative browser.
You should upgrade or use an alternative browser.
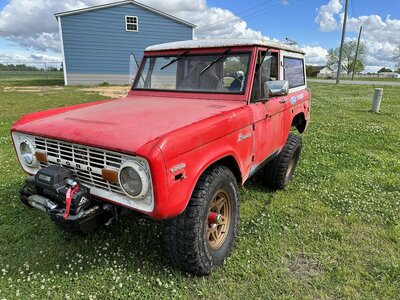
Bronco #2 The wheeler
- Thread starter YJKrawlin
- Start date
Been working on the bronco a little this week. Fabbed up a new removable transmission cover. Still tinkering with it and may adjust it a little but looking good so far. Got the top of the engine put back together, fuel tank back in and plumbed the fuel system. Trying to figure out an affordable steering solution now. I plan to do P/S in the future but don't have the extra money laying around so I am working on how to get the manual steering back together for at least 1 or 2 wheeling trips. I'm missing all of the bell linkage pieces for the steering shaft so i'm tossing around the idea of buying those pieces or buying a universal joint that will convert from the steering shaft to the spline of the steering box. Both will cost about the same by the time I buy the pieces I need (from what I can tell i'm missing, there could be more). Not sure which route I should go. Need to get the engine to TDC and drop the distributor in, finish replacing the last panel in the cab and then I can get started on wiring the truck. Slow but steady progress.
Attachments
paradisePWoffrd
Recovering Project Junkie
- Joined
- Nov 5, 2005
- Location
- Newton, NC
Do you know how many turns your manual box is? I might be interested in it, after you convert to PS.
I have no idea which one it is. Once I get it back on the truck I will see if I can get a count on the turns, lock to lock.Do you know how many turns your manual box is? I might be interested in it, after you convert to PS.
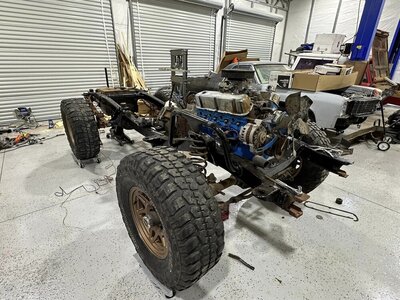
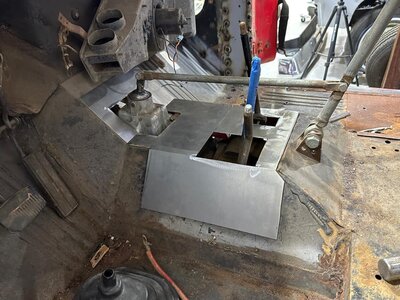
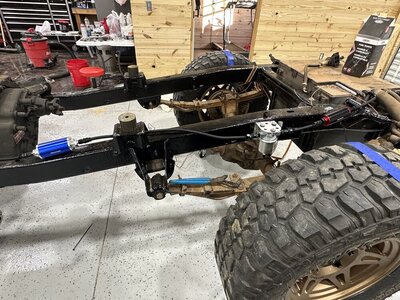
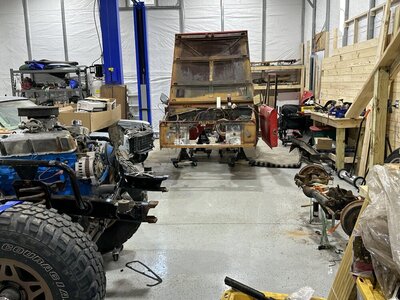
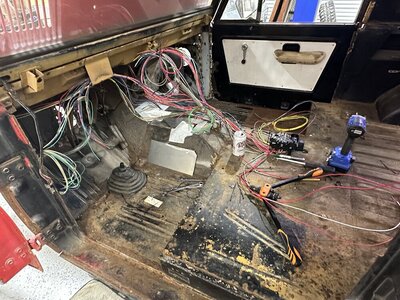
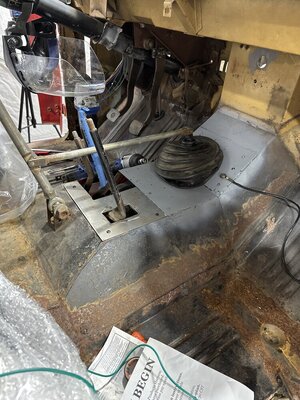
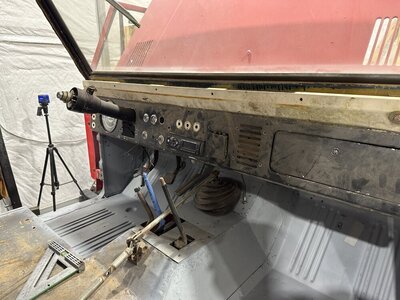
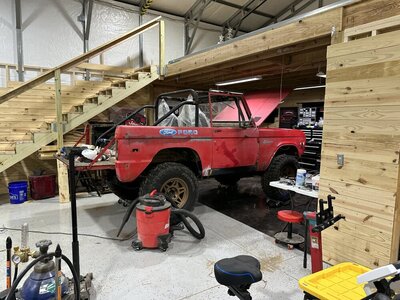
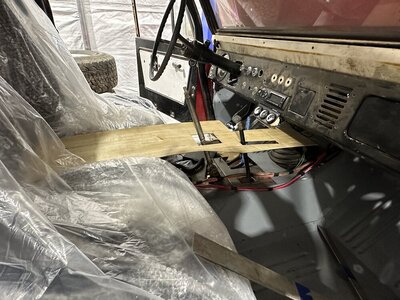
While I’m dealing with some air compressor woes, holding me back from replacing the last sheet metal panel, I decided to start laying out the wiring harness and putting connectors on it to make it easier to disassemble later on. Got most of it laid out and a small pile of extra runs that can be used later. Decided to mount the fuse panel in between the seats where I can cover it with a center console but still be able to access it without climbing under the dash. Found a picture online and wouldn’t mind doing something similar if I can extend the shifters in a usable way for the transfer cases. We will see what I come up with, no rush on that project though. Jacked the frame up to see if I could count the rotation of the pinion to get an idea of gear ratio. With one tire spinning, 2 whole rotations at the tire was a little more than 3.5 rotations at the yoke so I’m thinking 3:55 ratio front and rear. Not great but at least they are the same and should be usable in the meantime. Plenty of gearing in the trans and transfer cases to make up the difference. Got the body off the lift and onto some furniture dollies with Jack stands so I could work around it easier when wiring. Got the fuel system plumbed yesterday. I know the pump should be lower but this is lowest I could get it without it being in the way. Ed’s bronco had it about in the same spot for years so I don’t think it will be much of an issue. Also replaced the output seals in the Dana 20 so I can start filling stuff with oil soon.
Attachments
-
 80D918F6-0CFD-4056-A33A-6B8FDCAFDE24.jpeg137.7 KB · Views: 244
 -
 41B053E0-FE9D-4B7A-A476-D69B941FDEF4.jpeg231.7 KB · Views: 261
 -
 8F7EE187-C354-4ED9-AA1E-1F2DBBEF9855.jpeg228.1 KB · Views: 230
 -
 7DF25058-B22E-4E54-9F30-4D1CC2C01672.jpeg234.9 KB · Views: 242
 -
 BB63A9A1-E6D8-4295-B069-746604F1B9D9.jpeg222.2 KB · Views: 250
 -
 1F06B688-413D-4AFA-BAF8-77F79E64EB26.jpeg214.4 KB · Views: 247
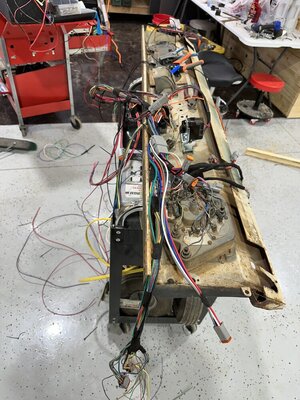
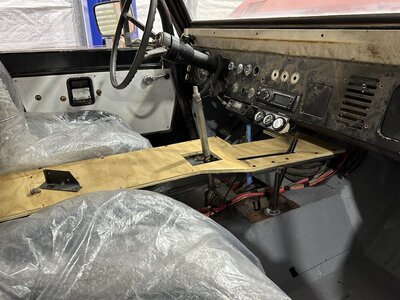
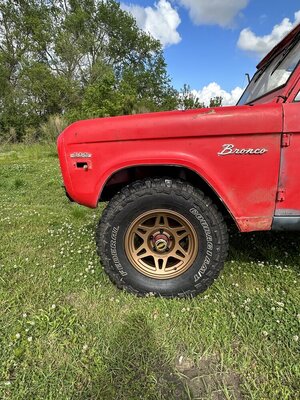
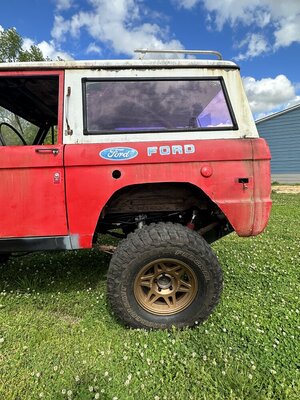
Been putting in some hours this week in the shop getting the main trunk of the harness routed and terminated correctly. Replace the last kicker panel, not my best work but plenty of welds to hold it in place. I may buy some panel bonding adhesive to give myself some reassurance. Stick welding sheet metal is definitely not fun. I do not recommend. Got the floor cleaned up, patched the transmission hole since that will be a permanent panel and riv nutted the case panel in place. Drove out to Charlotte after I got off Sunday morning to pick up some bronco parts from @snipes243. Great dude, got some lift coils for the front to get rid of the spring spreader lift that was on there. It sits mostly even now, the rear might sit just a hair lower. Little bit picky stuff here and there to be done, but the brunt of it is, driveshafts, brakes (booster, mc, all new lines and probably rear wheel cylinders while I’m in there), and headers. I made the harness as easy to remove as possible so that I could pull the dash with ease, the harness with ease, both together if I wanted, just a component, etc. without having to pull every single thing out of the truck. Need to go through and write out a wire diagram chart for the truck before I seal it up any further. In a holding pattern as I finish up the wiring, hoping to save up the cash for the headers and brakes soon then one final purchase for driveshafts.
Attachments
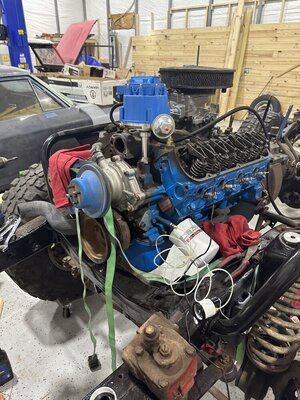
Spent the past couple days working on a wiring diagram, just need to go and record my pinouts now. Today I filled her with oil and primed the oil pump, solid 60 PSI. The priming tool didn't fit correctly so I ended up scavenging the points distributor to make a prime tool. Slapped the HEI distributor in to make sure it was going to clear the heater fitting and temp sender (the 302 in the big bronco had that issue). Everything seemed to clear, with the exception of the fuel line on the front of the carb hitting the cap tie downs so I need to rotate it or replace the 45 with a 90. Been working on trying to get the track bar off the dana 30 to see if it will be the right angle for now or if I need to invest in the drop pitman arm and adjustable track bar right away. (Still trying to save the budget a little). Coming along slowly, trying to keep from getting burned out. The cost of these last few steps is a bit of a bummer but we will get there eventually. On a side note, the lift has been great at this point to check clearances, route wires, etc, and then still be able to get close to the engine without being underneath or crawling all over the core support. So glad to have one finally.
Attachments
Getting ever closer to cranking it up for the first time to make sure everything sounds like it’s working fine. Picked up a cage for it the other day, nothing amazing but better than the hardtop that could barely support it’s own structure. I had kept the hardtop on to try to maintain the trucks shape while the body was off (and it barely did that). Got the rear lights and fuel wiring done. Finishing up the headlight wiring (some of the wiring is a bit confusing, a lot of piggybacking and grounding off of other fixtures instead of separate ground wires but it’s coming along). Made a spacer for the alternator and a bracket to repair/replace the factory tray for the battery. Simply a plate that I could bolt to what was left of the original that a plastic tray could then bolt to. Nothing amazing but enough to keep a battery in place. Got the front end bolted together with a few rivnuts to replace speed clips and hard to reach nuts. Mocked up the flares for the front but couldn’t quite tell exactly how they needed to go on (just didn’t seem to mold to the body very well). They are fiberglass so I didn’t push them too hard, I may need to end up getting some of the rubber/poly style ones in the future if these don’t seem to work out. All in all not much left, buttoning things up and still need brakes/driveshafts but hoping to fire it up and check how it sounds this week if all goes well.
Attachments
Sometimes you just want to kick back and watch tv while you wrench. Got the cage pushed into place and installed with some flat washers. Need to make some sandwhich plates. But this will work for the time being. Got the distributor dropped in today and once I pick up some headers this weekend I’ll be ready to fire it up. Had to troubleshoot some ignition switch issues today. Trouble getting 2 large wires on the ignition switch caused them to pull out. Replaced it and tested the fuel pump, lights etc. gotta track down why my stereo isn’t working (it’s cheap and could just be dead) but it’s getting there. No leaks seen on the fuel system so far. Once the headers are on next week I’ll be shooting for a first crank to set the timing and tune the carb. Then it will be on to brakes and driveshafts. I want to run full Teflon braided hoses for brakes but to save costs I may end up just running some NIcopp lines to get by. Trying to keep in mind the goal isn’t a perfect trail rig, just something to wheel and build as I go. She’s coming along.
Attachments
Been working on the bronco some this week. Finally got the distributor in and was working on getting the rest of the wiring done. After that got wrapped up, I wanted to check to make sure the ignition worked like it should since the replacement I got sheared the locating tabs and I was still using the factory switch. After troubleshooting some loose wires, the pins all fell out of the lock cylinder. After replacing that the rock auto starter turned the engine over 1/4 of a rotation and locked up. Sent that back and got a new high torque starter from a 93 f150. Rewired the solenoid to work with the new starter and it spun up like a new truck. Found someone who wanted my factory manifolds and traded them for some long tube headers. Finagled them into place and got the spark plugs swapped and wires ran and voila! She fires up. Still have to take plenty of time to both adjust this new carb and get the timing straight but at least I’m in the right area. I see a leak that looks like it might be from the oil pan gasket but I’m not too concerned about it. It’s going to leak, or at least that’s what I keep telling myself to keep from tearing it apart again. Brakes soon and then driveshafts. Small things in between, like bleeding the cooling system, making an overflow tank and torquing the suspension. I picked up some 3” lift spring to replace the block in the rear but not sure if I’ll end up swapping them In or not yet.
Attachments
Any Carb gurus want to come out to East Nc and give me a hand getting this thing tuned right? Feel like i'm pulling my hair out. Either this carb is plumbed differently than any other MC2100 or the vacuum advance is junk on this distributor. As soon as I hook vacuum up to the supposed port that is ported (I don't think it actually is, but not 100% sure tonight), timing jumps from 13 BTDC to 35-45 BTDC. About to pull my hair out trying to figure this out. maybe tomorrow will bring calmer minds and better results.
orange150
Well-Known Member
- Joined
- Mar 20, 2005
- Location
- Fairfax City, VA
I was having issues keeping my 2150 tuned and finally bit the bullet and bought one of the cheap ones off Amazon. I’ve been very pleased with it so far
That's what I have, I can get it to idle great without vacuum advance, but having issues once I hook up the vacuum advance. But haven't been able to adjust idle/air mixture because I thought you were supposed to set that with the vacuum advance hooked up. Going to take another look at all of my vacuum ports tomorrow. Maybe i'm just connecting to the wrong port? I'm connecting to the one under the choke which is what everyone is telling me is the ported vacuum port, but it's possible they are all wrong. Just been a frustrating experience haha.I was having issues keeping my 2150 tuned and finally bit the bullet and bought one of the cheap ones off Amazon. I’ve been very pleased with it so far
orange150
Well-Known Member
- Joined
- Mar 20, 2005
- Location
- Fairfax City, VA
FWIW I plugged that connection on the carb and connected my vac advance to manifold vacuum. Might try that and see how it does?
The only thing I have plugged to my carb are fuel and PCV.
You should only plug the vac advance while setting timing.
The only thing I have plugged to my carb are fuel and PCV.
You should only plug the vac advance while setting timing.
That seems odd, I would think you would be trying to advance way too much if that was the case. I had the vacuum advance plugged to set my timing and had adjusted my carb enough to stay idling smooth while setting timing, but as soon as I hooked it up to start tuning the carb itself, the timing jumps way too far and then the engine dies. so It's going to be a time for sure working on getting it tuned, but i'm sure after a few hours of messing with it this week, i'll get it taken care of eventually.FWIW I plugged that connection on the carb and connected my vac advance to manifold vacuum. Might try that and see how it does?
The only thing I have plugged to my carb are fuel and PCV.
You should only plug the vac advance while setting timing.
Go her running good now. After rebuild the original carb and having similar issues I ended up checking and had the spark plug wires in a completely different orientation than any stock one. I don’t know how it was even idling. But got to at corrected now vacuum advance works and everything seems happy. Still need to tune vacuum and even out the idle but man I’m happy to get past this hurdle.
Attachments
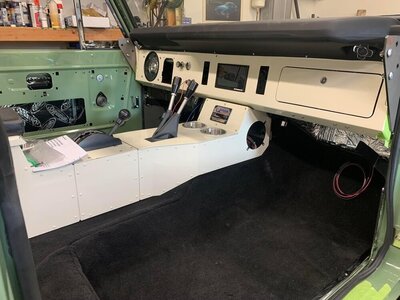
Tweaked the Vacuum, bumped up timing a few degrees and it feels pretty even now. Cranks right up. Found another leak on the oil pan I'll need to snug up but happy with where it's all at. Got the clutch rod adjusted for now, i'll probably need to tweak it a bit once it's driving but should work to begin with. Got the suspension all torqued down and some shocks installed. Still need to torque the steering and track bar. Been messing with a center console/shifter cover again just to have a place to put stuff when on the trails. I'm certain I'll end up redoing most of the shifters next year. They are just in odd places to do anything. up front. Getting close, just waiting on the wife to release some funds to finish the last bit, brakes/driveshafts. Hoping I can get it done and maybe do an early year shakedown run before veterans day which is the real finish by date.
Attachments
Been tinkering this weekend. Got my bumper/winch mount started so I will at least have recovery on the trails. Worked a little more on a center console to cover the shifters so I can put stuff down, have a drink, etc. transfered my initial design onto a thicker piece of plywood. Still need another support but happy so far. Tried to “flex” the suspension as much as I could with my jack. Still plenty of travel obviously but it was nice to see nothing obviously binding yet. Got the holes for the cab body mounts drilled, just need a second set of hands to torque it all down. Getting there slowly. Still need to pull my fuel line and replace a fitting that’s got a slow leak and might need to replace the thermostat housing due to a small leak.
Attachments
-
 230FA6E1-8352-446D-912A-678B36D59E49.jpeg174.5 KB · Views: 210
 -
 B4F2D91B-BB86-4BEB-94FF-55AE56EF0B26.jpeg194.7 KB · Views: 222
 -
 31AF5506-E4E3-4A36-A41E-E69CA179FF79.jpeg259.6 KB · Views: 221
 -
 169EBA08-0446-4F75-9C35-44932505A737.jpeg226.1 KB · Views: 198
 -
 730E24E7-B371-4D36-A479-54419F53C54C.jpeg225.4 KB · Views: 224
snipes243
Well-Known Member
- Joined
- Sep 18, 2007
- Location
- Huntersville, nc
The newer flat style coil buckets are pretty good at gaining some travel by freeing up the coil from the lower retainer. Easy to make to if you have time.Been tinkering this weekend. Got my bumper/winch mount started so I will at least have recovery on the trails. Worked a little more on a center console to cover the shifters so I can put stuff down, have a drink, etc. transfered my initial design onto a thicker piece of plywood. Still need another support but happy so far. Tried to “flex” the suspension as much as I could with my jack. Still plenty of travel obviously but it was nice to see nothing obviously binding yet. Got the holes for the cab body mounts drilled, just need a second set of hands to torque it all down. Getting there slowly. Still need to pull my fuel line and replace a fitting that’s got a slow leak and might need to replace the thermostat housing due to a small leak.

Heavy Duty Lower Coil Spring Retainers, 1966-77 Ford Bronco, Pair
Enhance your 1966-77 Ford Bronco's performance with our Heavy Duty Lower Coil Spring Retainers. Engineered for durability and functionality, this pair of retainers ensures superior coil retention during maximum flex, preventing coils from popping loose.
 dufftuff.com
I’m guessing this allows the coil to float a little similar to wranglers?The newer flat style coil buckets are pretty good at gaining some travel by freeing up the coil from the lower retainer. Easy to make to if you have time.
Heavy Duty Lower Coil Spring Retainers, 1966-77 Ford Bronco, Pair
Enhance your 1966-77 Ford Bronco's performance with our Heavy Duty Lower Coil Spring Retainers. Engineered for durability and functionality, this pair of retainers ensures superior coil retention during maximum flex, preventing coils from popping loose.
snipes243
Well-Known Member
- Joined
- Sep 18, 2007
- Location
- Huntersville, nc
I’m guessing this allows the coil to float a little similar to wranglers?
No the coil is still captured on both sides. These buckets have a lip that the you rotate the coil into. Since the top retainer doesn't allow the coil to rotate, the coil can't pop out. The og lower buckets holds the whole first row of the coil. The newer style essintially allows the coil to pivot in the bucket which gains a little extra flex as the axle travels. They are also stronger the original bucket are known to bend under hard use.
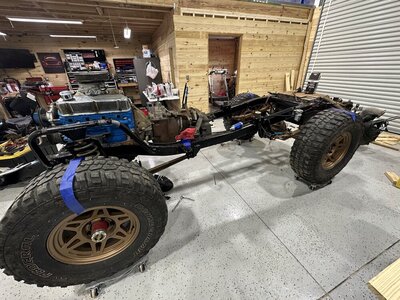
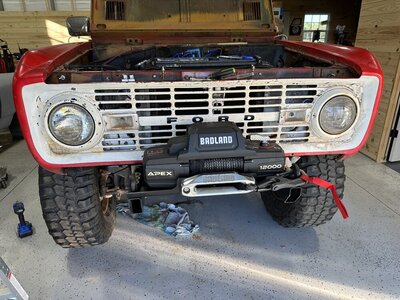
Picked up an Apex winch at HF on sale the other day so that I at least had some recovery options on the trails. Planning to do a shakedown run at the end of May for memorial day. Buttoned up the coolant leak I was fighting with on the thermostat housing. Got the clutch adjusted. The wife cleared me to spend some money on the brake parts/driveshafts/tow pig, so going to be a busy couple months throwing everything together. Brake booster and wheel cylinders are coming this week, Will give me a chance to pull the center section and replace the front diff cover, finally going to install the lube locker gaskets we got a few months back. I'll be ordering the lines and fittings this weekend to start working on running all of that next week. Then week after that I will be dropping the driveshafts off at the driveshaft shop to be shortened/repaired. All while working on the tow rigs brakes/tires/brake controller. Coming along though.
Attachments
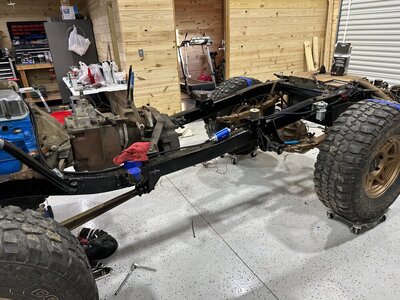
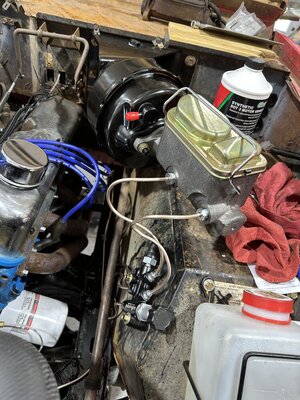
Getting close to the finish line on the Bronco. Got my power brake booster installed and all my brake lines flared and installed. Still working out the kinks and may need to reflare a few of the lines if they don't seat with an extra turn or 2. Driveshafts just got finished so I need to swing through and pick them up. Even with the leaks I should be able to pull the bronco out and putt around the yard with it, check the drivetrain out and see if there's anything that stands out as an issue right away.
Attachments
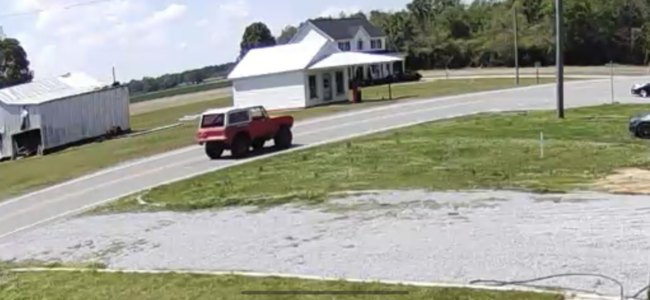
She’s mobile!-ish. For the first time in almost 10 years the bronco is moving under its own power. Tested out double low first pulling out of the garage and rolled it through the ditch beside the house to look for binding or clearance issues. Nothing to report so far. Brakes were sketchy, but vacuum isnt hooked up yet either. Pushing fluid out of the top of the rear section of the Mc, might just need some adjustment on the prop valve. Still some work to do but man this felt good!
Attachments
-
IMG_4318.MOV56.3 MB
-
 A198505E-BD9F-4B8A-9E1D-DC41F1D8096D.jpeg267.7 KB · Views: 189
 -
 3E2622AA-95D0-4914-9193-8FC4D678C26F.jpeg299.6 KB · Views: 189
 -
 0E1834DC-E134-4C6B-B1B1-4FB498663EA7.jpeg241.7 KB · Views: 218
 -
 F7C7B2FC-A6FC-41C8-B04A-437F5CD22CD6.jpeg287.8 KB · Views: 218
 -
 9450AB46-8A18-4CEB-BA74-69322815C934.jpeg259.7 KB · Views: 211
 -
 7209AA58-9942-4F83-B05D-C205716455F0.jpeg279.8 KB · Views: 219
 -
 4530CD11-80EF-4472-A0E9-C6A5B677A705.jpeg240.5 KB · Views: 204
 -
IMG_4317.MOV39.8 MB
Brakes definitely need to be truly bled now that I have the booster hooked up to vacuum. I get brakes but have a very soft pedal and no brakes until the end. After doing some research, some people just said the master cylinder cap just fits poorly on some of these reman'ed units. Threw a zip tie around the cap and seems to be sealing up properly now. Not seeing any leaks now either which is a good sign. Took a little trip about 1/8 mile up the road and turned around. The manual steering is going to be something to get used to, so is the mechanical clutch linkage. Still needs the exhaust installed and some small stuff buttoned up after the brakes are bled. Then I can work on tuning the carb more. It definitely needs it. But man this feels good!