monster 4runner

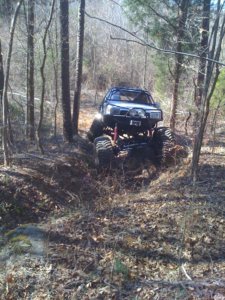
I took the 4Runner on a shakedown run at 99NCXJ's farm. I had a few small issues, but overall I am very happy.:huggy:

awww_4x4grace_com_vBulletin_attachment_php_2956962bad4830560cd0835391d23665._.jpg


awww_4x4grace_com_vBulletin_attachment_php_2b76e0beae1c1271780cb0eda81053bd._.jpg


awww_4x4grace_com_vBulletin_attachment_php_00109054a31f234849cf6804746a0173._.jpg


awww_4x4grace_com_vBulletin_attachment_php_50ae7fb947ca475e74540b5e8aee9c0b._.jpg


Even when all twisted up the rig is very stable.
awww_4x4grace_com_vBulletin_attachment_php_53b0088dfc6f712d12fd41db3b7960ea._.jpg


I had a small oil leak from the transfer case clocking ring, the compressed air system leaks somewhere, and the transfer case popped out of low range a couple of times. I hope to fix everything this weekend.
 
Thats awesome man!!!!
 
After the shakedown run we noticed that there was an oil leak at the front of the transfer case so we dropped it to determine the cause. We were nervous because we noticed that the dripping oil had aluminum flecks in it. Once we got it on the ground I found that the clocking ring mounting bolts were loose. This allowed the oil to go past the o-rings and let the aluminum clocking ring to vibrate on the mounting screws which caused the aluminum flecks. A little Lock-Tite and a torque wrench and all is good. Thank the Lord that it was nothing major.

While it was out, I reset the preload on the bearings and removed one set of detent discs to make a more positive "click" when shifting.

My 17 year old son and his 20 year old cousin tried unsuccessfully to help me to put the case back into the rig, so I had to do it all by myself. I used a couple of doubled-up 2x10s and sat the t-case in the middle and then stacked blocks alternately under each end to raise the case. It took about an hour to do, but I got it in

This morning I need to hook-up the cable shifters, rewire the speed sensor, reconnect the vent tube, and reinstall the skid plate. But first, I have do my house chores or wifey will not be happy...
 
I got several projects completed this past week. The first one was to install my on-board-air compressor system. The following pictures show the air system as well as the other things that reside behind the rear seat(left to right):
Rear axle suck down winch solenoid pack
3500 Watt (continuous) AC power inverter
2150 Amp Odyssey AGM battery
8 gallon air tank with regulator, filter dryer, oiler, and air locker solenoids mounted to the tank.
DC motor powered high volume air compressor
awww_4x4grace_com_vBulletin_attachment_php_034db681472c46a8aebc7ab8eb3b480a._.jpg


awww_4x4grace_com_vBulletin_attachment_php_33f3538e3defad8696bd9356775805c9._.jpg


I installed the CB antenna.
awww_4x4grace_com_vBulletin_attachment_php_595bf6d274a81060628ffeb5bd3d30d4._.jpg


I reinforced the 2x2 receiver to better withstand side loads by welding in two horizontal bars to keep it from being twisted off the truck during side winching. The wires hanging down from the truck have a 4-pin connector that plugs into the trailer wiring harness so that the three LED lights that are mounted below the license plate illuminate when the turn signals or brake lights are lit up on the trailer. Hopefully this will keep me from getting rear-ended again...
awww_4x4grace_com_vBulletin_attachment_php_4d43ecf6954e1ea26189e13d27617109._.jpg
 
That compressor system is really cool but now where to you put your camping gear? :)
 
That compressor system is really cool but now where to you put your camping gear? :)
I've got a back seat man!:huggy: I'm also building a storage box that bolts to the floor for my junk. You need something that keeps stuff firmly in place when you do this...
 

Attachments

  • photo[2.jpg
    photo[2.jpg
    266.1 KB · Views: 989
Hey is that the main vehicle battery or just an extra to run all the goodies you got stashed back there? If it's extra, what size cable do you have running from the isolator? (If you've got one) I ask because the power cables that came with my 2500 watt power inverter were 00 welding cable. That's what I ran for the AC unit I had in the truck, but now they aren't long enough to run clear to the back of the new 4runner where it will live. (Once I get ambitions enough to install it.)

That thing just keeps getting better and better. Well done!
 
That is the only battery, so no isolator. I ran 00 welding cable to the starter and also to the winch.
 
I just got back from RIDES of Conover. Brandon and his guys are great to work with and they have good prices to. He installed the Stauns internal beadlocks for me.

Thanks Brandon!
 
That must have been a fun job for him with the 46s.......been there, done that....lol

Glad he got you taken care of.
 
That looks like a rig made for the TTC. You'd have my vote if you entered.
 
That must have been a fun job for him with the 46s.......been there, done that....lol
Glad he got you taken care of.

Actually Scott and I installed them. The first one took more than an hour. The next three took about 30 minutes each. I can't imagine having to do it without the tire mounting machine.

Now I can drop the tire pressure down so that they will really grip the rocks.
 
I saw this rig today when i went by Rides, pics just don't do it justice.....this thing is bad.
 
go ahead and tell them about the carnage this weekend...
This past weekend YellowJeepCJ and I went to the 1st Quarter SFWDA meeting and ride in Tracy City, TN. We had a blast even though it poured rain all day long. We spent a good portion of the day fixing broken rigs, but still got in some fun trails. Early in the day we had to reattach a rearend on a 1st generation 4Runner. Next, our trail guide got hung up on a rock and destroyed his rear driveshaft so I had to drag his rig out.:driver:
It was getting late in the day and we decided to take the Parson's trail out so we followed our new trail guide up the rocky ravine. We got into the trail about a hundred yards and our guide sheared off his rear pinion. We removed his driveshaft, and since there was no way to go back down the trail, I went around him and hooked up a strap. I pulled him all the way to the top of the trail and then he got hung up on a huge boulder. I got a little heavy on the go-pedal and I discovered the weak point of my rig. I broke my left rear coilover shaft.
We used my hatchet to cut a log down to the correct length and wedged it between the frame and the axle. We then strapped the axle to the frame to lock the log in place, and drove the rig out. We had to winch the trail guide the rest of the way off of Parson's trail.

awww_4x4grace_com_vBulletin_attachment_php_1d1c63c9deb422e6c47a3aa8199094b3._.jpg


awww_4x4grace_com_vBulletin_attachment_php_22e0920524d0c3c8508de95caa76c1bb._.jpg


awww_4x4grace_com_vBulletin_attachment_php_c85bfc52942c1c905a492144f5df0442._.jpg


Upon inspecting the shaft it was obvious that significant heat had been applied to the base of the shaft because the color of the steel had turned blue. Apparently the guy that I bought the coilover from had heated the shaft to remove the mount so that he could install a shaft mounted bump stop. I believe that he must have dipped the hot shaft into water to cool it. This would have caused the steel to become brittle...
Nobody took any pictures because it was pouring down rain all day and nobody wanted to ruin their cameras.
 
Here are the only pictures that were taken during the ride. They were taken while the trail guide was taking his rear drive shaft out. While he was working on his rig I reduced the air pressure in my tires from 10PSI to 5PSI. In the last photo I had my winch connected to the trail guide to pull him back down the Sherwin Williams trail.

awww_4x4grace_com_vBulletin_attachment_php_8862c3ec98de79467dffd4b47bd6930a._.jpg


awww_4x4grace_com_vBulletin_attachment_php_4b315495ced353854978c02a6b54689c._.jpg


awww_4x4grace_com_vBulletin_attachment_php_15eb0625d179cac3cb4d47b6965cf1d3._.jpg
 
The first couple shakedown runs are always the toughest. Looks good out on the trail!
 
I found a few more pictures on another website. Here is the guide's jeep that I pulled out.

awww_4x4grace_com_vBulletin_attachment_php_2bbe04f9f5e5604b8ad4861a34384b1a._.jpg


Here is a better picture of me pulling him down Sherwin Williams.

awww_4x4grace_com_vBulletin_attachment_php_d60318f1b60075490e4cf7dc38e0a976._.jpg


Here is a picture of my 4Runner sitting next to the stream after I pulled the guide out.

awww_4x4grace_com_vBulletin_attachment_php_2e431c109324e017ab1c1f0849d937f6._.jpg
 
Nice! Now you can get the "Attach Stuck Jeep Here" sticker that we talked about............
 
Back
Top