Project: Tetanus Shot - 1948 Willys

Well, I took the plunge today... Ended up with a 10" stretch in the rear wheel well.


I removed the aluminum floor plans and started mocking everything up with cardboard.


Planning on getting a sheet of 16ga to build the panels. This will be my first time doing any kind of sheet metal work so I'm open to any tips/advice.
Use a thinner gauge to better match sheet metal. It will be easier to work and weld vs thick and thin. Easy method is a flanged fit and spot welds. Eastwood and others have a nice 2 in one punch flange tool. Next use clecos to lay out and temporarily hold everything to square and align. The flange works great for this. If your really anal and in for a fight butt joint, dolly, smooth and then all seems are hidden. With the flange and fully welded outer seem it will be stronger.
Best advice...0.023 wire and move around constantly. Heat is not your friend.
 
Could be worse.
FB_IMG_1485746218138.jpg
 
Use a thinner gauge to better match sheet metal. It will be easier to work and weld vs thick and thin. Easy method is a flanged fit and spot welds. Eastwood and others have a nice 2 in one punch flange tool. Next use clecos to lay out and temporarily hold everything to square and align. The flange works great for this. If your really anal and in for a fight butt joint, dolly, smooth and then all seems are hidden. With the flange and fully welded outer seem it will be stronger.
Best advice...0.023 wire and move around constantly. Heat is not your friend.

I would think a thicker gauge could be used for the floor pan but I agree that the wheelwells/sides could be thinner. What gauge do you suggest? I have seen the Clecos used before. I was also going to pick up a set of these clamps.

Butt Welding Clamps 8 Pc

After spending some more time thinking about it, the process should be fairly straightforward. Luckily I don't have that many bends. Everything could be accomplished by right angles and the tack tack tack method. This is not gonna be a show jeep but I don't want the stretch to be highly noticeable. I will probably use body filler around the welds/seams. It will be a learning experience for sure.
 
Be sure to not get it too hot when grinding the weld. Im sure there is a better way, but use a grinding wheel to knock all the really high spots down, then switch to a flap disc to get it close to flush, then to a random orbital sander to get it down to flat. Be careful with the grinding wheel and the flap it can produce enough heat for the metal to shrink in the area your working with.
 
Be sure to not get it too hot when grinding the weld. Im sure there is a better way, but use a grinding wheel to knock all the really high spots down, then switch to a flap disc to get it close to flush, then to a random orbital sander to get it down to flat. Be careful with the grinding wheel and the flap it can produce enough heat for the metal to shrink in the area your working with.

Thanks for the advice. I have all of those items as well. I plan on using 16ga for the floor and 18-20ga for the wheel wells/fenders. After doing some research, there seems to be a consensus that the original sheetmetal for the sides is around18-20 gauge with varying degrees. My local metal supplier can get me a full 4x8 sheet of 16ga for $120. I'll also need to build a trans tunnel/firewall as well. I am planning on making a small subframe for the "splice" section to add strength and so the floor doesn't move/bend.
 
I'm hoping I get to see this out at URE some time in the not too distant future!
 
Been gathering parts/info. Got my steel in this week. 16ga for the floor/trans tunnel and 20ga for the sides


I'm going to take my time with this and make sure the body panels look good. Any other advice/tips other than what was posted already are welcome.

Got the new input retainer bolted up to the SM420.


I still need to slightly clearance the bellhousing to fit. I also need to drill out the two lower holes on the bellhousing so I can get it mounted. Went ahead and separated the cases for ease of install


I also got my flywheel resurfaced today. Hopefully, the plan this weekend will be to install the trans/transfer case. I am planning on pulling the motor to install the clutch/bellhousing and maybe the trans and slide it into place. Anybody see anything wrong with this?
 
Well, you did have a bum knee for a while so thats a pretty good excuse. I'm really good at spending money/collecting parts. Now I need to start putting it all together...
 
Welp, I think my back is broke...:eek:

Had a friend over Friday night and we pulled the motor for better access to install the clutch, got the flywheel, clutch, and pressure plate installed and dropped the motor back in and called it a night. Had a busy day today. Met up with @ghost and grabbed a set of XJ manual pedals from him. Thanks again and good to meet you! Got back home and started working on the transmission mating the bellhousing to it.


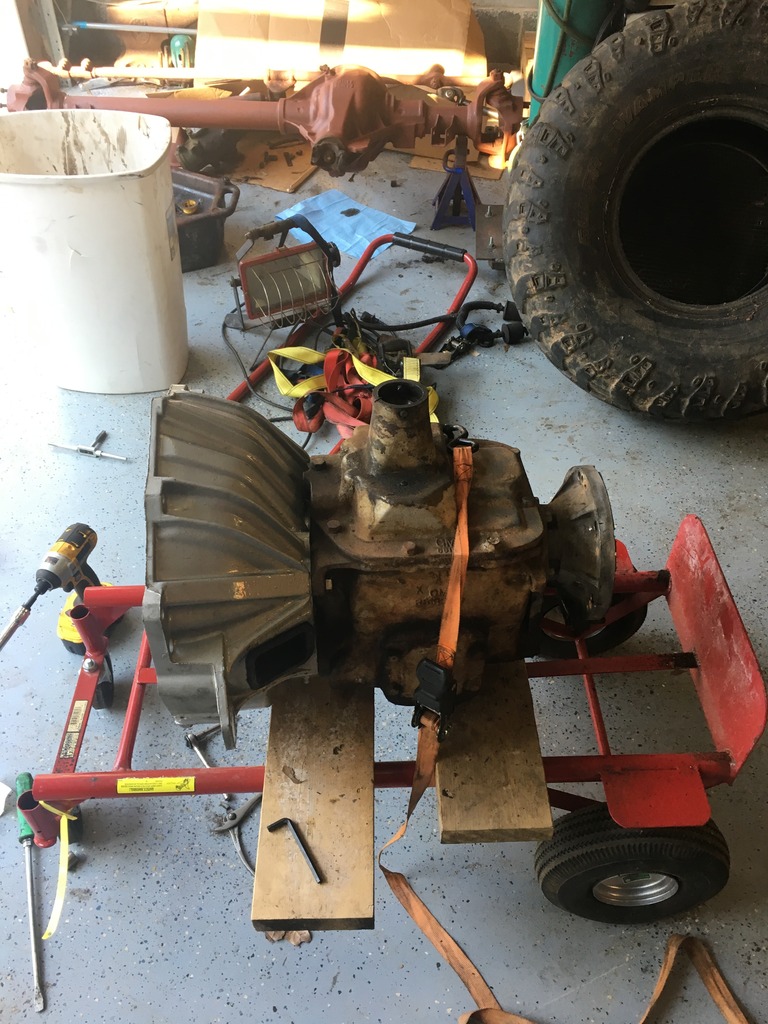
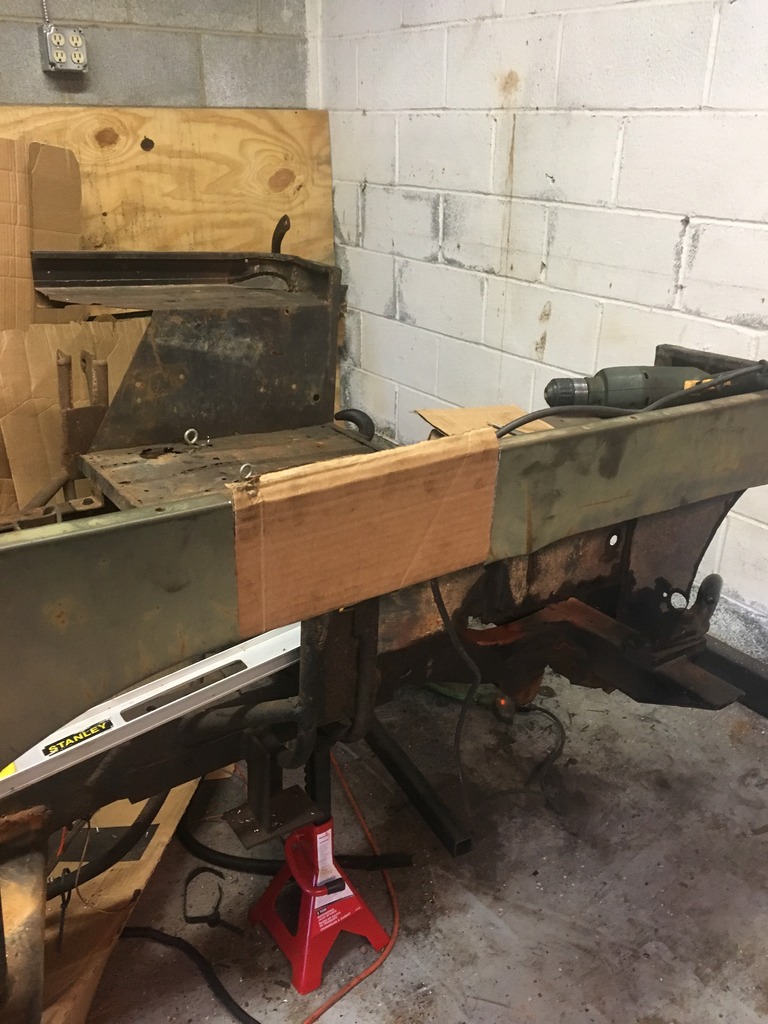
Used the engine hoist and dropped the transmission down through the floor. i did have to cut the rest of the tunnel for clearance. No worries, I have plenty of steel to build a new one. It took forever to get the motor and the trans at the right angle to fit correctly but it finally happened.


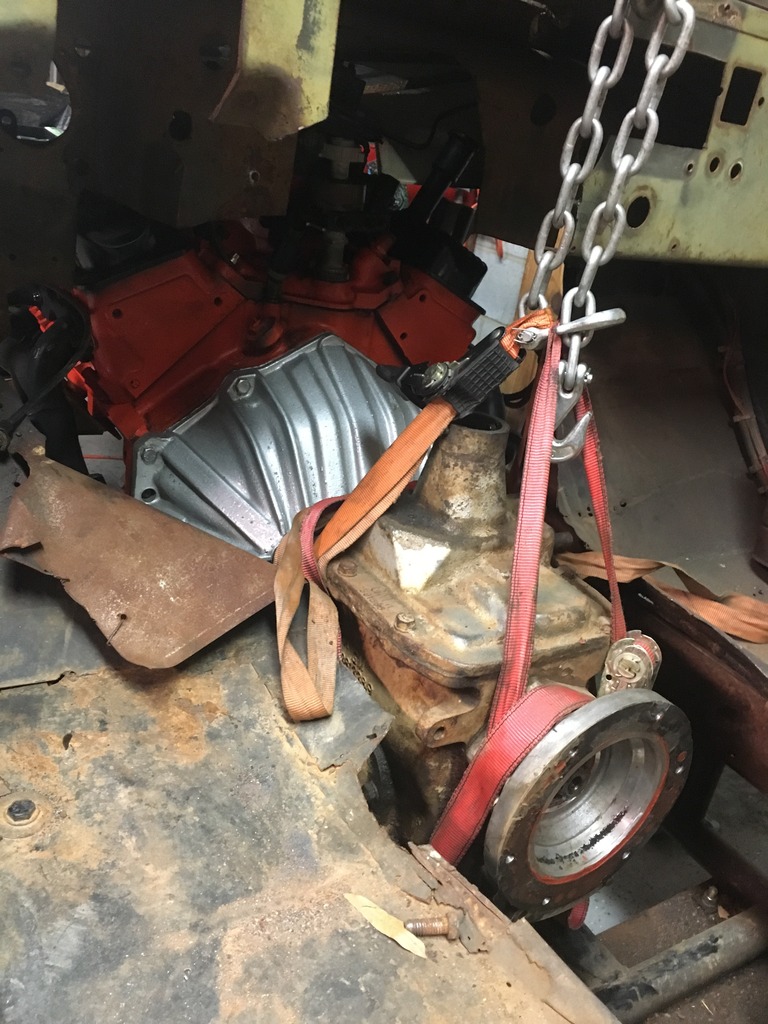
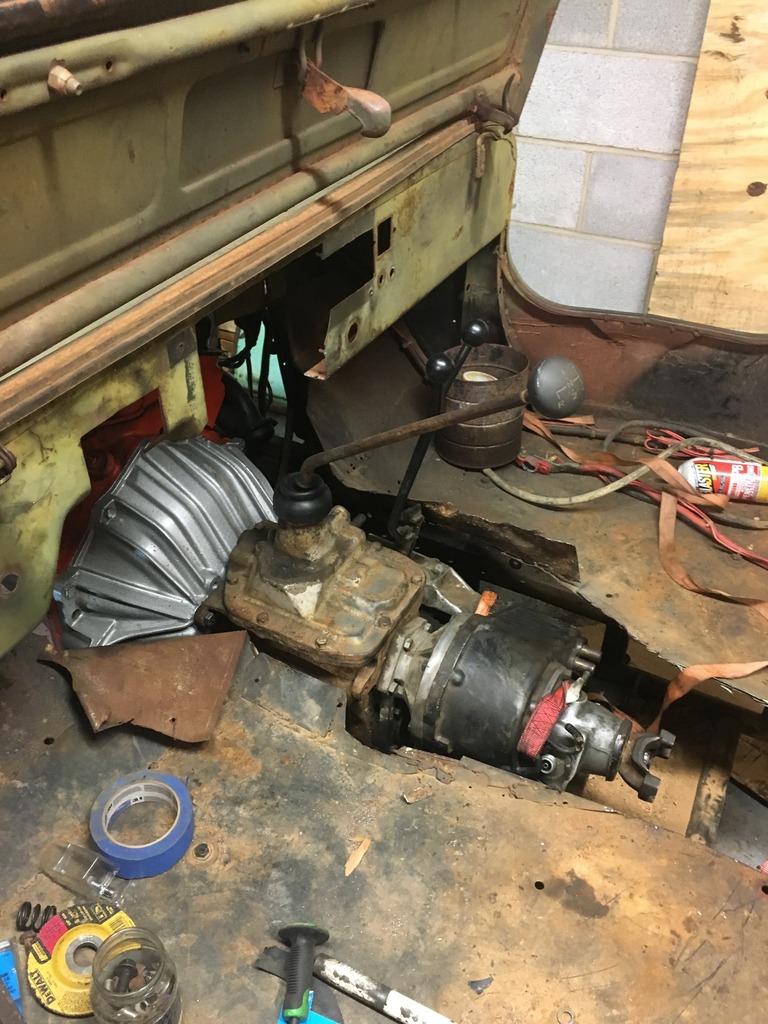
I decided I was a glutton for punishment and kept working. Got the D300 installed and tightened down. It was a pain in the ass to say the least. Theres not much room to work already and I'm trying to stuff 10lbs of crap in a 5lb sack:shaking:


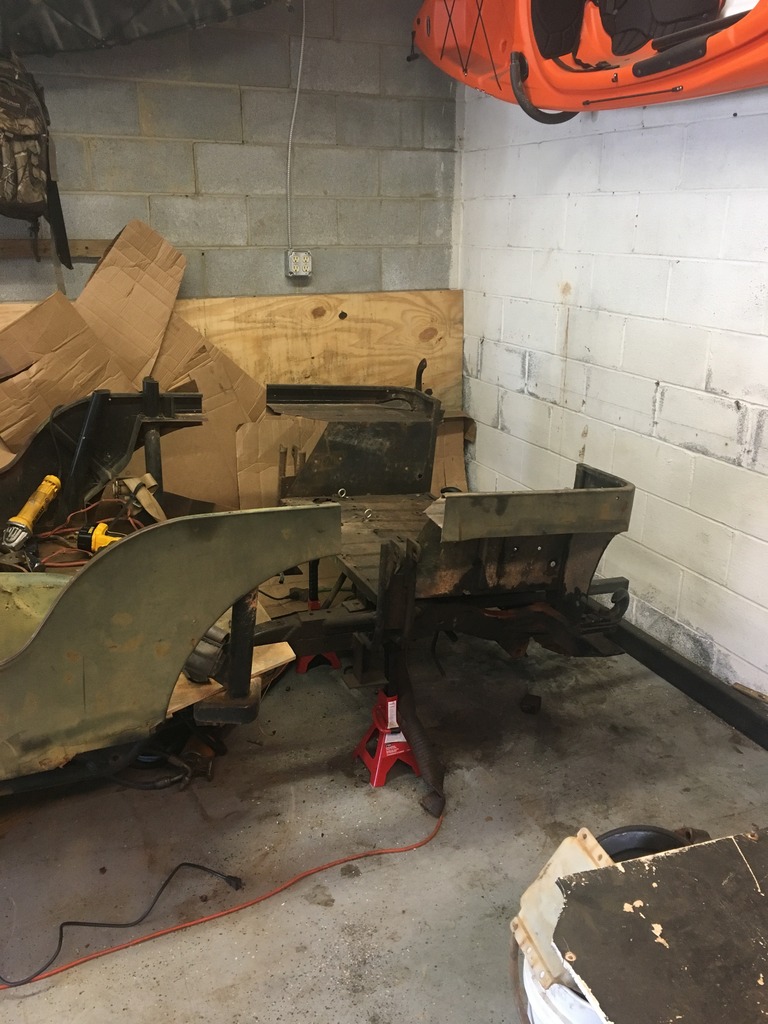
As you can see, I have a LOT of sheetmetal work in the coming weeks/months.


So couple things I have noticed. I might need to redo the skid plate/transfer case mount. The PO had a D18 and the mounting style is different. Currently the D300 is sitting on the skid plate. The current skid plate is stout but it hangs well below the frame so it might it get removed and a simple mount installed. This isn't that big of a deal currently...

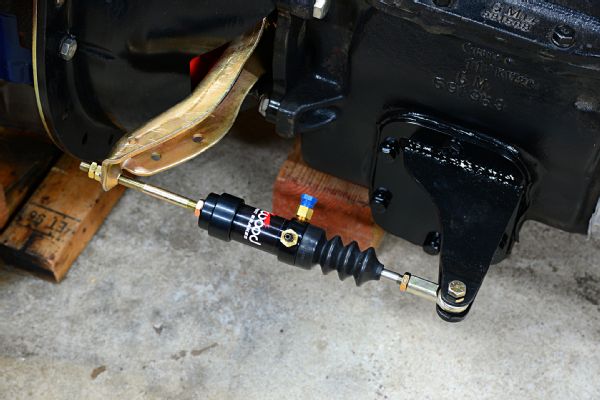
Second, I think I need a new style of header :mad:


As you can see, the mounting holes for the slave cylinder put the slave smack dab in the collector. I really, really don't want to run the OE style exhaust as they are heavy as crap and don't look good. Ideally, I would like to find a header where the collector comes straight down almost in a Y shape. If anyone has a link/or one I would be forever grateful.
 
Was good to meet you! Sorry I failed on getting all the pedals..... let me know if you need it before you come this way! Looks like you had some good progress!
 
Clock that d300 up and make a flat skid!


Find some block huggers headers. They usually come down right near the motor mounts rather than the back of the motor.
 
So I think I have figured out the slave cylinder issue. I am going to try and make something like this work.

009-jeep-willys-flatfender-engine-swap-cappa-gpw-43-gm-v6-sm420-wilwood-clutch-slave-cylinder.jpg


I can weld the bracket to the PTO cover. I just need to get a new slave which speedway has them for 35 or so. Should be a simple fix and it will clear.
 
Clock that d300 up and make a flat skid!


Find some block huggers headers. They usually come down right near the motor mounts rather than the back of the motor.

Going to try and make it the flat skid work. Only issue I see is that the shifters for the d300 are pretty close to the Sm420 housing. The existing skid will be removed and a simple flat one will be made/installed.
 
So I think I have figured out the slave cylinder issue. I am going to try and make something like this work.

009-jeep-willys-flatfender-engine-swap-cappa-gpw-43-gm-v6-sm420-wilwood-clutch-slave-cylinder.jpg


I can weld the bracket to the PTO cover. I just need to get a new slave which speedway has them for 35 or so. Should be a simple fix and it will clear.

Wow that is amazing to me. Never seen anything like that....
 
Same here, I have always thought of the slave cylinder has a push process. I will take the original PTO cover and trace it onto some plate steel i have and build a new cover with the bracket. I'm part of a couple Willy's groups on FB and this was proposed to me by a guy doing the same swap so I can't take credit for it, but it is pretty ingenious
 
Not much got accomplished this weekend as I had landscaping duties all weekend...:( . But I did get some misc stuff on the motor fixed. Installed the missing injector into the TBI unit, hooked up throttle cable linkage, bolted up some air sensors etc for the motor and generally got the garage cleaned up/organized.

However, got the axles out to @MarsFab on Friday with a box full of goodies.

4.56 Yukon Gears/Master Install Kits
Spartan Lockers Front/Rear.


Going to start working on the body work while the axles are getting fixed. My plan is to work on the rear section of the body work as not much should change back there. I still need to build the firewall/trans tunnel but will wait until I have the drivetrain in its final resting place.
 
Time for updates.

Axles are complete! Thanks @MarsFab! Ill be picking them up this coming Friday.

This weekend was spent doing sheet metal work. This is my first time doing any kind of sheet metal work. Luckily I did not have to many bends. But the bends I did have were for the floor sections and the channels for each side. I built a "brake" with clamps, a piece of heavy freight rail and used my granddaddy's anvil to work the rest of it smooth. I still have a lot of welding(tack, tack, tack) and grinding to do but most of it is there. I did build a subframe out of 1"x1" and angle for the floor sections. It doesn't move or bend when I stand on it so it passes my test. I still need to cut out the filler pieces around the seatbelt areas.

Floor is made out of 16ga and the wheelwells/sides are 20ga. Bending 16ga is fun:poop:


It took a while to figure out the correct wire speed/heat but I think I have a pretty good handle on it now. I was worried about warping but I kept moving the heat around and it didn't seem to warp badly at all.

I still have a lot of work left to do on the body but I think my first attempt at body work has turned out pretty good(flame away for good reasons!:popcorn:)

I still need to find a set of springs for the front and then I can work on turning this into a roller:bounce:
 
Got the rest of the floor/wheel well pans done. I still need a lot of filling/grinding/welding etc so don't look to hard :lol:


The axles are done, I'll be picking them up Friday. Ill be out of town on a hog hunt all next week so that will delay the progress. I'll start building the axles and hanging them when I get back.
 
Spent a week in the swamps of SC chasing hogs. Got back on Saturday and Sunday started working again on the Willys. I installed the disc brake conversion kits on the rear D44. I got the conversion kit from Daves Customs Unlimited out in Arizona. Really nice kit although the instructions could be a little clearer...

I'm using Eldorado calipers/pads with Chevy truck front rotors. There are two different sizes of Chevy rotors a thick and a thin version. I had the thick ones and had to go back to Advance to get the thin ones so the pads could clear.


Going to start working on the front axle this week. Still need to source some leaf springs for the front and some new perches for the rear.
 
Hats off to ya for diving in and hammer down.
 
Back
Top