84 CJ Truck Build (Project Do-Over)

Wideband or narrowband? Analog output?
This is a wideband O2 controller. It's the APSX D1G1 WBO2 controller. APSX D1 G1 Wideband AFR Controller It has both analog and digital outputs, as well as a simulated narrowband output, should a user wish to configure it that way...the only reason I see the simulated NB output being useful is if it's hooked to a tuner that isn't WB capable. The analog WB output is a 0-5VDC sweep that I'll wire directly to my ECM, and the digital output will be wired to the digital display that came with the kit. The cool thing (I think, anyway) about the digital output is it is a 9600 baud 8N1 that can be connected to a PC, if you didn't purchase the kit with the digital display...seeing as it was a $5 adder for the digital display, I just went with it. I'll likely gut an old gauge housing (trying not to make it look hacked, of course) and see if I can mount that in the dash for an A/F ratio display. Not that it's completely necessary to have that flashing in my face all the time, but it could be useful should something go awry.
 
IMG_2466.JPG
IMG_2467.JPG


All soldered up and snapped on the back shell. Now I'll dig around and find some encapsulant to pot this with after I hook it up to a power supply with the O2 sensor and check the calibration. You can calibrate it to gasoline, E85, diesel, ethanol, methanol, you name it. Also outputs in either lambda or AFR. Obviously I'll want gas AFR as the output.
 
This thread is 1 page of built, and 5 pages of Radio Shack advertising

:flipoff2:
:lol: One of these months I might get back to actually working on something!
 
Lambda is kinda cool too...it's just 1.
 
Lambda is kinda cool too...it's just 1.
True, I thought about having the display read lambda. Maybe I'll switch it up and do that just for giggles.

So this is annoying...got my O2 sensor in the mail, and it has the wrong connector on it. :shaking: Looks like I'll order the proper connector and just swap them out rather than pay more for shipping than I would on the correct connector. Who'da thunk that these have more than one connector type on them? :rolleyes:
 
May be a difference in the sensor element also. There are several different Bosch LSU versions. 4.2 & 4.9 mainly. And the controllers differ. I've got several used 4.9 units and mating harness side if you want to go that route.
 
May be a difference in the sensor element also. There are several different Bosch LSU versions. 4.2 & 4.9 mainly. And the controllers differ. I've got several used 4.9 units and mating harness side if you want to go that route.
I'd take you up on that, but this controller is only compatible with the LSU 4.2. That's what the sensor is that I ordered, but just has the "square" connector on it instead of the "round" (more like half-round, or possibly oval/elliptical) connector. Much appreciated though!

EDIT: I almost got cranky when I saw that my sensor had a 12-hole end on it...but then I found quickly that the interwebs has conflicting information (go figure...) that 12-hole is LSU 4.9, and the 6-hole ends are LSU 4.2. I cross-referenced both the GM and Bosch numbers on the sensor, both come up as LSU 4.2, so I guess I'm happy? Except that I have to wait for the correct connector and swap it out.

Bosch # 0258 007 206
GM# 12575657
^^ Just in case anyone else runs across this...Those cross reference to a LSU 4.2 sensor.
 
Last edited:
I feel fairly confident that nobody else is going to run in to the same nerd issues that you did :D
 
Small update... I returned the other O2 sensor I had and ordered one with the correct connector (Bosch 17014). Plugged it in, connected the controller to a DC power supply at 12V and 5A. The digital readout lit up, read A1 for a few moments, then 19.0. That tells me that the calibration was good, but I went through the recommended calibration steps anyway. I potted the controller in its back shell, and once it's fully cured I'll wrap it in tape and a couple zip ties around the end for some strain relief and additional protection from abrasion for the wiring.

IMG_2504.JPG


Next will be acquiring the rest of the sensors I need (already have a TPS) and building the engine harness. Also need to figure out a way to cleanly mount the TPS to my throttle body. That may take some time, because we're in the middle of moving...so after I pack/move/unpack all my junk from the garage, I might have a minute to do some work again.
 
Small update... I returned the other O2 sensor I had and ordered one with the correct connector (Bosch 17014). Plugged it in, connected the controller to a DC power supply at 12V and 5A. The digital readout lit up, read A1 for a few moments, then 19.0. That tells me that the calibration was good, but I went through the recommended calibration steps anyway. I potted the controller in its back shell, and once it's fully cured I'll wrap it in tape and a couple zip ties around the end for some strain relief and additional protection from abrasion for the wiring.

View attachment 285345

Next will be acquiring the rest of the sensors I need (already have a TPS) and building the engine harness. Also need to figure out a way to cleanly mount the TPS to my throttle body. That may take some time, because we're in the middle of moving...so after I pack/move/unpack all my junk from the garage, I might have a minute to do some work again.
I'm looking into making a carb body into a tbi unit on my Fairlane. I plan on using a gm tbi TPS sensor on the right front shaft. And I'm going to Fab up a sheet metal bracket that will bolt between the old choke bolts and the right front mount for the carb. Very similar to the Holley carb TPS they sell at summit for guys running an electronic transmission behind a carbed engine. They sell for just over $100 and I can make one for way less I think. Check out summit racing for some ideas.

Sent from my E6910 using Tapatalk
That was going to be my intention, fabbing a mount out of sheet metal. I just hadn't decided on location or what exactly it would look like. I'll definitely be browsing summit racing to get some ideas now. Thanks! :beer:
 

Bet some of you phockers thought I gave up on this piece, didn't ya? :lol: Nah, it's just been busy. Finally got in the garage last weekend after moving a year and a half ago and started straightening some things out, putting them in their places, and throwing out a bunch of trash. I have soooo....muuuuch…..SH!T. It's not even funny. Anyway, I digress.

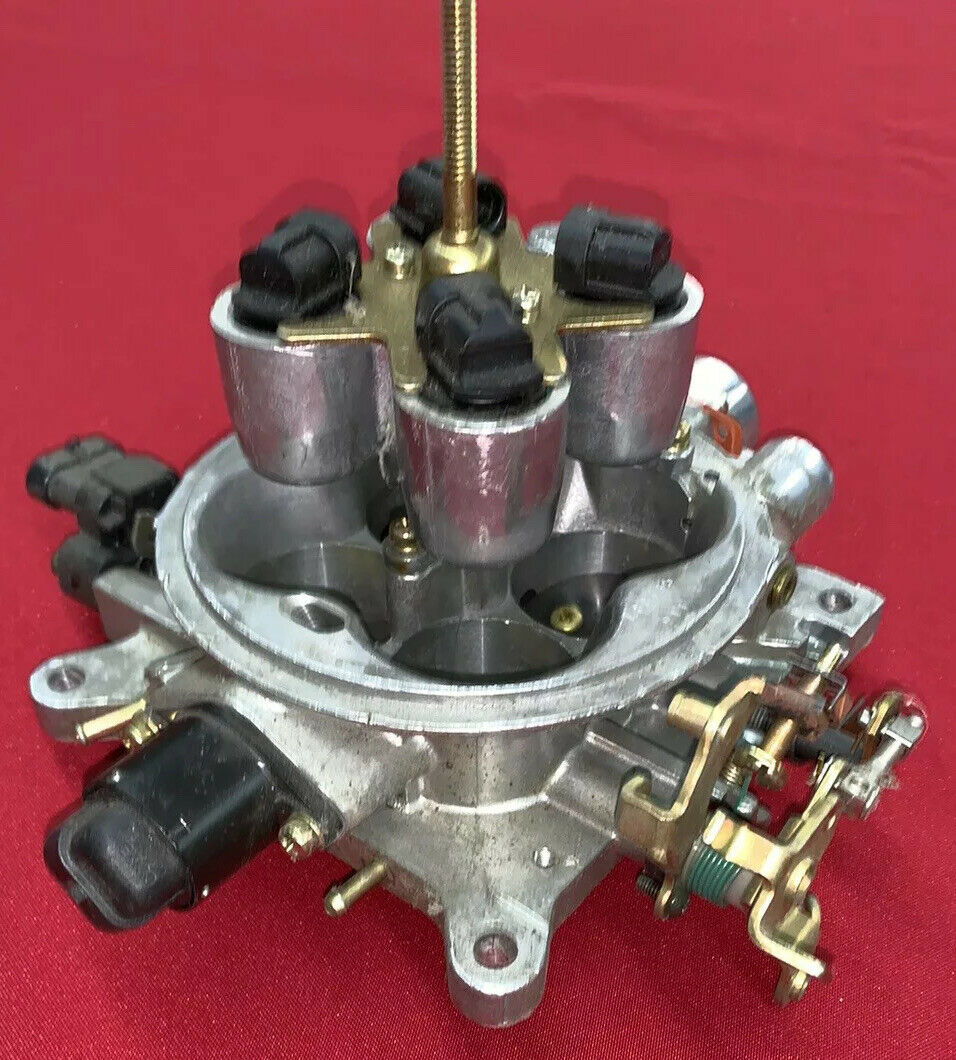
I have been thinking for a while about how to tackle the TPS/IAC/whateverdafuhkelse problems will arise from the ashes, and went to sniffing around on the fleabay. I ended making myself the proud new owner of what appears to be a gently used one of these:

s-l1600.jpg


s-l1600.jpg


s-l1600.jpg


The search started with looking at intake manifolds that will work with my heads (96+ Vortec is what it needs) that was a MPFI style, since I am beginning to hate my chopped up fuel rail thing that's going on.... I found one that the dude selling this had for a decent price for what was there (as I'm typing this, I see someone already jumped on it...too late for me (what else is new)). The seller of this also had another identical TBI setup that has all the wiring/connectors/etc, but for 2.5x the cost. I figured 'what the hell' and I'll give this one a shot.

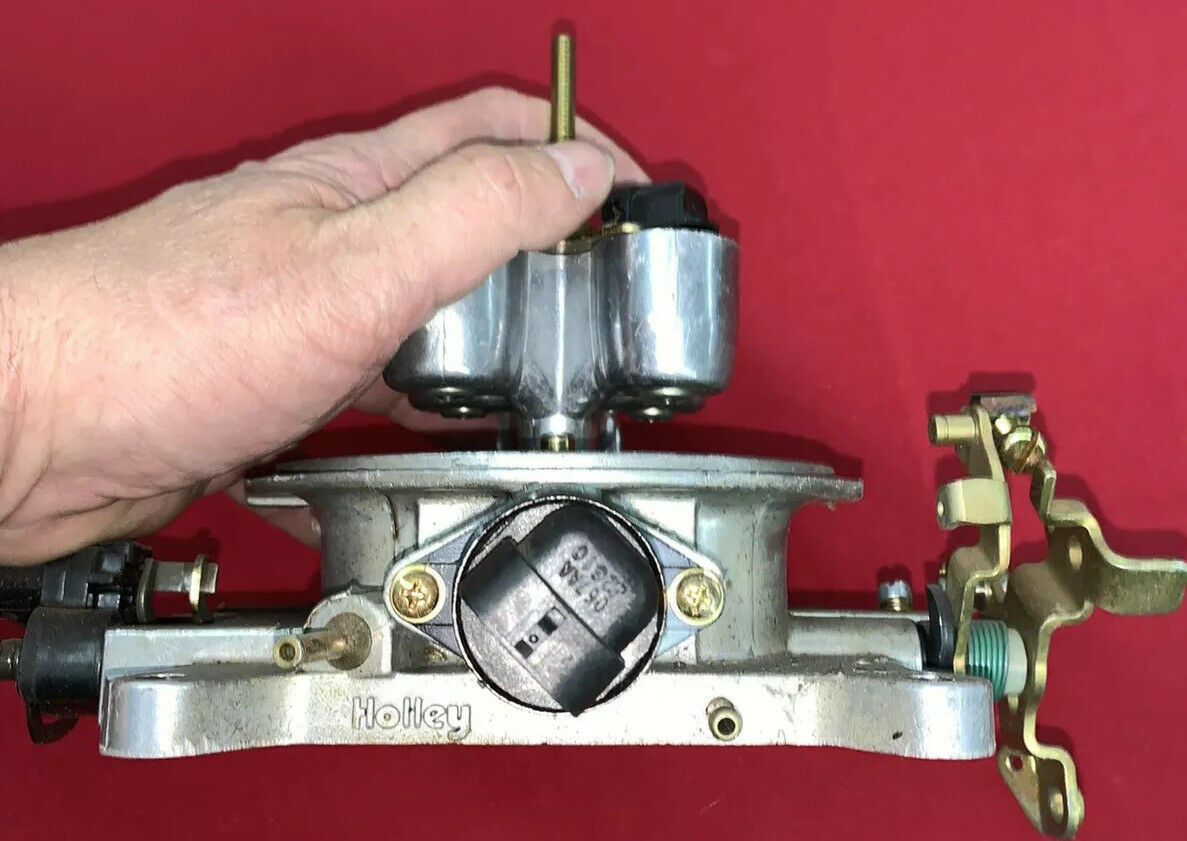
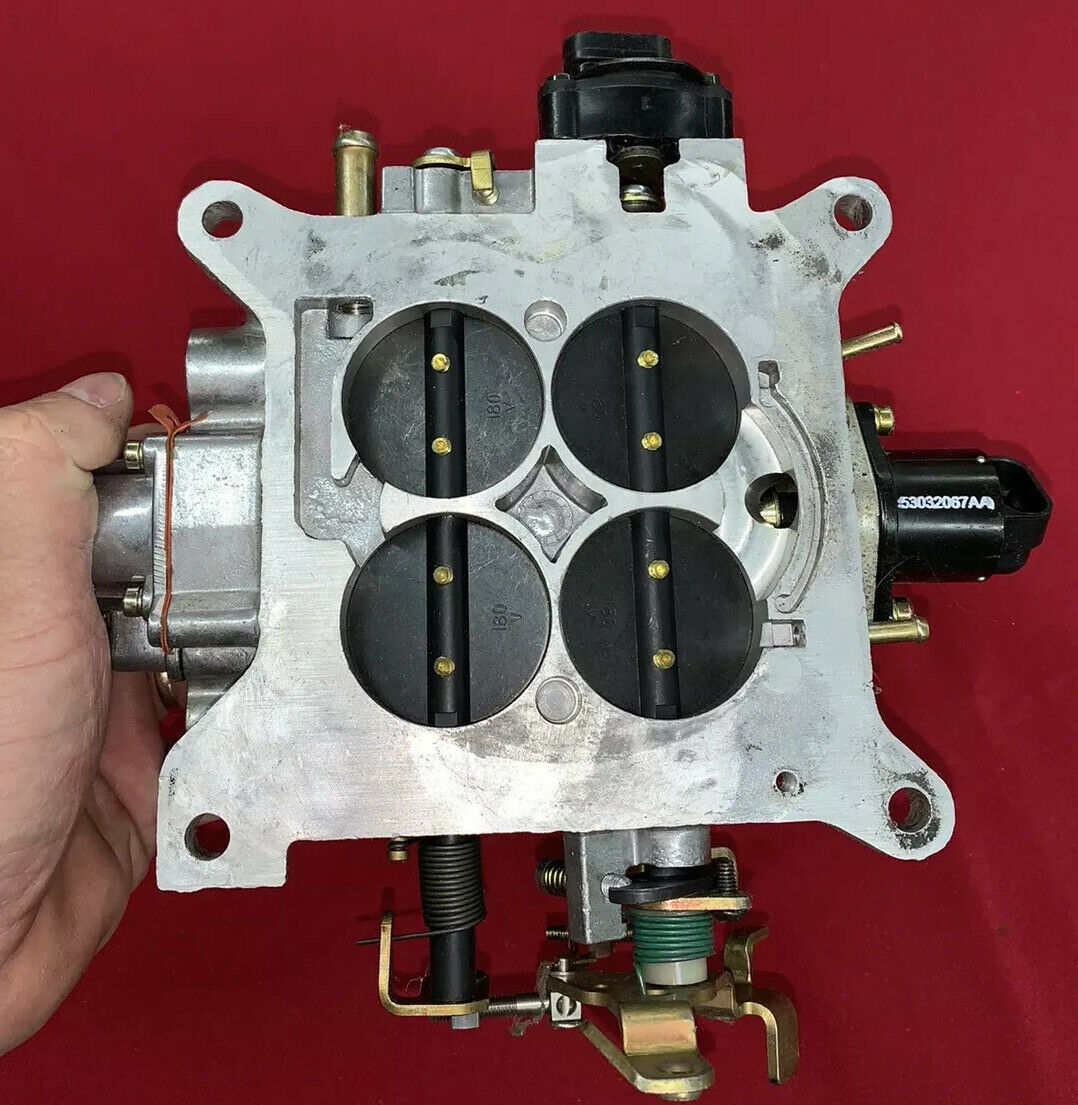
It's a Holley 900 CFM Avenger TBI that, like I said, is complete less wiring. No issues here, I can source the connectors since I'd have to adapt them to my ECM anyway. My original intent was to remove the injector pod from the top, and just use it as a throttle body and a place to house the already integrated TPS (as long as it works, pending testing) and the IAC (same as TPS - need to check it out). But then I got to thinking....don't you hate it when that happens??

If these injectors are good, why would I worry about the cobbled fuel rail mess on my current manifold? That is, depending on their size. Dude selling this didn't say in the listing, I didn't care to ask since I was intending to remove them anyway. I'll run the numbers on it and see what they are for giggles and sharts.

One thing I lack (among many) is some electronic hardware to properly drive the IAC on this one....I am currently configured to run a PWM-style IAC, and this one is a stepper motor. So I'll have to source a stepper motor driver and a few more bits and pieces, probably put them on another daughterboard to fit to my ECM...no sweat, really. Then I'll go back into the tuner software and make the appropriate changes, and all "should" be happy here (or so I think). I guess it's a good thing I still haven't bought an IAC valve before I found this?

With my current intake manifold, I could remove the bungs I put in and cover the holes, or just replace the hoooge-as-fawk Frankenstein mess with a more appropriately sized one (which is the way I'm really leaning....go figure). I will admit, the intake I have on this engine is too big. It was paired up with a much bigger solid roller cam that used to live in the engine. Something in the 1500-6000 RPM range would be much more appropriate.

Or, I could drill/tap some adapters in and make a nitrous fogger kit. :lol: nah, most likely not. And to think -- all this started because I was curiously searching for an LT4 intake manifold (the 90s version, not the modern sexy one). I was thinking I'd just get one of those, an oil pump drive, a handful of LS coil packs and go distributor-less with a slick looking top end.

Anyway, just wanted to update a little, and let y'all that are still out there know I haven't given up on this shit yet. :smokin:
 
So I had a few minutes to get in the garage today. Might be the last time for a while, because I have my 2nd little munchkin due the first week of June. Gonna have another girl! ....GAWD HELP ME.... lol anyway...

I started off by testing out all my injectors. Well, not fully testing, but at least checking their impedance and seeing if the solenoids still respond to power. I wanted to see if the injectors in my new (to me) throttle body were any good. As I suspected, they are low impedance. Not a huge deal, as I could wire in resistors (after first doing some Ohms Law homework to find the right ones) since my ECM will only work with high impedance injectors. BUT...as I was testing the last one, I found it to be considerably higher impedance than the other three...curious. So I kept probing, and checked the other three again. The first three came in at 3 ohms each. The last at first was measuring around 30. Then it was just acting like an open circuit. So.... I guess I have one dead injector. Not to worry, since I bought the throttle body because it already had the TPS and the IAC integrated into it. Just thought it would be nice if everything worked on that TBI unit. I can still strip the injector pod off of it and use it like any other throttle body.

So on that note, the TPS checked out fine...nice even resistance through the entire sweep. I also measured the proper amount of resistance across the pins of the IAC motor, at least according to a few resources on the interwebs. I’ll check it’s function sometime in the future, hopefully before I actually decide to fire the engine.

Also checked out the set of 8 injectors I bought a while ago. They’re all high impedance, measuring all even at 13 ohms. Also checked them with a 9V battery momentarily, and they all fire. Cool beans.

What brought the suck was that I decided to try to spin the engine by hand. Well, it was stuck. I actually found this the last time I was in the garage. So when I found it, I pulled all the plugs and hosed the cylinders down with WD40. Today, it would rock a degree or two, but was still tight. So....

32E44B89-59E4-4860-99AE-C2325359C55E.jpeg


I yanked the top end off the engine. No. 7 had some rust in it. Not bad, just surface flashing. Most of it wiped out because of the WD40. I kept hosing it down, letting it soak, then wiping it out more. Now there’s still a little surface discoloration, but nothing too unnerving. Now it spins nice and freely.

I have MLS head gaskets, and I have read that they can be reused, but I don’t quite have the warm and fuzzies about that. Think I’ll just get a set of FelPro composite head gaskets and slap it back together. You know, when I’ve got another minute sometime in the next three years or so.

So, still plugging along, but I think this is now making me appreciate taking my time with things. Literally everything that I’ve done on this pile of shit has been the way that it is because I was rushing to throw something together. I think it’s time to take the time to just do it right. I think I’ll appreciate it more in the end, if I ever reach it.
 
B4E0A64F-C2BC-4D97-B683-F61C22005C82.jpeg
28381A77-B1DC-4849-8F1E-8EB69764F97B.jpeg
4566D693-1D66-48C1-9976-8675E7E52718.jpeg
Don’t mind me, just sticking these here for my own future reference (interwebs research and such).
 
Back
Top