1930's Farmhouse Rebuild - phase ll

Got a few pictures of 2nd floor framing.


This is really the only major change from the original floor plan. This was originally the 3rd bedroom, now to be the master bath. Shower where the ladder is sitting, vanity to the right on the adjacent wall, and walk in closet on the other side of the wall. The other 2 bedrooms in the background only got a relocation of the closets, which left some fun floor patching for me in the future. :rolleyes:

New ceiling joist/ floor system

IMG_2537.JPG


Toilet corner. There are 2 sets of double windows on both exterior walls which limited me in layout options. We will be reusing one of the clawfoot tubs in the corner where this picture was taken from.

IMG_2538.JPG


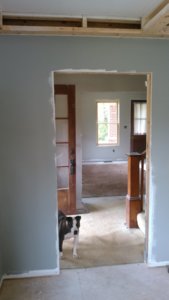
Looking into the master bedroom.

IMG_2539.JPG
 
I think this about all the pictures of have of plumbing and wiring. Drilled holes, nailed up boxes, pulled wire....you know how it works. I never really had done any plumbing so I had a friend come help me with my drain lines and vents. Both of the bath room walls are both load bearing on 6x8 beams under the house which made it tough for us to figure out how to run main line. Ended up having to build a chase wall to catch all the upstairs plumbing and miss the beams.


IMG_3459.jpg


High def picture of 2nd floor air handler and trunk work. I did not do the HVAC system, I sub'd that out.


IMG_3460.jpg


IMG_3461.jpg


Not sure what was going on this day....it all runs together. My guess is getting ready to reroof. I did a tear off/patch and reroof of the main roof around the same time I finished the dormer on the back of the house. Built a small saddle behind the chimney to help divert the water.

Dad in the corner cleaning up my destruction.


IMG_3064.jpg
 
With the main roof redone, I figured it would be a good time to work on soffits,facia, and porch ceiling while I waited on my windows to arrive.
Front porch almost scraped clean. This could have been the worst week ever.

IMG_20150530_134212.jpg


Finished, 2 coats of kilz and 2 of paint.

IMG_20150604_144550.jpg


This picture shows a little better before/after.

KIMG0053.jpg
 
From the start, I dreaded the day l would have to start on the windows. It wasn't the work so much as the fact there were about 38 windows that I would have to buy. I opted for aluminum clad Plygem Windows with 6 over 1 grill between glass. Not top of the line but I have used them before and have been pleased with them. Actual tearout of old windows and installation new windows went faster than scraping and painting the soffits.

All new windows,fresh paint, new Miratec facia, and some flowers make it look halfway liveable.

KIMG0100.jpeg


Still have to do new sills on the outside. I am wanting to do a solid sill or some nice bullnose sill bricks, Anybody have any experience with cast stone products?
 
We use cast stone all the time. You might also consider a precast concrete sill if you can't find a cast stone shape that fits the site conditions. We had some precast concrete stair treads made in Greensboro and shipped to Raleigh. Shipping was more than the concrete.
 
We use cast stone all the time. You might also consider a precast concrete sill if you can't find a cast stone shape that fits the site conditions. We had some precast concrete stair treads made in Greensboro and shipped to Raleigh. Shipping was more than the concrete.


I called a place in Warrenton just outside of Raleigh but the guy never got back in touch with me. Are they able to make a their products to different lengths or do they just carry certain lengths?
 
I had some custom concrete stair treads made for the brick patio at our last house. My buddy, David McQueen, at Oldcastle sourced and priced it for me. Give him a shout.
 
I'm a fan of Sherwin-Williams 'Rainwashed'.
 
I.'ve noticed that done on the houses in Charleston when I have visited my brother. I thought it was to keep bugs away...didn't know it was for the boogeyman! I've got an extra gallon I can go get tinted if I need too :eek:

You might wanna paint it just in case you finally find the old man's money....you know he's gonna haunt you if you do!
 
Just found this thread. When I saw the first pic of the house I had to look and see where you were located. There is an almost identical house sitting vacant in Shelby all boarded up.
 
You might wanna paint it just in case you finally find the old man's money....you know he's gonna haunt you if you do!

If he didn't come back after I gutted his house, cleared his trees off, dismantled a barn and tore down all his old fence lines he's not coming back :D


I'm a fan of Sherwin-Williams 'Rainwashed'.


That would go well with the rest of the Sherwin-William colors my wife used. She actually has planned on painting our master bedroom ceiling upstairs with their 'Silvermist'


There is an almost identical house sitting vacant in Shelby all boarded up.

These Foursquares have a way of looking very similar on the outside. There are a few around here that look a lot alike.
 
We had some precast concrete stair treads made in Greensboro and shipped to Raleigh. Shipping was more than the concrete.

I had some custom concrete stair treads made for the brick patio at our last house. My buddy, David McQueen, at Oldcastle sourced and priced it for me. Give him a shout.

Day late and a dollar short. :flipoff2:

But she did include more information than I did. So I guess that's something.
 
Did a little siding work somewhere along the way. Since I was doing this on my own, I opted for some lightweight Hardie board and batten :lol:. 4x9 sheets for the addition and 4x8 for the mud room. I still have to do both dormers sometime in the future.


KIMG0041.jpg


IMG_0347.jpg


KIMG0045.jpg


KIMG0051.jpg


IMG_0659.JPG
 
I sub'd out my insulation work. I opted for open cell foam in the rafters and fiberglass in the walls and crawlspace. Hopefully we will see some lower energy bills....We moved in at the end of February and the bill for March was around $120, April and May were about $70 and $60. I thought that was pretty good for the size of the house.

The only shot of insulation I took

KIMG0116.jpg


I made a call and a guy with a big truck showed up with a load of evil. I debated on whether or not I wanted to tackle this job or not. My brother and his father-in-law were lined up to come help hang but I eventually talked myself out of it. As much as I would like to have been able to do everything on this house, I didn't mind passing this off to someone else. I would probably still be trying to hang and finish it if I hadn't! It ended up being around 200 boards, 3 guys hung it up and 1 guy finished.


IMG_0302.jpg


Must have worked on the facia after this.....sorry I got a little out of order :D.

IMG_0303.JPG


IMG_0348.jpg


IMG_0349.jpg
 
With sheetrock done in 2 weeks, I was now 3 months ahead of my schedule, 6 months behind on everybody else's :D....


Caught a fairly good deal on paint at Lowe's so my wife loaded up on some Sherbet Williams, along with 15 gallon or primer and 10 gallon or ceiling paint...I think

I figured it might expedite the process so I bought a sprayer...

Looking in to the kitchen/pantry/mudroom

KIMG0107.jpg


This is the second floor master bed/bath.

KIMG0111.jpg


Upstairs hallway

KIMG0110.jpg


Dining room, looking into kitchen

KIMG0063.jpg


Got a few lights and fans up

KIMG0101.jpeg
 
My wife wanted wide mouldings like the originals that I pulled off. She found a picture on pintrest of some craftsman styles that she liked. I found some 1x6 trim material at a local salvage supply yard and ended up cleaning out. I tweaked her design to eliminate waste and enhance the profile some. Simple but I like the way it turned out......so did my wife ;)

KIMG0123.jpg


Working up my panel box along the way....

KIMG0093.jpg


I caught a deal on LED can retrofits, so I bought a pile of them. These were "daylight", I took them back and exchanged for soft white.


KIMG0128.jpg
 

Attachments

  • KIMG0064.jpg
    KIMG0064.jpg
    51.9 KB · Views: 234
Wow, those window moldings look familiar. Wife wanted something more farmhouse looking when we were building ours in 2011:
20160618_190117.jpg
 
Back
Top