Bent Fab CH2

Trans and steering coolers mounted.
Radiator mounts built, getting them into chassis today and then onto fuel cell mounting.
737ED325-F703-495D-9240-0C33A73BA680.jpeg
765AAECC-B007-4694-B87B-747EBC75E1EB.jpeg
F1F59E6F-14E4-4B17-9DE2-05B887DD4F85.jpeg
 

Attachments

  • 6CBEA243-ACCC-4522-8E34-A55B1D13A904.jpeg
    6CBEA243-ACCC-4522-8E34-A55B1D13A904.jpeg
    125.5 KB · Views: 141
Why the use of heims rather than rebuildables such as Johnny Joints? Not a critisizm, just wondering. This is an awesome thread, thanks for the detailed chronology
Strength. Heims last longer and too much of a battle trying to find cartridge joints that have the same misalignment and strength as a heim. Then it’s also cost. Just easier to replace the heims when they are worn out @ 3 yrs or so. That is based off 7/8 and 1” heims, anticipate these 1.25” to the the same or better. The price on all 1.25” was good enough to not worry with smaller uppers
 
@WARRIORWELDING asked about these on Instagram so I thought I would explain a little on here.
I made mounts out of steel to hold these radiator bushings from summit.
the Scott drake ones are rubber but are secured easier than the prothane poly ones.
The Scott drake ones have two “nipples” and one pin to locate and hold the rubber to the mount. They can be used flat or have a relief to fold around corners. They fit the universal speedway radiator perfectly tight when folded.
the prothane ones only have one round pin to sit in the bracket as the oem application has a small step to secure the other end. Much more difficult to keep in the brackets but do “float” to self align where the tanks meet the core.

79868DFC-8ED8-4737-9725-686B5C24E2D2.jpeg
61CAD306-ABCF-409E-9BA5-9EC083C932FE.jpeg
0AABB363-AF21-4997-AF09-680358CF5680.jpeg
E990DDBB-65EA-461D-89E5-DAFDD3C2501C.jpeg
BEB9B4EE-7D3B-44E4-A94A-EC4AF21978A4.png
6F1EAF28-E548-4B9E-A5D8-878AE63E53FE.png
 
Going to go ahead and put a heater core in the hot side of that coolant pipe? Seems like it flows through the perfect spot to stick a small heat exchanger under the dash on the pass side.
 
Going to go ahead and put a heater core in the hot side of that coolant pipe? Seems like it flows through the perfect spot to stick a small heat exchanger under the dash on the pass side.
We’ve talked about it. The new seats have heaters so he’s going to wait and see how it is in the winter, but definite possibility. There will be room for it in there.
 
With the help of my dad Russ @moldman05, him and Steve thinned a bunch of unnecessary stuff out of the engine harness and got all the old loom off. This allowed cleaner routing of the harness. Still working on getting the extra length into a big loop behind the center dash panel to keep the ends clean and trouble free.
Built the battery box, finished the fuel cell mounts and bed floor.
Built the upper radiator and center cell support.
Steve Started cutting templates and transferred them to aluminum to get started on the fire walls and floor.
B3DB7662-97EF-46CA-97DD-3D0B05805A8E.jpeg
FA3160E7-EB35-4C6A-959A-CC638E10F32F.jpeg
F85487B3-B7C4-4864-B092-3C8CDDF535F0.jpeg
00526D50-3AE6-45A9-BA35-9581C53B4865.jpeg
982C2F61-9E96-4820-BE1F-7775893030DA.jpeg
CE8C5376-DCA8-40A9-85D9-1919D7B58420.jpeg
250DF9E4-9A6F-4709-8770-F01BA36DFF74.jpeg
CACAEB9C-9701-48FC-9C1F-AA3EEC0840EC.jpeg
52D08CFD-C2B8-479D-BF66-196737644AE1.jpeg
99575130-8451-4B88-9868-C1383158C6A5.jpeg
 
Sorry guys, cleared my cache, got logged out, and couldn’t remember password. Been super busy with work and with this build, finally had t to reset password.

next couple updates will be photo dumps as time is short with getting this finished up. Haha

half way thru with final assembly for maiden voyage. Going to come back to me to finish side skins and rear tin work as well as a proper hood and dash.
Sam, Steve, my dad Russ, and our good friend Kevin have been helping tenfold with painting everything.
Decided to rattle can the chassis for now, until the remaining sheet metal and tabs are all done, then will likely get blasted and powder coated later. Likely when the rear steer goes in. This way the spray paint is easy to remove and add necessary tabs and mounts, and touch up.
9A5BA7D2-18B4-441D-B3E2-FCDF967A8B75.jpeg
D4F8030E-EE90-4108-B497-6744D7CFC12D.jpeg
C0CC4BD9-4208-4E47-861D-B6D5092A46D0.jpeg
CB60001B-598E-4568-A0A6-B01D7776C3A5.jpeg
E1182A6D-AB02-493C-84D0-2089AF0F10B3.jpeg
9D0BF81C-9D44-42A6-92E4-9AD439AD51C9.jpeg
219A5160-2E15-476F-B25A-9C4BC388F9E6.jpeg
C96BE220-8BE0-45A1-8BA6-5F2E933929CE.jpeg
1DB5701D-F8CF-49BB-8EB2-0F4CF90B750E.jpeg
2B39AD71-C7F1-4A1C-9220-DB16C779B4C5.jpeg
 
Had a pretty productive evening. @BRUISER came over and helped sam, Steve, my parents, Kevin and I with assembly.
Fuel cell in and lines installed.
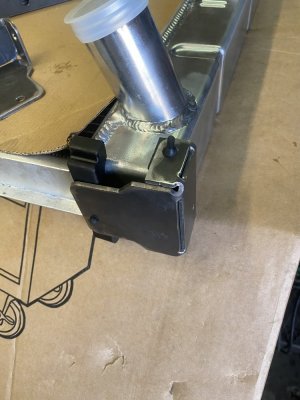
radiator in, coolant lines in and checked for leaks,
Trans and steering lines and coolers in. Need a couple fittings for steering lines that Steve will get tomorrow.
battery in, exhaust in and done.
winch in.
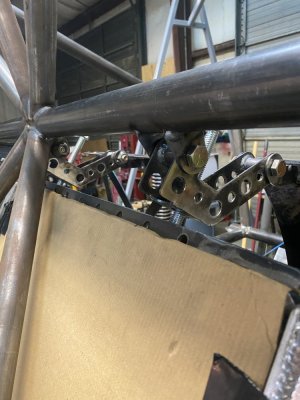
Final bolts in all the links and tightened. These are shanked correctly to get the shank of the bolt thru both sides of tabs and the extra thread cut off.
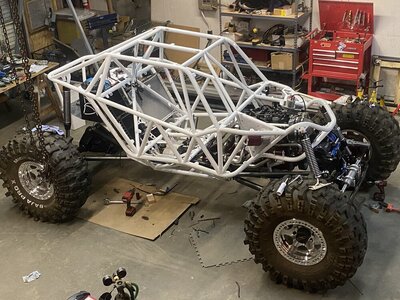
Tomorrow after work we will work on getting the remaining fluids in, work on finish wiring, and hopefully fire it up. Once the wiring is done, the tin work will go in, with seats and harnesses.

8E926CE2-C5AC-448D-B434-8E2EBEB06C3E.jpeg
C0F79941-72BD-43A6-91C7-5A5ABE638EAC.jpeg
611D7A35-80B2-4F39-AFBB-DC97B78FF745.jpeg
392E5FEB-2E1A-4F23-BF64-FC719B1C1FAA.jpeg
C5D5C12C-7E7F-416F-95DA-FDB9878C2907.jpeg
 

Attachments

  • BE76DB50-892C-4655-B7A4-8271D843B63E.jpeg
    BE76DB50-892C-4655-B7A4-8271D843B63E.jpeg
    213.7 KB · Views: 123
Back
Top