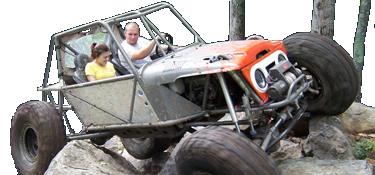
Gone Postal : Mail Jeep Build

Looking great!!!

You should have done a pre weight and a post weight. I'd like to know how much this thing has gained, lol. Of course with that motor, it won't matter. :)
 
Will that thing even fit in the garage?

I think it'll fit with the motor in it. It weighs it down nicely. My YJ is the garage queen though. This one will not be in the garage until I move to a house with a big garage. hmmm....I can't wait to move to a house with a real garage!!
 
Looking great!!!

You should have done a pre weight and a post weight. I'd like to know how much this thing has gained, lol. Of course with that motor, it won't matter. :)

Thanks man! It had a plate on the dash when I got it that told the total gross weight as well as some other specs. I'm hoping to take it by MarsFab when I get it done and have Chris weigh it. Hopefully! I am eager to know how much more it is going to weighs too! I'm guessing 3500-3800lbs with everything on it. Hopefully a little less though.

Original specs from my measurements and the original plate on the dash with their specs:
Gross Vehicle weight: 3350 lb.
Wheelbase: 81"
Width: 63.5"
Height: 69.5"

Current Specs:
Weight: Unknown
Wheelbase: 94"
Width: 81"
Height: 80"
Height to bottom of framerail: 23.5"
 
Day 5. I knocked out some more today. I got the shackles painted and bolted in place. I also got the other used shock a buddy gave me painted up and installed. I'm going to work on getting the steering box mounted tomorrow.

New shackle length vs old length.
ai1024.photobucket.com_albums_y309_95builtjeep_gone_20postal_DSCN2632.jpg


New shackle angle.What do you guys think? Better?
ai1024.photobucket.com_albums_y309_95builtjeep_gone_20postal_DSCN2634.jpg


Painted shock. It's not very "hardcore" but its part of the puzzle I guess.
ai1024.photobucket.com_albums_y309_95builtjeep_gone_20postal_DSCN2633.jpg


New height. The new shackles raised the front about an inch or so.
ai1024.photobucket.com_albums_y309_95builtjeep_gone_20postal_photo17.jpg


My cage tie-ins didn't rub the tire. Love it!
ai1024.photobucket.com_albums_y309_95builtjeep_gone_20postal_photo18.jpg


Flexed out.
ai1024.photobucket.com_albums_y309_95builtjeep_gone_20postal_photo19.jpg


Leafs flex pretty good too. It's not in the coilover category but they work okay for me...and my budget.
ai1024.photobucket.com_albums_y309_95builtjeep_gone_20postal_photo20.jpg


Another.
ai1024.photobucket.com_albums_y309_95builtjeep_gone_20postal_photo21.jpg
 
Back at it again today. This can be day 6 or 7. Not too sure at this point. I'm getting some nice calluses on my hands. :D

I started off this morning messing with mounting the steering box but I didn't have the right length bolts. :shaking: So I started working on the sheetmetal work. I got the foot panel welded in and got the battery box mounted up. I welded the firewall like Chris at MarsFab does...or at least tried to. I think his technique is super cool so I gave it a shot.
ai1024.photobucket.com_albums_y309_95builtjeep_gone_20postal_DSCN2635.jpg


ai1024.photobucket.com_albums_y309_95builtjeep_gone_20postal_DSCN2636.jpg


The rest of the passenger floorboard. There was one more bend added up top because the floors are angled twice by the way I built them. I'm using 14ga metal for the floors. Its pretty heavy duty for floors so it should hold up great.
ai1024.photobucket.com_albums_y309_95builtjeep_gone_20postal_DSCN2638.jpg


Fully welded in place.
ai1024.photobucket.com_albums_y309_95builtjeep_gone_20postal_DSCN2639.jpg


ai1024.photobucket.com_albums_y309_95builtjeep_gone_20postal_DSCN2640.jpg


ai1024.photobucket.com_albums_y309_95builtjeep_gone_20postal_DSCN2641.jpg


Shot of underneath the tub so you can see where I welded the floors from the bottom too.
ai1024.photobucket.com_albums_y309_95builtjeep_gone_20postal_DSCN2644.jpg
 
Another day in the garage. I finished up the driver side floorboard and started working on the tunnel also.
ai1024.photobucket.com_albums_y309_95builtjeep_gone_20postal_DSCN2650.jpg


Another.
ai1024.photobucket.com_albums_y309_95builtjeep_gone_20postal_DSCN2651.jpg


ai1024.photobucket.com_albums_y309_95builtjeep_gone_20postal_DSCN2652.jpg


From the other side. You can see my cardboard template.
ai1024.photobucket.com_albums_y309_95builtjeep_gone_20postal_DSCN2653.jpg


I also welded the rollcage to the floors in the front. Since I'm using 14ga steel, I was able to weld it without it burning through like with typical sheet metal.
ai1024.photobucket.com_albums_y309_95builtjeep_gone_20postal_DSCN2654.jpg


Another.
ai1024.photobucket.com_albums_y309_95builtjeep_gone_20postal_DSCN2656.jpg
 
man dude ...rock on...thats all i can say...but im only three weeks into mine so ...hmmmmm...anyway im going to stretch my front cowl by like 5-6"s so i can shove the grill,hood, and fenders forward..and i think the xj is going to have to cough up its drivetrain(for now)...want to run oldsckool in the DJ...i.e. a ford 400/c6/np205...it would definitly seem you had a better body to start out with than i did...well back to the beer drinkin staring stage..
 
man dude ...rock on...thats all i can say...but im only three weeks into mine so ...hmmmmm...anyway im going to stretch my front cowl by like 5-6"s so i can shove the grill,hood, and fenders forward..and i think the xj is going to have to cough up its drivetrain(for now)...want to run oldsckool in the DJ...i.e. a ford 400/c6/np205...it would definitly seem you had a better body to start out with than i did...well back to the beer drinkin staring stage..

Thanks man! Your body did seem to have alot of rust. I think they were about the same but mine just had some "creative" body work done by the previous owner to hide all the rust. :shaking: You do have a much longer wheelbase than mine. Yours is looking more like a mud truck. It's cool to see how people start out with the same blank canvas and build them so different. That is what makes this all so fun.
 
Any of you guys install an Advance Adapters t-case / transmission adapter? This thing is a damn puzzle! It doesn't seem like I have the right hardware, it took 2 and a half months to get the adapter and the directions are garbage.

here is my dilemma. The clocking ring that came with the kit needs allen head hardware to work (at least it seems that way with me) but there are not any allen head bolts in the kit, only 2 different length hex head bolts. Those won't work with the clocking ring because you can't fit a socket in the holes. Wouldn't you guys think the same thing?
ai1024.photobucket.com_albums_y309_95builtjeep_gone_20postal_photo22.jpg
 
Okay. So I talked to Steve at Advance Adapters today, who was very helpful! Apparently I don't need the clocking ring at all since I have the "short stick out NP231" (from AX15 or AW4 model t-case) so the transfer case will bolt to the adapter housing like what I showed above. The customer service rep and I scratched our heads for a few minutes trying to figure this out. All should be good now. I won't need allen heads at all.

Thanks for the info about the t-case I bought from you BRUISER! Hopefully I can butcher my floorpans that i just finished tonight or one night this week and flatten a piece of the tubing of the roll cage seat cross bar to make the t-case fit in place. One step forward, two steps backwards. :shaking: One plus about having to alter the floors and roll cage means that the t-case and transmission will fit up close to the bottom of the frame to achieve an almost flat belly pan. From some rough measurements last night, my driveshaft will be about 16-18". Pretty short but not impossible I don't think. It has a lot less angle than my YJ has so hopefully it will work out okay.
 
You planning on doing tube sliders to protect those pretty rockers you built? Im loving this build, damn nice work buddie!!!
 
You planning on doing tube sliders to protect those pretty rockers you built? Im loving this build, damn nice work buddie!!!

Say what? tube sliders? :confused: I thought paint would slide well over the rocks. jk. You know I'll repaint and/or alter them whenever they get banged up. :D

Thanks man! I am glad you like it.
 
Another day in the garage. My postal is finally a 4WD after a full year of work. :D The Advance Adapters kit worked but I had to use some hardware I had on hand since they didn't supply enough of what I needed. It also included that clocking ring that I didn't even need. I cut the output shaft like specified in the directions and double-checked everything to make sure it was all correct. The output shaft on the SM465 is HUGE!! I wrapped a wet rag around the output shaft when I cut it to make sure too much heat didn't get into the transmission. Then I beveled the edges so the new adapter shaft could slide on easily.


This is the final cut length.
ai1024.photobucket.com_albums_y309_95builtjeep_gone_20postal_DSCN2658.jpg


Rear of the 2wd transmission after I cut the shaft and added their coupler to make sure the rear bearing didn't move outward.
ai1024.photobucket.com_albums_y309_95builtjeep_gone_20postal_DSCN2659.jpg


You can see where I had to notch the roll cage front tube and cut the floor I had already completed. :shaking: You can see where I capped the ends of the rectangle tube subframe where I had to cut it out. I didn't have to do this, but I didn't want it looking like sh*t when you looked under the jeep.
ai1024.photobucket.com_albums_y309_95builtjeep_gone_20postal_DSCN2664.jpg


T-case in it's final resting place.
ai1024.photobucket.com_albums_y309_95builtjeep_gone_20postal_DSCN2665.jpg


Notched tube. Do you guys think this will be strong enough the way I notched it or should I add perpendicular supports on each side of the notch.
ai1024.photobucket.com_albums_y309_95builtjeep_gone_20postal_DSCN2666.jpg


Almost flat belly. :D That crappy looking cross member that is hanging down so low won't be there when I'm done. I'm going to build a tube transmission cross member so it fits up tight. That cross member is just in there right now to hold the transmission until I build that new cross member.
ai1024.photobucket.com_albums_y309_95builtjeep_gone_20postal_DSCN2667.jpg


Rear shot. I had to grind down one of the cast pieces that stick out the left side of the t-case to keep it from hitting the frame. It fits like I actually knew what I was doing. I assure you I did not!
ai1024.photobucket.com_albums_y309_95builtjeep_gone_20postal_DSCN2670.jpg


Couple more.
ai1024.photobucket.com_albums_y309_95builtjeep_gone_20postal_DSCN2671.jpg


ai1024.photobucket.com_albums_y309_95builtjeep_gone_20postal_DSCN2672.jpg
 
WOW! Thats all I can say. I wish I could get that much work done in a week. Man it's looking great. And as far as the tube you notched, as long as you put a piece back in it to keep it closed, I'd say leave it. It may be a little weaker than the rest of the tube but not by much in that position I wouldn't think. Thats only my opinion though. It's still looking pretty awesome man. Keep at it and get it done so you can get it out there and wheel it.
 
I will get up there one of these days and get that crane. I bought another one at an auction so I am really in no hurry to come get it if it isn't in your way.

That is cool. Just pick it up whenever you're in my area. I can keep it a few weeks, I just don't want my neighbors getting upset.

WOW! Thats all I can say. I wish I could get that much work done in a week. Man it's looking great. And as far as the tube you notched, as long as you put a piece back in it to keep it closed, I'd say leave it. It may be a little weaker than the rest of the tube but not by much in that position I wouldn't think. Thats only my opinion though. It's still looking pretty awesome man. Keep at it and get it done so you can get it out there and wheel it.

Thanks man I really appreciate it. I thought the notched tube would be okay but I wasn't sure. I'll leave it. I might add a few perpendicular pieces of tube and then build some cupholders to that piece. I am really happy with the work I got done last week. I just need a few more weeks like that and I could get it done. I'll get it done soon. I'm really starting to make some headway with this thing. It's great because my tiny garage is getting bigger since all the parts are making their way to the jeep. :D
 
Back at it today. First I stripped down the factory XJ 4wd shifter so it's as simple as possible. It will shift backwards now that it doesn't have the factory pivot point but it's no big deal to me. It will add more quirks to this turd bucket.

The parts that I removed are in the top portion of the pic.
ai1024.photobucket.com_albums_y309_95builtjeep_gone_20postal_DSCN2673.jpg


I finished the rear hump today too. I call it..."the growth".
ai1024.photobucket.com_albums_y309_95builtjeep_gone_20postal_DSCN2674.jpg


ai1024.photobucket.com_albums_y309_95builtjeep_gone_20postal_DSCN2675.jpg


ai1024.photobucket.com_albums_y309_95builtjeep_gone_20postal_DSCN2676.jpg


I also cut and re-welded the shifter and then added a few bends so it fits nice with the right hand drive shifting.
ai1024.photobucket.com_albums_y309_95builtjeep_gone_20postal_DSCN2677.jpg


I also got the seats back in it.
ai1024.photobucket.com_albums_y309_95builtjeep_gone_20postal_DSCN2678.jpg


Floors with the seats mounted.
ai1024.photobucket.com_albums_y309_95builtjeep_gone_20postal_photo23.jpg
 
Got a few more items checked off of my punch list. I drilled the dash for the gauges, toggle switches and new ignition switch I'll be running. I also got the steering column mount welded in place. I just need to drill the dash for the steering shaft and it should be about done.
ai1024.photobucket.com_albums_y309_95builtjeep_gone_20postal_DSCN2679.jpg


I just used a piece of scrap tubing to see where I wanted the steering wheel to be. It felt really comfortable at this position.
ai1024.photobucket.com_albums_y309_95builtjeep_gone_20postal_DSCN2680.jpg


ai1024.photobucket.com_albums_y309_95builtjeep_gone_20postal_DSCN2681.jpg


ai1024.photobucket.com_albums_y309_95builtjeep_gone_20postal_DSCN2682.jpg


Upclose of steering column. It's nothing fancy but it should work okay.
ai1024.photobucket.com_albums_y309_95builtjeep_gone_20postal_DSCN2683.jpg
 
Question? Do you guys see a problem with mounting the cross member solid to the adapter between the t-case and transmission but putting bushing on both ends at the frame?
 
I got the dash cut for the steering shaft/column. I still need to have Charles TIG the end for the quick disconnect and run the heim firewall joint, etc.
ai1024.photobucket.com_albums_y309_95builtjeep_gone_20postal_DSCN2685.jpg


My big project for today was getting the steering box mount completed. I'm using a standard 4 bolt saginaw box from a chevy truck that will be attached to the outside of the right side framerail. The mount is made using 1/4" for the top piece and 3/16" for all the other pieces. I used 1" .25" wall DOM for the frame sleeves.

Inside piece.
ai1024.photobucket.com_albums_y309_95builtjeep_gone_20postal_DSCN2688.jpg


Outer piece painted.
ai1024.photobucket.com_albums_y309_95builtjeep_gone_20postal_DSCN2693.jpg


Another.
ai1024.photobucket.com_albums_y309_95builtjeep_gone_20postal_DSCN2696.jpg


Box mounted in its final resting place. :D
ai1024.photobucket.com_albums_y309_95builtjeep_gone_20postal_DSCN2697.jpg


ai1024.photobucket.com_albums_y309_95builtjeep_gone_20postal_DSCN2698.jpg


ai1024.photobucket.com_albums_y309_95builtjeep_gone_20postal_DSCN2700.jpg


ai1024.photobucket.com_albums_y309_95builtjeep_gone_20postal_DSCN2701.jpg


ai1024.photobucket.com_albums_y309_95builtjeep_gone_20postal_DSCN2704.jpg


Tire turned to full lock. You can see there should be plenty of room for the pitman arm to not contact the tire.
ai1024.photobucket.com_albums_y309_95builtjeep_gone_20postal_DSCN2705.jpg
 
Hey bud, this build looks f'n great!
You're doing a hell of a job, I hope to get to see it in person.
I'm in Charlotte as well, and also a graphic designer.
I've got a busy schedule, but if you run into a spot where you need a hand, hit me up and I'll do my best to help you out.

Cheers,
Burleson
 

Thanks Joe! I'm trying to make it as blingin' as the front axle in your XJ. Mine can't look like buzzard crap or you might be embarrassed to ride with me. :D

Did you purchase or build the fuel cell brackets?

I built it. I could probably build another one or one similar if you need one. Just hit me up.

Hey bud, this build looks f'n great!
You're doing a hell of a job, I hope to get to see it in person.
I'm in Charlotte as well, and also a graphic designer.
I've got a busy schedule, but if you run into a spot where you need a hand, hit me up and I'll do my best to help you out.

Cheers,
Burleson

Thanks Burleson! I really appreciate it. This is my first ground up build so I'm pretty happy with it so far. I do wish I would have chosen YJ rear springs instead of the XJ's (the left rear is already sagging and I haven't even wheeled it yet :shaking:) and some other stuff but I hope to have a pretty nice "jeep" when it's done. You're welcome to come by anytime. I am usually in the garage every weekend all weekend long.
 
Back
Top