My First Jeep CJ

Well works been kicking my tail...

One thing that has always bothered by about the CJ was the bolts that are to secure the xfer case pan the frame were barely doing their job.
The threads in the frame that were to secure the bolts were almost stripped out.

So out comes some angle iron and the welder

View attachment 302342 View attachment 302343

Next was to reinforce the pan and add some extensions.

View attachment 302344 View attachment 302345

Then the modified pan was bolted to the welded on pieces of angle iron

View attachment 302347 View attachment 302348

Now I can drive the CJ around the yard w/o worrying about the Dana 20 falling down.

View attachment 302346

Of course the Dana 20 is leaking like crazy.
The rebuild kit is on back order.
Might be time to have the cage installed.
Zert nuts, might have been an easier fix! I've run the T-18 /D 20 combo, for years. Several years back, installed the Don Custer Twin Stick. It's Much easier to use & shift, than the Single Factory shifter. I still get bind sometimes in 4 low. If it doesn't want to "rock out", I just hop out & unlock a hub, or two. Releases the bind, & slips right out.
 
Well, its has been way too much work work recently.

John was nice enough to offer to help with a couple of the bigger projects left to finish.
One of the bigger problems was the Dana 20 had a bad leak and was locked in 4 Low.
Ordered a rebuild kit with the optional aluminum pan from Novak.

The Dana 20 was a real pain to get out since the exhaust and anti-wrap bar was installed.
Once those were items were out of the way, the Dana 20 came out.

The Dana 20 looks relatively small, but there is a bunch of parts.
John's favorite part was all those roller bearings. :D

IMG_8665.JPG

A couple shots of the Dana 20 being rebuilt

IMG_8663.JPG IMG_8664.JPG

Long story short, the Dana 20 is back in the CJ and it shifts really nice.
 
One of the things that was a must add before the next trail ride was a cage.
Since the CJ is not a bonce buggy and is just going to be for medium trails, and needs to be usable on the streets, what cage is needed?
A couple of other factors include a need for a harness bar, which means the rear seating option will be lost.

After looking at a bunch of different cages.
A lot of folks tie the cage to the frame.

One issue was a cage to frame route was the A-Pillar tube and the dash pad along with the 1/2 doors.
After talking with the folks at GenRight they have a solution for the clearance issues with the CJ

GenRight Cage.jpg GenRight Cage 2.jpg GenRight Cag4e.jpg GenRight Cage3.jpg
To get the clearances, GenRight recommended to go with their A Pillar kit.

Since John was willing to help build a cage, we both chipped in picked up a tubing bender and a notcher.
Then a trip to Race City Steel to pick up some sticks of 1.75" 0.120 wall DOM tubing.

John and I came up with a plan to build a cage that would tie into the A Pillar and B Pillar.
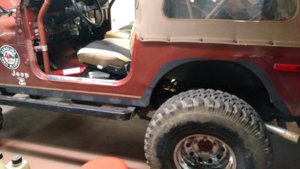
This is the result.

IMG_8682.JPG IMG_8684.JPG IMG_8686.JPG IMG_8691.JPG IMG_8687.JPG

One thing that was discovered was if you weld the A pillar DOM to the A Pillar Kit, then it is not possible to easily remove the cage.
Since the cage has to come off to power coat it, those two parts are now designed to be bolted together.

One nice feature is the bikini top still fits.

IMG_8698.JPG

The cage was inspected by the dogs and they approve.

IMG_8697.JPG

Any thoughts before this cage goes to get painted?
 
Nice cage, & the cowl mount may be more ridge than mine, but seems like too much work for the outcome. I've been satisfied with mine; tube to the floor. Floor pics were posted back when you were doing the floor pans.
 

Attachments

  • EXTRAS 004.jpg
    EXTRAS 004.jpg
    93.2 KB · Views: 245
One of the things left on the list was to address the steering in the area where it comes out of the firewall.
The old bearing had jumped out of the plastic cup that holds it in place.
IMG_8794.JPG

Taking off the steering shaft was not too bad since that had been recently replaced.

IMG_8797.JPG

The old bearing took a bit more work, but nothing the PB plaster and and some leverage could not handle.

IMG_8798.JPG

With the old bearing off, it was time to remove the three remaining pieces, the plastic cup, the metal retaining ring, and the spring clip.

IMG_8807.JPG

After cleaning up the steering shaft and its housing, time to press the new bearing into the plastic cup.
It simply snaps into place with moderate pressure.
IMG_8808.JPG IMG_8809.JPG IMG_8810.JPG
Some red grease was applied and the plastic cup and bearing were put onto the steering shaft. Note, the plastic cup has notches and must be aligned to the steering shaft housing.
IMG_8811.JPG IMG_8812.JPG

With the cup in place, put the metal retaining ring over the plastic cup and install the retaining clip. The notches in metal retaining ring must be aligned notches in the steering shaft housing

IMG_8814.JPG IMG_8815.JPG

Install the steering shaft and then install the set screw and lock nut using locktite.IMG_8817.JPG
 
The cage was dropped off at the powder coat place.
Should be ready in a week or so.

IMG_8845.JPG

A bunch of straps were used to keep the cage from moving on the trailer.
Of course it's always a pain to keep up with the ratchet straps, so a triangle box was ordered.
The instruction say to use the sheet metal screws to the hold the box in place. Not going to happen...
Welded some aluminum angle to the trailer and drilled some holes.

IMG_8860.JPG IMG_8861.JPG IMG_8862.JPG

Of course, had to use some SS fasteners.

IMG_8863.JPG IMG_8864.JPG

Then bolted the box to the trailer. Used some grease to keep the SS bolts from galling.
IMG_8865.JPG IMG_8868.JPG IMG_8869.JPG

Now I know where my straps are.
 
Picked up the cage from the powder coat shop.

IMG_8966.JPG IMG_8971.JPG

The yellow dog approves of the powder coating. The black dog (her sister) has past ~week ago.
I was hoping to take the dogs for a ride when I get done with this build (hopefully one day).
I guess it will be just the yellow dog and me.

The next day, the tractor was used to install the cage.
IMG_8975.JPG IMG_8976.JPG IMG_8978.JPG

Then bolting the A-pillar pieces and bolting the cage to the tub.
For the B-pillar, the old brackets from the original cage were reused.
Also made a couple of underside plates to sandwich the tub sheet metal.


IMG_8979.JPG IMG_8980.JPG IMG_8981.JPG IMG_8982.JPG IMG_8986.JPG

Need to make some more underside plates and finish bolting everything together.
 
Last edited:
Started on the heating system.
The old heater core was leaking and the old control cables were stuck and/or broken.

After removing the lower portion of the heater box, a 5 piece set of Barney's Jeep heater control cables were ordered.
They state they are made in USA and are really great.
When they arrived, I was pleasantly surprised.
The quality was great.
IMG_9044.JPG IMG_9045.JPG
IMG_9046.JPG IMG_9048.JPG
What I really liked was the new cables came with new push nuts that secure the ends of the cable onto the heater controls

Compared to the set that was on the CJ, Barney's is a much better design

IMG_9047.JPG IMG_9049.JPG

The old set used plastic clips that broke.
The new set has a metal nut to secure the cable to the dash.

Here is a picture of one of the new cables installed.

IMG_9051.JPG IMG_9052.JPG IMG_9050.JPG
 
A Jeep with heat! BLASPHEMY!
 
So it would be pure heresy for the CJ to have heated seats too?
Being a EE, it would not be too hard to modify the seats.
they sell seat heater kits. Heck with the top off or if it's as drafty as my old yj was a decade ago, you'll be forever thankful if you do. Bonus points if you get the massaging heated inserts!

Not heresy as long as they're not Bluetooth!

But you may need to upgrade the alternator next.
 
Finally got the HVAC heater box rebuilt and installed.
The new heater cables are great.
Took a while to figure out what wire in the engine compartment when to the blower motor.
It turned out to be a tan colored wire with a black plug on the end.
Just had a make a jumper wire from the black plug to the spade terminal on the motor.
The upgrade fan really puts out some air to vents.
 
Knocked a couple of small things this past weekend...
With the install of the roll cage that bolts to the A-pillar, the parking brake release handle had to be bent.
Moved some cabling away from the headers.
Need to re-install the radio then install the seats and harness.
Getting closer to having this rig ready for the trails.
Now if I could just find an AMC 401 :D
 
I must confess,
Been working on another Jeep project, so the CJ has not received all the attention it deserves.

However, I did work on the shifters for Ox Lockers.
Had some 1" square tubing around and made a platform to mount the shifters for the lockers.

IMG_0374.jpg IMG_0375.jpg IMG_0376.jpg
61193715393__A5010210-4E51-4A03-95C0-BCEFE7917087.JPG IMG_0378.jpg

After installing the shifters, the seats were installed.
Working on the belts now.
 
Back
Top