Project: Tetanus Shot - 1948 Willys

That is a good idea. Although these shackles are temporary, not really a big fan of them or the length. I guess the only way to correct it is to either get bigger springs for the front or try and flatten the rear by removing a leaf
 
50# bags of "play-sand" ($3-4/ea) to see what happens with a full cell/seats/etc... though I'd suspect even 300# (way more than what you've listed) won't squat it...
 
After looking at it some more, I think I am going to go with SOA in the front. This should level it out and provide better performance off road. Does anyone have a link to spring perches for the front D44? The reason I ask is that the passenger side perch is cast into the housing more or less.
 
Wow...been a while. Between work/school/weddings, not much as gotten done in the month of May. I ordered a set of spring perches from 
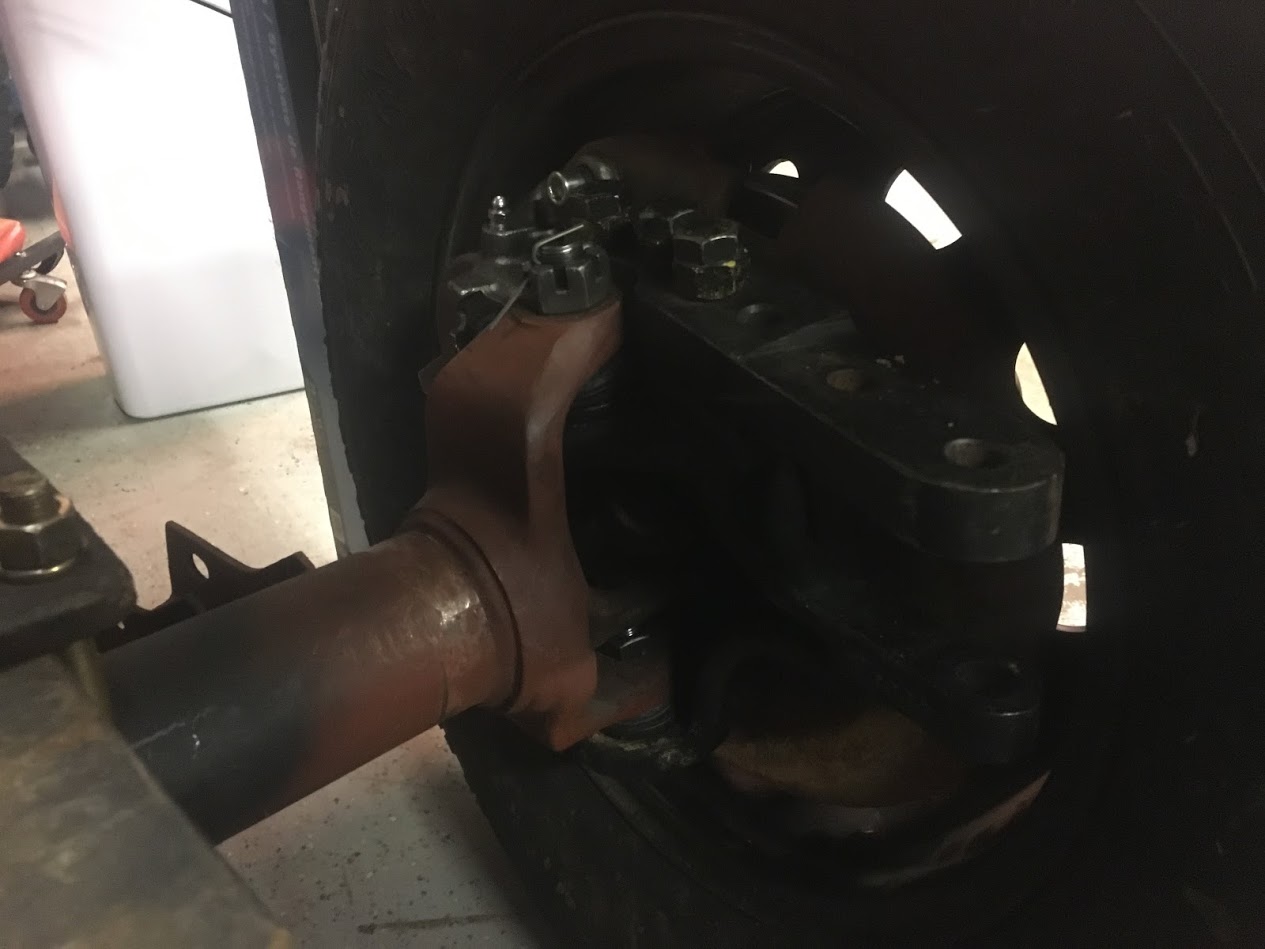
@Barnes 4wd and they showed up today. The plan will be to SOA the front axle which should level everything out adequately. I will have to modify the perches to fit around the cast housing on the passenger side but it should not be a big deal. Last weekend I decided to tackle the skidplate. My plan was to remove the original crossmember/skid and redesign it so that I have a somewhat flat belly. Here's the original skid plate.


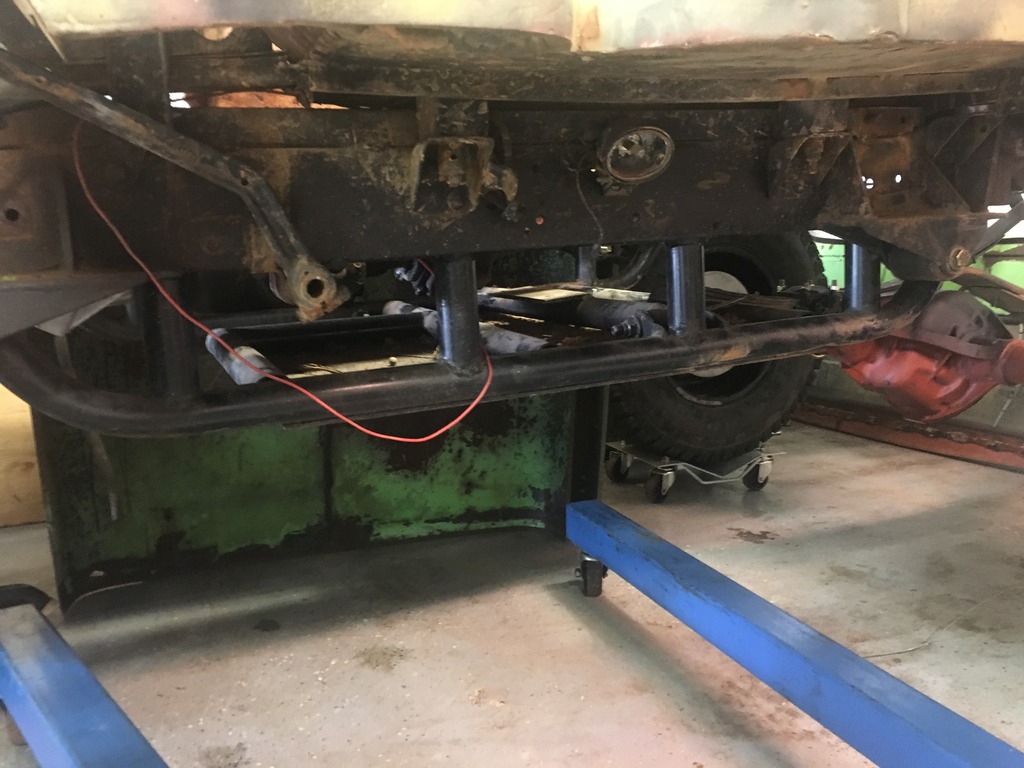
It hung down quite a bit and added a lot of weight. Fired up the sawzall and with a pair of fresh Lennox Torch blades it came right out.


Now that the old one is out of the way, its time to build something functional. I am going to clock the D300. This will allow me to stuff the drivetrain up inside the framerails, better belly height etc. To do this I have to go from twin sticks to cable shifters. Luckily @justjeepin86 had a pair of cables and the bracket that I could use. I'll fab up a simple shifter design in the future. While I have the D300 out of the jeep, I'll upgrade the balls/springs so it won't have the tendency to pop out of gear.

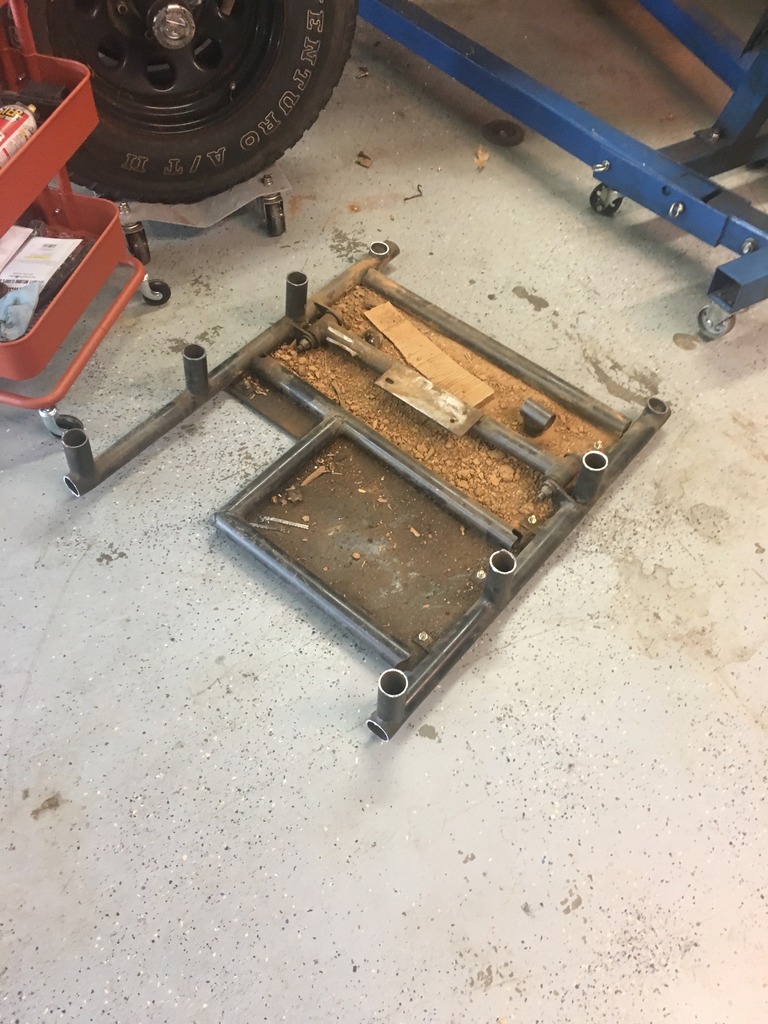
My crossmember will be built out of 1.75"x.120" DOM and should be simple enough to bend up(thanks @rockcity for the bender). I am planning on making two crossmembers. One will serve as the transfer case mounting point. The second one will be behind the rear tailshaft of the D300 and will be tied into the first one. A simple hoop will be added to the front crossmember to protect the transmission. The crossmembers will be welded together but will be bolted to the frame so that removal is easier. Some areas of the crossmembers might get plated as well depending on final design/layout. Lastly, the transfer case mount will be cut down so that the crossmember can be as high as possible. The transfer case mount already has a poly bushing in it so I will not need to put bushings on the frame mount. As always, if anyone has a better design or idea, please speak up :beer:
 
Got a set of cables and a bracket from @justjeepin86. They fit perfectly, thanks again! Pulled the trans back out of the jeep on Friday, cleaned it up really good and then got to sawing off the stock shifter bracket. I made up some collars with a tab welded on to them to slide over the shift rails so the cables could attach. I had to cut off two small tabs from the shift rail cover so that the cable shifter bracket could fit.


Dropped the case back into the jeep and was able to clock it flat:bounce2:


Now instead of 5-6" of case hanging below the frame rail, I have about 1.5". I can raise the transmission/transfer case up a few degrees more and it should result in a completely flat belly pan. I might have to rework the floor but in it's condition I'm not too worried. I'll be bending some tube up tomorrow for the crossmember and hopefully will then start working on SOA the front axle.
 
Looking good
 
Is the bottom of the transmission not several inches lower than the t-case? I looked at clocking mine, but wasn't really worth it because of the transmission depth. Did clocking help with drive shift clearance?
 
Is the bottom of the transmission not several inches lower than the t-case? I looked at clocking mine, but wasn't really worth it because of the transmission depth. Did clocking help with drive shift clearance?

Clocking the transfer case definitely helped with front driveshaft clearance. On the SM420, there is a large bump in the case that houses the reverse gear, with the transfer case in its original position it was very close coming in to contact with it. Now that its clocked, there is no issue with the driveshaft. Bottom of the transmission is in line with the transfer case now.
 
Got a lot done yesterday on the Willys. The transmission/transfer case crossmember is installed. It's made of 1.75"x.120 DOM. First time using a bender and I think it came out really well. It's bolted to the frame so I can remove for maintenance etc. The transfer case mount got shortened as well from its stock height. Still need to drill and bolt the mount to the crossmember and add some more bolts to the bottom of the plate on the frame to but it is currently holding up the weight of the drivetrain


The plan is to make another crossmember identical to this one and place it behind the tailshaft of the D300. We will then run vertical bars between them to add rigidity. A traction bar will also attach to the rear most crossmember. I'm planning on using some interocking tube couplers. I'm also planning on adding a small hoop off the front crossmember to protect the transmission. All of the drain plugs/fill holes are easily accessible as well.

Even though its not "flat", I gained 3-4" of clearance which will help out quite a bit. I'm happy with how it turned out.

Next step will be to pull the front axle and weld the new spring perches so that I can go Spring over.
 
I just finished my first shot at building a crossmember for my ranger. How did you determine the appropriate height/angle for trans?? When you finally loaded the crossmember, how much did it drop when it compressed the poly? Yours looks great.
 
I just finished my first shot at building a crossmember for my ranger. How did you determine the appropriate height/angle for trans?? When you finally loaded the crossmember, how much did it drop when it compressed the poly? Yours looks great.

The poly compressed no noticeable amount. It's pretty stiff, I'm sure once I bolt it down it will compress a small amount though. With most of the floor missing, I could have raised the rear of the drivetrain almost completely through the floor which would have given me a totally flat skid plate.

However, I was worried about oil starvation in the motor. I could have done raised motor mounts but there really isn't that much vertical room in the engine compartment once the air cleaner is bolted on. We raised the rear of the drivetrain until we had about a 1/2" separation from the top of the transfer case to the remaining floor. It's still angled down a few degrees as well so I shouldn't have a problem with oil starvation. Hopefully we will be able to build the rear crossmember and assemble a traction bar in the coming week(s). Appreciate it bud, it's getting there
 
Last edited:
Reworked the front suspension today and went SOA for the front. Now its sitting just a tad high in the front which is great. I should be able to easily level it out by using the correct shackle lengths


Next step will be to build the rear x-member and finish the traction bar. That should complete suspension work(with the exception of shock tabs on the rear). I also need to start researching high-steer options.
 
You don't need all that. Just do what Fuller did and it wil be fine. :lol:

That abomination won't come anywhere near this. I'll build the high steer correctly so I can drive it on the street without killing myself and a bus load of nuns/orphans/puppies :lol:

My friend that is helping me out with the Willys has a well stocked wood shop(he makes custom guitars as a hobby). We were playing around with his CNC wood machine and decided to test cut some shifter knobs for the Willys. These are only test cuts and will be a lot bigger when finalized/finished. Still need to get a good picture of the D300 shift knobs as the picture we pulled the patterns from was slightly distorted. I'm thinking of using cocobolo or some other hardwood. Whole process took about 2hrs with design/setup/bit changes.


Those are awesome. I would love to have a few for the Tacoma. Doesn't even have to be fancy wood.
 
Bringing this back to the top. Been working night shift 72hr weeks for the last couple months. No time to work on the Willys. Current progress is the following:

Fenders on, grill mounted and radiator secured. Reworked my transmission crossmember to gain a couple more inches clearance. Still need to build the anti-wrap bar(have to pick up some tubing) Picked up a set of hi-steer knuckles from @Caver Dave and in the process of rebuilding the front axle with new Moog balljoints. Transmission tunnel framing is coming along. Still need to build shifters for the D300. Once the interior is in good shape, I'll move on to engine wiring/plumbing/brakes/clutch linkages.

Will update with pictures when I get home.
 
You should look into Land Rover used radius arms for axle wrap control 1999-2004 Land Rover Discovery Front Radius Control Arms Trailing | eBay
I used them on mine with a few mods to them and it works great. I cut off the end and extended it and ran it to a Johnny joint/shackle attached to the frame. John Cappa used them on his Flatty also that he has been building but for use as real control arms. If you're interested I can do pics of mine later.
 
I already have the Ruffstuff kit for the antiwrap bar. Just need to get some tubing. Those do look promising though.
 
Alright, picture time.

_l6zAhWX7h1pEuI_rUTr0bNN9vS8jQWNqgIVKGrgxmDI1bWs4kYlAJs-OftwOlF6J9AkoYNc6cT3rqHekHIv56R5ysNuSZbhn-MuNvBwm3DFM_E40gLEgkyN5LxJyw1zYkaD-9-KUgpCE8MHv5Up237sVab7mV5_09T2uKMwtHtq2j_bntxgcn8uv8j8pkU4qQIOdw4uZt1FXUHhwfjpekH3lltyHgDIrD0EKvzbBsNSZW3lZcxPQvk7xipxFFHARJe5DiAyf4CZLXpJiMsUlkWgopyW-cHaDiNOVjUmSu8Jo3RcVfqV_JpnbAu3FjUFcukO4KtC5XbzBGbujigKQIJcD4UolFd06Jj0qN6wvGT5Zbf4NvuC7sazlLn-ydAwo-OzPrZHDz3x0Sn2dj19xLQP5Y0PZrb_33MybkhTYouyl9YtUqIDv1EKnP11q3p43fjBaNSwImrTfwz_16VZG17olZp4fCg-x8oDog2yTNOkzmgSK9jOWwKjdo1l2-ywRjYuUO422DnBEFACry8lTD2bCTSGFaWGDt0MQ8is7TdoJdBVR5VRrGmg4AKNCTfwWBQmWWePrs8iQb7rszcLDrsUsZ7Mr-1VybqKXDrkpw=w1266-h949-no


Grill/Fenders mounted for now. Still need to get some hardware to button everything up.

o2WV_4Jl16MbnphHZB6G5_1SeOrbywQuAi-n76DBHbzI48Z2_6RxqHE2VNbAxboOCZyWluu0Q6pMbYfP0FGXEuzIoinDno984KR869-sx8Kjoq4r-szZ9WbLOaI8H-TS7Rj_cYOEfnwMf3RCiCZ-aSUiSNYg_RPRKEsuEggF_qnGyMGrcQMfOJ109-fi-nRjNIzd1N2gnmyV_2Vz6h_zB6p_K-6ndXhR5vPOa-OUvGhYlMVFYzIdCKpQPQtquIevWwcHlAt4Fz5hxCgBGHg80R4W9pZkc49SCbKDznz2SfckESrt2ukJz_PfcwqUGxiiW9qwgKjXh-7WJDK8hmVD7MJvUP05T98-8k1mUbPtK_GVI1L2gMByX40OHDyUuDDzz-Az2qECRyaSBnxoI_sjUCaf4YbkSC7TuMc4r0y0CVaOyIb2rRPzdJcCK2bAVPIgeFuhmadqjvNvZ_d-byUZ0stGChBHGPuJtNG2fEMCoAZWbSta9d_JzdJ1K4fRVmS3NhUI-JWqn7WzZD-Fymkfdu1gFTnZTldTL8vYfTTQt0sl20KXDwDKdUlna5i6ic7DyfWzAx1KYL7N1XHon9X-MYV7NyNDEgWKCNlmt919fw=w1266-h949-no


Alternator and radiator installed as well. Picked up a 20tn press from HF with a 20% off coupon. It did its job well.

5Uutg0zfJWBgQyt1ig_Q566fKKP5_L9iWd2mKqvPqCZSLD5T9hbmsNW0SGGrn70zVeZb6Q_A-n9gXqoYSD8q5kEZpKyc76PopW2LGCwdsN0Nh1BonqVKwLGiVXgS8QKtgs4zMDV8XALegL2vRisjYp4vHkQ6-64S6FQYrODnrNKLomnP_CAVrvkShbydQp_ROeBBhmX-Sfmp99uA-cXtYUiW1R3-gagVrPPQCpqdjFXEGmEGPEemee5Ybs9JKWEYgdYEq23--XnZZMaSTkoOUbO35LaFyucmYtr6-SXPXCJya_3-nihNhLF1DUMMelnMf-od6CSb82pFkt212m7hMDM04DKJcHX_9vc4Eo_36-muyhOxUXxcJ_EGJWT5k0uWpPNMtJtKLJbHjUOSfIWbeJ_y6Fjeu8coqmM1d7qPFA03ew6DqB0KlaOX2L2ZpgoD60KixyKanVqg6hzYKxF4TFN25bswiFd5FRCTLLAm237My91JIp4Toi0s71osLiEp73jGKizpbgTmzuEHT74O9vs896EqilVqsLqEvLalFOUwJEiMgYanc_y0ozn68iTeue6ZMr7DZ7QB3QNRA326mXx2RMqshb5NtnP8g6la-Q=w712-h949-no


The press allowed me to install the hi-steer arms I bought from @Caver Dave
JWfIWb7v4VH6dNDrFrQ7grMmqQjldgTe-6b1Au-4HSu4pFXbc1Yl6pAN0kd3Ng9h-tQlYIdG6LVWqr7KV3XW64hNbTuYr61zJ6fFAZLm9R8DnEjtcfH7obljqIrAHrdq5e1dobbHDVHE6-UTEdg6-q561UOKlc5DQyvcD-HyTCDXGQvcdDKnwx-T1JlhzGYOCBldrN7_RoywaqwR9pBX1H0fTwHADHILgoIL1sq3SMd4fmdFjgqZFziuqK8_MroYc8TV3r96Zpd3sHzbQpidR_1j770UPgWYcfhyFPAPULlOVaTeqBL3mjrDNey2CviP6hHJKHEsKW3Mjx1qESbZD6ymRpmXj61Cf5n-CaOudaP22fQHt4mRC1_MXxY4hWslTJ37upQv-XALh7sOpy_KU0c0Tk15Y2nArw3D3a7BTt7SkoD9MRXfS5gaFyYYxUV5FJ3OMvDDA1b_KrLqLt-TcARH944EHGRDTiBg3nSbsPkp0w7X75c1IOab2GeZmcYedUYiASkCSbt7Grjwt0gkFBVRyzpRDRwoh9yJRqfvO46vjwcHP_vpVPqhhlgJ9nZkUHN_y1LKAQLlxfibOg7tBJHqqsqIechltNxl7AV65w=w1266-h949-no


Npb72Yca326yJv2_U8p-2T41STr7kb5arI4TlRPYNcKRLsBE3eYktWP7MQr7QX62xV4_pUdEN61nfMKuvAYYsJPPH75nVPyg9nrvI--deyOduziNqARaZdp9FwnNRdiRkiVNRWLEz3Fx-gWl_yUeb_INylvJujFk8BNGjxGPpy9RH1-oVSOTz57BDQUV5ONVOV1gvohuGQxL2AuwJSb3ueNfzM0mZCAcjCJPu3ENNN_QGoYR8AqGeT6TiTi8LWfqkabfDx4x3dDGxMSIgRJByEAL4zc5Mcv14sx2vkf16xzHw0Ar4l54Z1SNwsX32Qgkv_VG7r1gx77simyn5c6Vke24QbifzSllt-l5BZhZ6djIFvOvhFaoLaxiaZgN1cDdY5FKg0QVIL0rAw-j0pmkKGws5HhCHwI2BD8FByYExLdF8Xn6RXDOwDnm-MRQCNqZzJQ66I21oaqNXu4J8eaMOupZr3wTqRTYtSw5PhzNlj3SagRo1E8m6WM2bDV66qyGFTIDCSR_f3oF6t_26OOYAqakm2Q-ochRWLiWESma5aZ4h1yZozKSKqgf8vEUntsjS_xNkiNjc9_RB-3HwO_W2uCy6n_e9uMk_TA2zEc_wg=w1266-h949-no


Still need to get the tierod from @rockcity and I need to source a power steering box. I have the wagoneer box but I think it will be too large. I have heard that Astro van boxes are a pretty good fit. I have quite a bit of time off for Turkey day, so hopefully I'll be able to knock some more out.
 
More updates. Picked up a set of well worn 38's on beadlocks from a member on here over Christmas. Got the tires dismounted and then mounted back up to my 36's. First time working with beadlocks and aside from the time spent on 32 bolts per wheel, they went pretty well. I torqued the bolts to about 15ft/lbs and so far no air loss.

PXGDqX7QI3lxMIHLE5mNFKU9z2w-LN2y9632S4Xv_Q9W3DMN2NBahOh_3hD-iYc_08UQHskRNh8IZrlIJSp5l9wnZAeJORYcI0DMLs2yv-1rnNpkDqdHPzkQPdUwpTgAS_pg-roMCx2wPKmvsh4b6iPp5xoZJBChM_nCTP2h3SDdPLqMWB9ndOETrXTLcQCavjfIjrYGaSJqReu8TqXe7CUdNiql-zC4PZfi0qw4MWFZ_99zx6NQC4U8xK2vC56xewUTtFCpqZDPGjB_U1hY3Ppt2-K9Bkj32jezx-F2AvKciPBYp_coA11K507tm93N_EeoNW6NsVTSt86_SIHJEfQrKdEZEBJVY6dAtj2H6IOZET-V7xUHk4dbRPIMe9duNDwtwVfJjsdWDvh8WxaOPEcx2YRpexSO1pjmERiQjFR-aZcgSeNfJ3DVnnFoxlnc76tLoobLGG0TY8YtpsHwMo0Hl2X3EbEN5jOikUhorq3hMDwpw9rzfN4H-cIWG70rgpi4F3qg2zJE-OCU-CJA--eHZmW3IzuKOyH1mVCZansBfXe3nbt9R1t3traqPeHMVLGbWSc4RVXxCxDr6Fhlz8ksVQRMEEVLzxRaJz4=w675-h900-no


96069bA99EhIhNfCuto5_f6rhWvygP2FZDE9Q4vpsTn1z8vT0nF6p_cHjaRKIGqG0yLqBVhc-RrHS6JPk5HI9JWDe6L8b3x37saXLzFZzSy3P1RttkdEJAmmGYsrER5FH6ZmNwRyZQizpCqfdiFDSyhmiXdvLur8aAkbWknWXUGsEXYbgBju7C0eI6pibmgozhZLxQrht43qx00WdAXS8prfVCEUwfBiLmEGpbs4X-Ta1DSkzEnoSkwv3o3nn7lUM85PkU_3Gn_ABe6jokIXwXK04rR9a1UgdwmuwoY_fmV-h_9TwZM9D1awOIDQyMQJIgXCIuFdbXq3pc0IayHY1bgOd7d_BH8oeOrDNp5kGYp9js4enkTnnMB6iOZT5tE8dMkcYTlVSPIsTELP4GTOBRt00JuYjxAx2A8lvGuCgm2agz_ABT9hXvtWHiQOZxM9-m3OthSPt7CM8bUx5a9vrbND9yyzvWmKphJnRjWeySkn_xwsN_hClSWHfELLZXAozYTjoZblD1ZnpXPDuve3SxvFE3wOnvB1j7qHgYPzCO50c_bxEHKewdshnbOoKiaPEXzelXeJ9mLMBn8oc2LT548-pTVDUf9Y6YxDGhk=w1200-h900-no


I think I'll pull a leaf out to lower it some as its sitting pretty high now but that will have to wait until the rest of the cage/interior is installed. I really need to get going on the steering setup as well. I need to source a column, draglink, tie-rod, and a steering box.
 
Looks like you used the barnes universal transmission mount on your crossmember. Their website says it 1/8". Did you think it was sturdy enough?
 
Back
Top