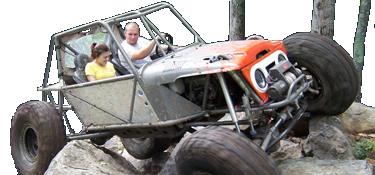
1 Ton YJ'ish Build

TheGriz

Well-Known Member
Joined
Apr 6, 2005
Location
Raleigh, NC
So It will be a long build (slow cash flow for building and buying parts).
Thought that I would share my thoughts, pictures, and tech. And hopefully in return, i'd get some input.
Build Up Basics:
93 YJ - Backhalfed and cabbed
HP Ford D60 (1BIGAZZBURBN!)
14Bolt :)D Thanks Yager!)
Chevrolet 350 small block
700r4 Transmission
TC - 203/205 doubler
39.5-42" tires???
 
It started as a bone stock YJ and i've been selling off the unwanted stuff:
ai71.photobucket.com_albums_i135_sff5758_YJ_20Buggy_20Build_S6300004_1.jpg


While the inflow of parts is going slowly, I started working on the body and backhalf.

Marked up the unwanted section:
ai71.photobucket.com_albums_i135_sff5758_YJ_20Buggy_20Build_S6300087.jpg


Started cutting:
ai71.photobucket.com_albums_i135_sff5758_YJ_20Buggy_20Build_S6300088.jpg


More cutting:
ai71.photobucket.com_albums_i135_sff5758_YJ_20Buggy_20Build_S6300089.jpg


The grafting has begun:
ai71.photobucket.com_albums_i135_sff5758_YJ_20Buggy_20Build_S6300094.jpg


I'm currently welding in floor sections. My welds look like poo. Tyring to remove herculiner and seam sealer has been difficult in some tight regions.
 
I'm not sure. The previous owner had no idea... meaning that it probably has 150k :shaking:. I found it on craigs list with the trans for muy-cheap.

I was told that it ran, but I found tons of sludge when I opened it up. If I stick with this motor, it will need a rebuild or at least a dunk in a hot tank.

I am going to make it a roller before I totally commit to motor choice.
 
I have a 700R4 with a 23 spline output shaft if you want to flip a 300, or Jeep 231, or Atlas. All you need is the adapter portion from AA. Just let me know if your interested.
 
Good luck on the project... it's probably a long road ahead.
 
I have a 700R4 with a 23 spline output shaft if you want to flip a 300, or Jeep 231, or Atlas. All you need is the adapter portion from AA. Just let me know if your interested.

Thanks, I already have a 700r4, but who knows what condition it's in though! It looks to be ok, fluid looked good when I drained it. I'm not sure how many splines my output shaft has. It had a NP231C behind it.
 
Progress 1

Have had some progress over the past few weeks: Here it goes...
Started to smooth the 14 bolt out a bit.
From this:
ai71.photobucket.com_albums_i135_sff5758_YJ_20Buggy_20Build_S6300199.jpg

To this:
ai71.photobucket.com_albums_i135_sff5758_YJ_20Buggy_20Build_S6300232.jpg

Also got my HP60 in. I didn't modify the perches, I just let the hangers stretch a little bit. So far so good. The plates are from BTF. Leaf packs are stock YJ, and shackles are stock... for now at least.
ai71.photobucket.com_albums_i135_sff5758_YJ_20Buggy_20Build_S6300230.jpg

Drilled a hole through the cast gusset to slide the U-bolt through. This may be a mistake, because I have to separate the spring from the perch to get it in.
ai71.photobucket.com_albums_i135_sff5758_YJ_20Buggy_20Build_S6300229.jpg
 
I Used Google Sketch Up to draw up my design. The design is a bit off. When I drew it, I thought that the frame rails continued straight longer than they actually do. In reality, they begin to curve up right at the end of the boatsides.
All tubing is 1.75" .120 DOM.
ai71.photobucket.com_albums_i135_sff5758_YJ_20Buggy_20Build_YJBugyDesignview2.jpg

ai71.photobucket.com_albums_i135_sff5758_YJ_20Buggy_20Build_YJBuggyDesign.jpg

John, Scott, and Jeff came over Friday night and started working on the boatsides. We fish-plated where the tubing meets the frame, tacked it all in and pulled them off for finished welds. We finished the passenger side, and I finished the drivers side up on Saturday.
ai71.photobucket.com_albums_i135_sff5758_YJ_20Buggy_20Build_S6300222.jpg

ai71.photobucket.com_albums_i135_sff5758_YJ_20Buggy_20Build_S6300217.jpg

ai71.photobucket.com_albums_i135_sff5758_YJ_20Buggy_20Build_S6300218.jpg
 
There are 4 collars made of 1.75 OD .120 wall. They run on 1.5 OD .120 wall. Allowing the whole seat frame to slide forward and back.

There are two places where we have drilled through the collar and runners. A 3/8 hitch locking pin runs through to lock it into position. John and Scott thought that they needed grease fittings, so we drilled and tapped them, to add fittings. We can't paint these, and still allow free movement, so liberal grease will be required.

I still need to weld a plate between the front of the two tubes as an emergency stop.

It would have been near impossible to line everything up and keep it from binding, so we drilled 1.5" holes all the way through the 1.75" cross tube and slid one long tube through the cross piece to keep them in the same plane.

Maybe this picture helps.
ai71.photobucket.com_albums_i135_sff5758_YJ_20Buggy_20Build_Seat_slider_detail.gif
 
Back
Top