3D PRINTING

I've seen it in person, and it can do a lot, but not sure it justifies the 7 figure price tag. Basically laser welding additive mfg combined with a CNC in one package. Seems like an extremely narrow use case. But it's cool, and I look forward to buying a broke one in 40 years and spending $17 million dollars to fix it (i assume that will be the equivalent of about $5k in todays dollars).
I read someplace else the Meltio is "only" $300k or so.

I'm really cuious what the g code is like for this, where you have different processes going on simultaneously
 
I read someplace else the Meltio is "only" $300k or so.

I'm really cuious what the g code is like for this, where you have different processes going on simultaneously
Not sure what it would look like on that machine, but on a twin spindle lathe you have a separate program running for each head. Then you add sync codes to keep everything happening at the right times.

Well I just pulled the trigger on a artillery sidewinder X2, anybody got one? Any upgrade suggestions?
Lol.
My son has one in his room. Technically belongs to a friend who is in London for a year, left it w us for him to use for the robotics team.

Overall we like it. Don't know if this has been addressed in the newest version, a drawback w ours is that you can't use direct USB control wo disabling the TFT screen. Which means no Octoprint, which would be my first suggestion.

Jonas added a BL touch for bed leveling. Oh, a .6mm nozzle is nice bc you can take advantage of that big bed and do big prints a lot faster.
 
Not sure what it would look like on that machine, but on a twin spindle lathe you have a separate program running for each head. Then you add sync codes to keep everything happening at the right times.

Well I just pulled the trigger on a artillery sidewinder X2, anybody got one? Any upgrade suggestions?

I have one. Been using it for 6-7 months now. I very rarely have any issues with it. It suddenly stopped printing right about a week or so ago. Took a long time to narrow down the issue(s). I think it was a combination of the bed rollers being loose and the leveling probe not working right. Auto leveling has appeared to stop working, or at least working correctly. The X2 uses a proprietary type probe, so sourcing a new one looks like it requires going back to Artillery which I didn't really want to do. I've been manually leveling and it seems to work fine now.

I haven't upgraded anything personally, it's all pretty solid out of the box. It uses a non-removable glass bed, so DO NOT use a metal scraper or anything like that to remove the prints. They typically come off easy on their own anyway, or use a plastic one. I've been pretty happy overall with it. It's one of the largest FDM printers that isn't an insane price.

I also have a Mars 3 resin printer if anyone is into that stuff. It's a whole different type of printing, but it's pretty cool. Super high resolution small scale prints.
 
What does the washing and curing consist of with the resin printers?
That depends on what type of resin and printer you use. Most of them you use a "wash station" which is basically a vat of cleaner, often a high IPA based solution, you dunk it, swirl around awhile, and set out to dry. Then yet another box for UV curing. Some of them you can get by cheaply by just making your own IPA bath in a bucket.... then set outside on a nice day for UV exposure. But it's not nearly as reliable. Some people even just make their own UV box (just a box w/ grow lights) but IMO the work isn't worth it.

The post-processing is by far the worst part about SLA over traditional FDM. The detail is phenomenal and there are a lot of great materials, but the materials and space needed etc make it a PITA for Home Hobbyist Harry.
 
My son found a candy dispenser on thingiverse, I proceeded to find one I liked the design of better (and he agreed). We modified it to make it shorter so it would cut off a couple hours of print time, he also added 'Droid Parts' since they like star wars. He also drew the little ramp at the bottom as the m&M's wouldn't come out without tipping it forward. I am fine with downloading stuff off thingiverse but I try to make them 'make it their own' if at all possible. He was up this morning before me, uploaded the knob/top cap in cura, exported them, swapped filament colors and printed them himself (he doesn't know the cura settings he just used the settings already in it and they were luckily OK). I showed him how to change filament yesterday so apparently he thought he would take it upon himself to go ahead and print them. I was impressed!

First person to guess what the clear panel is made out of wins nothing.

IMG_20220706_231855346.jpg
 
My son found a candy dispenser on thingiverse, I proceeded to find one I liked the design of better (and he agreed). We modified it to make it shorter so it would cut off a couple hours of print time, he also added 'Droid Parts' since they like star wars. He also drew the little ramp at the bottom as the m&M's wouldn't come out without tipping it forward. I am fine with downloading stuff off thingiverse but I try to make them 'make it their own' if at all possible. He was up this morning before me, uploaded the knob/top cap in cura, exported them, swapped filament colors and printed them himself (he doesn't know the cura settings he just used the settings already in it and they were luckily OK). I showed him how to change filament yesterday so apparently he thought he would take it upon himself to go ahead and print them. I was impressed!

First person to guess what the clear panel is made out of wins nothing.

View attachment 376198

The clear is the sliding top off of a (CCI ?) 100 ct. .22 box.
 
What does the washing and curing consist of with the resin printers?
I decided to go ahead and buy a ready made setup from Elegoo rather than build my own. Seemed easier and the cost wasn't that outrageous.

Resin prints need to be washed in IPA after printing to rinse off excess resin. Some people will also do a second rinse by hand, but I've found that my setup does a fine job on its own. Basically I set the build plate into a vat of IPA and the wash cycle activates a magnetic mechanism that spins the IPA, sort of like a clothes washer. I pull the plate, let it air dry for a while to get rid of all the excess IPA. I remove the part off the plate and put it in a warm water bath to make it easier to remove the supports. Once those are gone, I put the part into a UV cure portion of the station. That solidifies the resin and finishes the part.

It's by far the most annoying part of resin printing, but it's not THAT bad. Just make sure you take proper precautions. Resin is toxic so I wear a respirator, gloves, and safety glasses.
 
Wow. I bought a couple rolls of TPU. After only having printed PLA and ABS I couldn't believe just how flexible TPU really is. I have a quad-lock printed on the back of my current phone case, but I'd say a quadlock printed out of TPU would be worthless. I was wanting to print another case out of TPU to give a little more grip and impact protection.
 
Wow. I bought a couple rolls of TPU. After only having printed PLA and ABS I couldn't believe just how flexible TPU really is. I have a quad-lock printed on the back of my current phone case, but I'd say a quadlock printed out of TPU would be worthless. I was wanting to print another case out of TPU to give a little more grip and impact protection.
Great stuff. Also, heads up, there's a pretty wide variance in in between MFRs. Some have more pliability than others.
The misleading thing is most FDM TPUs still have a Shore A hardness of like 90-95, so its not pliable, just flexible. However you can really change how flexible and sort of simulate pliability based on the infil density and pattern, as well as the structural pattern of the object. We have made a lot of different type of grabbing intake wheels and lfappers and stuff for robotics with it. A great combo is TPU dual-head printed with ABS as a solid structure, then with Dycem stick pliable sheets on top.

One thing that is both kinda neat and a huge pain, is that a lot of things won't stick to TPU.
 
Anyone tried this one yet?
Think it may be on github ......

3dcatprint.jpg
 
On a serious note ...
Has anyone tried to print a 9mm magazine loader/pusher/thingie?

I would be happy to contribute a couple of bucks and be a product tester!

:rolleyes:
:rolleyes::rockon:
 
Go to thingiverse.com and see if you can find one that you like.


Seems nice and simple enough.
 
It's a summer Friday night. We have 3 printers going. Sidewinder, CR-10, Bibo2. None are even my projects.
#NerdHouse.
 
I'll just leave this here
1663076539661.png
 
And what I woke up to this morning
IMG_20220913_072340443.jpg


Hey look I made a bright green brillo pad!
 
Apparently it’s the 103rd layer you have to watch.
Its always the one around 3am. Fucker could fail before bedtime... noooooo.....

In this case the base I think my bed height isn't quite perfect enough. Or maybe need a little more heat for the PET. The model stopped adhering and slid over, Must have had a tiny bump. Need to check the tolerances on this thing, I've noticed evidence of ringing with tall prints.
 
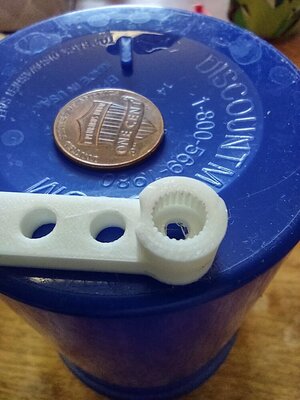
After getting settled in w high speed larger parts, I had to change gears the other way.
Robotics team needs a custom made 25 spline mini servo adapter to drive a grear. No way you could do that w "typical" fdm.
Changed to 0.2mm nozzle, changed some settings, a couple trial and error tests, and Voila!
IMG_20221008_153756653_HDR.jpg
IMG_20221008_153556862_HDR.jpg

A key is using a slight negative hole horizontal expansion to rezise the splines, holes are notoriously undersized w FDM.
 
Back
Top