Under that Samurai they look like one tons compared to the factory twigs. Keep it light and wheel it smart they should last forever.In the past I've had such wild ideas as you. Good luck sir. Dana 30 still gonna be sub par to pretty much every axle ever made.


You are using an out of date browser. It may not display this or other websites correctly.
You should upgrade or use an alternative browser.
You should upgrade or use an alternative browser.
Getting the samurai to Harlan
- Thread starter 91samurai
- Start date
91samurai
Well-Known Member
- Joined
- Apr 20, 2016
- Location
- Midland, Nc
Under that Samurai they look like one tons compared to the factory twigs. Keep it light and wheel it smart they should last forever.
That’s what I’m going for. Almost a 3/4 scale tj on tons and 40s
My test run to uwharrie went great. I love the new motor. It has way more low end. My transmission has a whining sound in first gear now. That I can only hear at low speeds and when engine braking. So maybe I messed something up rebuilding it or maybe the New bearings made the gears mesh differently
paulevans76
Well-Known Member
- Joined
- Mar 21, 2005
- Location
- York, SC
How's the steering? I'm looking for options for my Sami and I want to try not to use a conventional ps pump to keep any additional load off the 1.3.
91samurai
Well-Known Member
- Joined
- Apr 20, 2016
- Location
- Midland, Nc
It’s alright. I really need a bigger alternator to power it I think. It’s much better than no assist but I can watch the voltage drop if I try to turn fast in the rocks at idle. But my front axle has 10 degree of caster and I might have 1-2 psi in my tires. My other plan was to run a Saginaw pump with a v belt. Mine has the ac pulley so it has 2 grooves.How's the steering? I'm looking for options for my Sami and I want to try not to use a conventional ps pump to keep any additional load off the 1.3.
Van-go
Not an old man
- Joined
- Dec 11, 2014
- Location
- Greensboro
Man I love this thing.That’s what I’m going for. Almost a 3/4 scale tj on tons and 40s
My test run to uwharrie went great. I love the new motor. It has way more low end. My transmission has a whining sound in first gear now. That I can only hear at low speeds and when engine braking. So maybe I messed something up rebuilding it or maybe the New bearings made the gears mesh differently
If you really want to go 3/4 scale get a set of these mini treps (roxxzilla) we were talking about.
32 or a 35 would probably suit you fine.
It's really not that bad and the hydraulic steering with a pump is much better than the electric one IMO.How's the steering? I'm looking for options for my Sami and I want to try not to use a conventional ps pump to keep any additional load off the 1.3.
91samurai
Well-Known Member
- Joined
- Apr 20, 2016
- Location
- Midland, Nc
I’m really considering putting the LTBs off the samurai on the k10 instead of buying new tires for it. And getting the roxxzillas for the samurai.Man I love this thing.
If you really want to go 3/4 scale get a set of these mini treps (roxxzilla) we were talking about.
32 or a 35 would probably suit you fine.
Even after running the electric I’m still considering swapping to a belt driven pump. Draw your own conclusion from thatIt's really not that bad and the hydraulic steering with a pump is much better than the electric one IMO.
91samurai
Well-Known Member
- Joined
- Apr 20, 2016
- Location
- Midland, Nc
We took it to uwharrie again and had a really good time
My little girl loves the “Sami”
91samurai
Well-Known Member
- Joined
- Apr 20, 2016
- Location
- Midland, Nc
Working on getting samurai ready for windrock. We are going Friday after Thanksgiving and wheeling Friday and Saturday. Bolt checking everything and topping off fluids
Finally cleaned my bead locks. I haven’t had a pressure washer for a few years and it was building up over time.
I ordered a new higher amp alternator so I build a mount for my old alternator in the back behind the front seats. I’m going to pick up a new battery for it tomorrow.
91samurai
Well-Known Member
- Joined
- Apr 20, 2016
- Location
- Midland, Nc
Windrock was fun. We ran trail 15, 21, 22, 38 and some of the easy connector trails.
We left around 6:00 Friday morning and got our camp site set up and hit the trails around 2. We went strait to trail 15. I got the through the bottom and the long v notch section without much trouble, but I when I started to get to the top it started to get really hard to shift the transmission. I thought I just needed to adjust the clutch some. After messing with it for a little while I found a broken clutch cable. I had to winch out the top and fire it up in gear to drive back to camp.


I got really lucky on finding a clutch cable. I ordered one to the oreillys
20 minutes away for pickup the next morning. By the time we got back to camp it was about dinner time anyway so I went ahead and pulled the old cable out. I installed the new one Saturday morning and we were ready to hit some more trails.

We ran 21 starting from the pavement so we went down the ledge.

Then we ran some of 22 and some green trails back to the top of 15 and ran 38. This trail was my favorite for sure. I got a little twisted up on this rock trying to go around the left. I went ahead and pulled some cable so I could pivot the front up the hill some more and ran it all the way out the top.

There was already a dent here from the gulches but I made it a lot worse on 38. I need to try to bang it out some because it actually stopped the seat belt from retracting.
I’m really happy with what this thing can do being on 31s.
We left around 6:00 Friday morning and got our camp site set up and hit the trails around 2. We went strait to trail 15. I got the through the bottom and the long v notch section without much trouble, but I when I started to get to the top it started to get really hard to shift the transmission. I thought I just needed to adjust the clutch some. After messing with it for a little while I found a broken clutch cable. I had to winch out the top and fire it up in gear to drive back to camp.
I got really lucky on finding a clutch cable. I ordered one to the oreillys
20 minutes away for pickup the next morning. By the time we got back to camp it was about dinner time anyway so I went ahead and pulled the old cable out. I installed the new one Saturday morning and we were ready to hit some more trails.
We ran 21 starting from the pavement so we went down the ledge.
Then we ran some of 22 and some green trails back to the top of 15 and ran 38. This trail was my favorite for sure. I got a little twisted up on this rock trying to go around the left. I went ahead and pulled some cable so I could pivot the front up the hill some more and ran it all the way out the top.
There was already a dent here from the gulches but I made it a lot worse on 38. I need to try to bang it out some because it actually stopped the seat belt from retracting.
I’m really happy with what this thing can do being on 31s.
91samurai
Well-Known Member
- Joined
- Apr 20, 2016
- Location
- Midland, Nc
mostly just been wheeling the samurai without really working on it.
But now there’s a few things I actually need to address before they get worse.

We took it wheeling at the ranch in the snow, the gulches twice and opening weekend at uwharrie so far this year.

My daughter had to help with with straps unloading and loading the Sami on the trailer. She held all of the ratchet straps for me.

I did brace my steering box mount. I made my own wedge for the tracker box and with power steering now I started to worry about ripping the mount off the frame. I slugged some tube through to the outside of the frame rail.
I had my winch out to work on the steering box and the grease inside the gear box was really nasty and it’s making some bad noises. Hopefully I’ll be able to replace it in the next few months. I’m looking at the mile marker 5000 utv winch to replace it, since it’s around the same price as the harbor freight 5000

The electric power steering is starting to show some issues when the air temp is warm the pump won’t want to restart after shutting off. I don’t think the electric pump can supply the pressure do turn sitting still in the rocks like I want. I’ve heard similar things about the tracker pump, so I’m thinking of trying a gm pump before jumping in on hydro assist. I will build a bracket like this one I found on zuwharrie.
But now there’s a few things I actually need to address before they get worse.
We took it wheeling at the ranch in the snow, the gulches twice and opening weekend at uwharrie so far this year.
My daughter had to help with with straps unloading and loading the Sami on the trailer. She held all of the ratchet straps for me.
I did brace my steering box mount. I made my own wedge for the tracker box and with power steering now I started to worry about ripping the mount off the frame. I slugged some tube through to the outside of the frame rail.
I had my winch out to work on the steering box and the grease inside the gear box was really nasty and it’s making some bad noises. Hopefully I’ll be able to replace it in the next few months. I’m looking at the mile marker 5000 utv winch to replace it, since it’s around the same price as the harbor freight 5000
The electric power steering is starting to show some issues when the air temp is warm the pump won’t want to restart after shutting off. I don’t think the electric pump can supply the pressure do turn sitting still in the rocks like I want. I’ve heard similar things about the tracker pump, so I’m thinking of trying a gm pump before jumping in on hydro assist. I will build a bracket like this one I found on zuwharrie.
paradisePWoffrd
Recovering Project Junkie
- Joined
- Nov 5, 2005
- Location
- Newton, NC
I would look into the TC style pump vs the P-pump. It should rob less power from the engine. and they are easier to mount, IMO.mostly just been wheeling the samurai without really working on it.
But now there’s a few things I actually need to address before they get worse.
View attachment 370236
We took it wheeling at the ranch in the snow, the gulches twice and opening weekend at uwharrie so far this year.
View attachment 370237
My daughter had to help with with straps unloading and loading the Sami on the trailer. She held all of the ratchet straps for me.
View attachment 370238
I did brace my steering box mount. I made my own wedge for the tracker box and with power steering now I started to worry about ripping the mount off the frame. I slugged some tube through to the outside of the frame rail.
I had my winch out to work on the steering box and the grease inside the gear box was really nasty and it’s making some bad noises. Hopefully I’ll be able to replace it in the next few months. I’m looking at the mile marker 5000 utv winch to replace it, since it’s around the same price as the harbor freight 5000
View attachment 370239
The electric power steering is starting to show some issues when the air temp is warm the pump won’t want to restart after shutting off. I don’t think the electric pump can supply the pressure do turn sitting still in the rocks like I want. I’ve heard similar things about the tracker pump, so I’m thinking of trying a gm pump before jumping in on hydro assist. I will build a bracket like this one I found on zuwharrie.
DirkaDirka875
Ima need 'bout tree fitty...
- Joined
- May 16, 2010
- Location
- Bear Creek, NC
Nice thing about TC style pumps too is that they sell a bracket to mount it so alot of the research has already been done on that subject for you.I would look into the TC style pump vs the P-pump. It should rob less power from the engine. and they are easier to mount, IMO.
91samurai
Well-Known Member
- Joined
- Apr 20, 2016
- Location
- Midland, Nc
I did some research and it does look like the tc pump is my best option. The biggest thing I noticed is I can get a 4.5in pulley and the smallest I found for the p pump is a 5.5in pulley. That makes a big diffence since I’m going to try to run it off my stock 1.3 ac crank pulley and the front groove for the belt is pretty smallI would look into the TC style pump vs the P-pump. It should rob less power from the engine. and they are easier to mount, IMO.
91samurai
Well-Known Member
- Joined
- Apr 20, 2016
- Location
- Midland, Nc
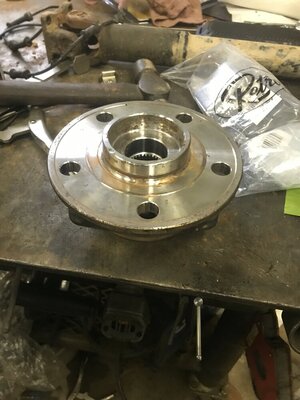
I scored a free mock-up part from work. A unit bearing from a 2017 jk that has a little bit of play. But it will give me something to measure to make my bearing cups. The hat on a samurai front brake rotor clears. I’ll use that and my old samurai calipers
Attachments
91samurai
Well-Known Member
- Joined
- Apr 20, 2016
- Location
- Midland, Nc
I started to make a list of what I need to convert it to a belt driven power steering pump. Since I’m leaning towards full hydro in the future and would need a big resivour and the pump, bracket, bigger cooler, and fittings. It was adding up quick, so I’m going to put that off for a bit.

So to try and bandaid my electric pump I’m going to try three things, Bigger cooler(will need this in the future anyway), wrapping the exhaust manifold, and taking out some caster. I was aiming for 10 degrees of caster with my axle swap because I liked that with the stock axles. I checked it today just off the top of the ball joint and it was 12 degrees ish so I’m going to try around 7-8

Going from this small tube and fin to this plate and fin cooler.
So to try and bandaid my electric pump I’m going to try three things, Bigger cooler(will need this in the future anyway), wrapping the exhaust manifold, and taking out some caster. I was aiming for 10 degrees of caster with my axle swap because I liked that with the stock axles. I checked it today just off the top of the ball joint and it was 12 degrees ish so I’m going to try around 7-8
Going from this small tube and fin to this plate and fin cooler.
91samurai
Well-Known Member
- Joined
- Apr 20, 2016
- Location
- Midland, Nc
I adjusted the caster down to about 7.5 so hopefully that helps, if I go any further I think I need to pull the springs and make sure the panhard is still in the middle of the notch in the oil pan at full bump.

I built some mounts and new hoses for the larger power steering cooler.

Also exhaust wrapped the manifold. Just waiting on it to dry now so I can install it.
Going to try to get everything buttoned up to go to Zuwharrie next weekend
I built some mounts and new hoses for the larger power steering cooler.
Also exhaust wrapped the manifold. Just waiting on it to dry now so I can install it.
Going to try to get everything buttoned up to go to Zuwharrie next weekend
91samurai
Well-Known Member
- Joined
- Apr 20, 2016
- Location
- Midland, Nc
the samurai has been getting some use dragging logs around the yard while I’m collecting parts for a new power steering pump setup
I’ve got a v belt tc pump pulley, a tc pump and the low range bracket so far.
91samurai
Well-Known Member
- Joined
- Apr 20, 2016
- Location
- Midland, Nc
Finally have enough parts to start test fitting everything
I used my lazer level to measure how much I’m going to have to modify the pump bracket. I knew that I was going to have to cut it when I bought it but it’s a good starting point.
A piece of angle clamped to the ladder and the magnetic mount for the lazer worked great.
91samurai
Well-Known Member
- Joined
- Apr 20, 2016
- Location
- Midland, Nc
Cut the pump bracket apart and moved the the mount 3/4in. It’s just tacked now, will be test fitting after I trim the exhaust manifold
91samurai
Well-Known Member
- Joined
- Apr 20, 2016
- Location
- Midland, Nc
built a new pressure hose
Installing this one was much easier than the last one I built. using a straight fitting on one end and 90 swivel instead of another 90 fitting means I don’t have to twist the hose to get the other end on
I found a belt at the part store that fits but it’s really tight to get it on there. I had to loosen the pump all the way up to get it on. I’m not actually using any of the adjustment in the bracket so I hope it stretches just a little bit.
Last edited:
91samurai
Well-Known Member
- Joined
- Apr 20, 2016
- Location
- Midland, Nc
I built a quick mount for my resi and made a short feed hose to the pump. I had to tighten the crap out of both fittings on the resi to get it to stop leaking.
We made a test run to uwharrie and it worked good. It was a 90 degree day and my old pump would have been cutting off all day.
I’m going to try leaving the system sealed for now. I don’t really have room for a pressure relief valve above the resi and I would like it to be sealed so it doesn’t spill at angles.
91samurai
Well-Known Member
- Joined
- Apr 20, 2016
- Location
- Midland, Nc
I was getting really tired of getting hung up on the belly of the rig. I mangled the exhaust again while turtled on the skid plate last trip out so I decided to go ahead and flat belly the samurai. I decided to go with bushings for the transfercase mounting instead of the solid spacers this time.

The old skid was bolted to the bottom of the trans crossmember and had a lot of edges sticking out to grab stuff instead of sliding over.

The old skid had taken plenty of abuse but I originally built it when the samurai was about 4inches taller and shorter wheelbase. It didn’t really hit anything ever. It isn’t really ideal for pushing the limits of what hard trails I can run on 31s

To start cleaning up the frame rails I cut off the part of the trans and t-case brackets welded to the bottom of the frame and welded them to the side.
The old skid was bolted to the bottom of the trans crossmember and had a lot of edges sticking out to grab stuff instead of sliding over.
The old skid had taken plenty of abuse but I originally built it when the samurai was about 4inches taller and shorter wheelbase. It didn’t really hit anything ever. It isn’t really ideal for pushing the limits of what hard trails I can run on 31s
To start cleaning up the frame rails I cut off the part of the trans and t-case brackets welded to the bottom of the frame and welded them to the side.
91samurai
Well-Known Member
- Joined
- Apr 20, 2016
- Location
- Midland, Nc
I cut a big hole in the floor to have some room to raise the transfer case. I’ll have to notch the side some. I’m hoping for the passenger seat to bolt right in but if not I’ll have to raise it some or cut the seat mount.
This is with the case raised up and most likely where it’s going to live. I have to check the angle on the front drive shaft to make sure it doesn’t bind. If it does I will raise the rear of the case to help the angle.
with my level flat against the frame rails it’s got 3/8in to the bottom of the case and a little less to the bottom of the t-case mount
91samurai
Well-Known Member
- Joined
- Apr 20, 2016
- Location
- Midland, Nc
I notched the original frame side mount on the drivers side for a bushing shell and fit some plates to the t case spine. I will box it in on the fab table where I have better access to the top.
Notched some square tube for the first time, it worked great. That is the start of a bushing mount for the passenger side.
I’m using a lot of 1/8 and maybe some thinner material. I’m trying to keep everything light weight and the frame this is all getting welded to is only 1/8 anyway.