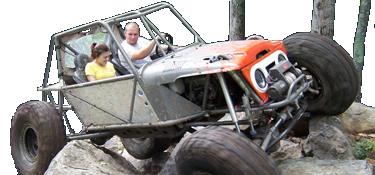
Granny 2: The Resurrection

The cage is finished, and Granny2 is back at home. These are the best pics (pay attention Chip) of about 15 that I snapped... seems that cages are like hillclimbs... hard to get a good angle for a picture. The cage is made as I ordered it. I did not NOT want frame tie-ins this time (don't fault the builder)... more on this at a later time. The bar that will be behind the back seat is removable should I want/need to haul something, and the others are located so as to minimize head bumping. The welds are all TIG and I can't spread butter that smooth. :) I will highly recommend this fellow's work to anyone.

The work is going to slow down from here on as I do not plan to have her finished now until spring (or later, pending weather). If this plan changes and I do get it done earlier I will consider it a bonus. I still have many things to get done, and I will post as I complete them, but again, weather conditions will greatly affect my progress.
 

Attachments

  • Cage_Work-04.jpg
    Cage_Work-04.jpg
    187.4 KB · Views: 719
  • Cage_Work-05.jpg
    Cage_Work-05.jpg
    143.8 KB · Views: 703
A few more...
 

Attachments

  • Cage_Work-06.jpg
    Cage_Work-06.jpg
    223.5 KB · Views: 659
  • Cage_Work-07.jpg
    Cage_Work-07.jpg
    143.7 KB · Views: 635
  • Cage_Work-08.jpg
    Cage_Work-08.jpg
    182.1 KB · Views: 640
  • Cage_Work-09.jpg
    Cage_Work-09.jpg
    98.5 KB · Views: 646
  • Cage_Work-10.jpg
    Cage_Work-10.jpg
    139.9 KB · Views: 662
Looks like Damien did you well Don. I went by his shop and saw it in person the other day. I really like the 2" tubing you don't see that every day.
 
Looks like Damien did you well Don. I went by his shop and saw it in person the other day. I really like the 2" tubing you don't see that every day.

Damien told me you had stopped by. I'm very pleased with the job he did for me, and I won't hesitate to brag on his work. I know I've already told you, but you would have got the job if he hadn't started up a shop. I hope this project gets him some additional exposure.

Gee Don, Granny dont look so...Granny no more!!:rolleyes:
Really looks good!!

ThanX Scott! :) Granny took a few double-doses of Botox during the reincarnation. :lol:
 
Damien told me you had stopped by. I'm very pleased with the job he did for me, and I won't hesitate to brag on his work. I know I've already told you, but you would have got the job if he hadn't started up a shop. I hope this project gets him some additional exposure.

No sweat Don. Damien does great work.
 
Looks really good Don. I like my 2" tube, I meant to ask you about that last weekend. Could you post a picture of how the A pillar comes down with the door open?

Keep us posted as you keep slower progression through the winter months and I look forward to seeing Granny II in the spring. Hope to see you and Darlene at the Christmas party, I am now supposed to be back in town on time from Japan.
 
^^^ Nate, I'm not sure what you are looking for, but I hope one of these does it for you... if not let me know and I will try again. :)
 

Attachments

  • 5.jpg
    5.jpg
    86.6 KB · Views: 466
  • 4.jpg
    4.jpg
    136 KB · Views: 506
  • 3.jpg
    3.jpg
    130.6 KB · Views: 442
  • 2.jpg
    2.jpg
    125.1 KB · Views: 482
  • 1.jpg
    1.jpg
    114.2 KB · Views: 441
Pictures tell the Story!

Nice tubing, "MADE IN USA'' ! And, pick up a new leather wrap, for the steering wheel. Don, did admit, to sitting on a box, or bench, [but didn't mention, he had to add "riser blocks"] !:lol:
HAHA, just messing with you Don; be glad it wasn't the HDG!:huggy:
[hey, where's his 2cents been, lately]:shaking:
 
Just a short post so nobody gets the idea I kicked the bucket or anything like that...

I took advantage of the nice weather today and modified my winch mount to fit the YJ frame. In short, I had to add 2" to each end of the mount to match the outside width of the frame. Rather than mess with plugging pre-existing holes I simply cut 4" off each end and put 6" back on. I will drill new holes as required. There's a fellow near where I live that does media blasting, and supposedly can do larger stuff. I am going to see if he can blast the old paint off for me. Don't know when the next update will be, but I plan to start on the front bumper next. More as I get it done. Merry Christmas to all!!! :)
 

Attachments

  • Winch_Plate-1.jpg
    Winch_Plate-1.jpg
    156.4 KB · Views: 516
  • Winch_Plate-2.jpg
    Winch_Plate-2.jpg
    143.4 KB · Views: 540
  • Winch_Plate-3.jpg
    Winch_Plate-3.jpg
    141.8 KB · Views: 533
  • Winch_Plate-4.jpg
    Winch_Plate-4.jpg
    146 KB · Views: 504
well... any updates????
 
no problem man.. i've been following since you first posted this one up. Being stuck over in the middle east for 6 months not being able to work on my jeep is driving me crazy so i'm living through everybodys build threads on here haha
 
Recently, I have been working some on the rear bumper/tire carrier, but no major accomplishments yet. Once the nights start staying warm enough outdoors to allow paint to cure properly the project will pick up speed again. Truthfully, I am not in as big a rush as I was last fall. :)
 
I'd be anxious to see some of your ideas, i need to build one for the Rubicon and the black Jeep. I haven't settled on a final design yet.
 
He's Really SANTA!

I heard his sleigh broke down, on the way back to the N. Pole, & he's stuck in Siberia!:lol:

The sleigh wasn't really broke, but I was asked (more than once) to be Santa.

The hair is all gone now, the weather is getting better, and I'm finally back to work on Granny2.
 

Attachments

  • 3-11-12_3.jpg
    3-11-12_3.jpg
    81.7 KB · Views: 298
Granny2 is moving along again... I just finished up the front bumper and winch mount, and it is now waiting for paint. I will be finishing up the rear bumper and tire carrier next. M.O.B.S. Fab in Concord (made my cage) is making my sliders for me. Once this stuff is done and painting weather sets in steady the project should move on again. No projected completion date yet.
 

Attachments

  • Bumper-Winch-1.jpg
    Bumper-Winch-1.jpg
    186.8 KB · Views: 398
  • Bumper-Winch-2.jpg
    Bumper-Winch-2.jpg
    177.4 KB · Views: 318
  • Bumper-Winch-3.jpg
    Bumper-Winch-3.jpg
    167.9 KB · Views: 367
  • Bumper-Winch-4.jpg
    Bumper-Winch-4.jpg
    134.5 KB · Views: 355
  • Bumper-Winch-5.jpg
    Bumper-Winch-5.jpg
    59.4 KB · Views: 339
Back
Top