Killer Weldz Thread

I will get some soon sent 5 for testing when that's over I will take a video welding one the jig has been my problem not being able to control the torch
 
Last edited:
Unfortunately because I own a miller welder and it's not at least a mm252 I can't actually tell you what voltage or ipm I weld at. But in the past I welded with low heat, very low travel speed and a pretty slow oscillation. It worked pretty well because it gave me time to really focus on how the metal flowed and shaped up. Plus it made a very convex caterpillar looking weld. You could actually hook your fingernail on each "dime"
It looks cool and it's pretty solid but the draw back to it is that you're running such low voltage that you can barely get the initial burn hot enough to flow the end of the previous weld. You end up with beads that meet at a cold point that eventually will rust because there's a cold lap at the start/stop point.

This new way is still pretty slow and easy to shape up but it flows out wider and makes for a better start/stop point that's burnt in deeper.


For all of the above reasons, I love using .023 on tube work. It allows me to get the heat input up where it needs to be while allowing me to manipulate the puddle so the bead looks good. The .023 keeps the deposition rate slower so that the bead doesn't pile up and become extremely convex. Also keeps from getting cold lap between each circle of the "weave" you described above.

Everything else I use .030, and rarely use .035 for 3/8" and up structural stuff.

Nice work with the squirt gun Chris.
 
So I did some testing of some different weld myths the other night with the students on the last class night.

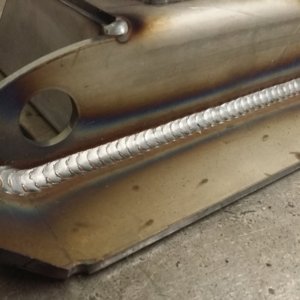
I welded a horizontal plate test with .035" wire. Machine settings were 17.8 volts, 182 on the wfs. Amps were 100-105 while welding.

5 passes, 1 root, 1 hot, 3 cover.

Water quenched the plate immediately after each pass and after finishing the test, as well as quenched the coupons after flame cutting 4 equal pieces.

I was shocked by the results.

Root
ImageUploadedByTapatalk1418735042.103532.jpg


Hot
ImageUploadedByTapatalk1418735068.915014.jpg


Root coupons
ImageUploadedByTapatalk1418735103.739173.jpg


Face coupons
ImageUploadedByTapatalk1418735118.512072.jpg


I was in too big of a hurry to take any pics of the finished cover.

We were all surprised to see that the water quenching did not cause severe embrittlement of the piece especially with the different cooling rates of the weld alloy vs steel alloy.

Everything taught and in the books we have, regarding this all say the opposite of what we found.

My guess is that the weld pool has solidified enough by the time the weld has finished and I walked 10 ft to the quench tank, that it is not effected by the quench. As well that the temperatures achieved while welding aren't hot enough to cause a severe enough change when quenched. I'm no CWI or Weld Engineer, just theories out of my head.
 
Last edited:
For all of the above reasons, I love using .023 on tube work. It allows me to get the heat input up where it needs to be while allowing me to manipulate the puddle so the bead looks good. The .023 keeps the deposition rate slower so that the bead doesn't pile up and become extremely convex. Also keeps from getting cold lap between each circle of the "weave" you described above.

Everything else I use .030, and rarely use .035 for 3/8" and up structural stuff.

Nice work with the squirt gun Chris.

I don't like switching wires for quick jobs. Generally lately, our welders have been spooled with .023. I had a buddy come in with a walk-behind with a busted frame. The plate that the deck support frame was welded to was 3/8" steel that had literally torn to pieces. I did some grinding and beveling, cranked the old MM210 up to 6 and 95, give or take, and gave it hell with the skinny wire. Wow! Penetration was fantastic, and it laid a nice, wide, low-profile bead over the joint. It sounded as if it was approaching spray transfer. I welded the tears on both sides, went over a little shoddy repair work from the previous owner, and sent him on his way. I told him that the earlier repairs would likely be the next to go, but we didn't want to deal with them at the time. He was OK taking that chance. Well, a month later, he calls to tell me its broken again. Not my repair, but right where I told him it would. So I got a chance to examine my repair, and it still looked great. This time, the 210 was spooled with .045 flux, and I was welding thinner material! 1/8 and 1/4" mainly. Point is: .023 is a very versatile wire if you know how to dial it in. I love the fact that I can go from welding 18ga tube and 20ga sheet to doing 1/4" repairs with a twist of the knob.
 
With all this talk of .030 and .023 I may have to step down my wire from .035 when I use this roll up. I've always had a problem with the weld building up and not laying very flat, I was told I move slow so maybe a smaller wire will help me have enough time to shape my puddle without building up the weld so much.
 
With all this talk of .030 and .023 I may have to step down my wire from .035 when I use this roll up. I've always had a problem with the weld building up and not laying very flat, I was told I move slow so maybe a smaller wire will help me have enough time to shape my puddle without building up the weld so much.

Exactly. As long as you keep the arc on the front of the puddle, using .023 will allow you to move slower in your circles/weave.
That's the trouble with using larger wire and not moving fast enough. The weld pool builds outward from the joint and insulates the arc from the base metal and then you have cold lap on the root of the weld. Leaves a decent looking weld with poor penetration.
It's the most common hard wire defect I see.
 
*********I was in too big of a hurry to take any pics of the finished cover.

We were all surprised to see that the water quenching did not cause severe embrittlement of the piece especially with the different cooling rates of the weld alloy vs steel alloy.

Everything taught and in the books we have, regarding this all say the opposite of what we found.

My guess is that the weld pool has solidified enough by the time the weld has finished and I walked 10 ft to the quench tank, that it is not effected by the quench. As well that the temperatures achieved while welding aren't hot enough to cause a severe enough change when quenched. I'm no CWI or Weld Engineer, just theories out of my head.**********


I can't ever get quotes right.


you'd be exactly right! metallurgy taught me tons about why my welds succeed or fail for all sorts of reasons and alloys. The heat soak and effected time table isn't nearly enough to transform the grain structure, carbon displacement, or density of the plain carbon steel. Its also a very normalized alloy to begin with. So without adding a high carbon content or similar alloy into the weld pool your not creating to much "shock". Now take some free radicals in the form of high carbon, iron ferrite, or large amount of chromium, nickel ect. in the form of a special alloy or cast iron you'd have a problem. High end tools steels, high wear alloys, and cast iron (done properly) have much higher preheats, inner pass temps, and often require spray transfers in large weldments are greatly adversely affected by quenching. Even so just like in hardening for the said purpose quenching takes place at red hot temps or more, say well over 1200 degress while the molecular structure is still elastic from the heat. Oil baths, AIR, and temperature control furnaces all help control this freeze when critical.
 
i wouldnt ever click on this thread because i figured it would just make me feel bad about my welding ability, well i sat here and read every post start to finish. it was well worth the time to do so, i learned a good bit as well. i have a MM212 that started out on .030, last time i bought wire i grabbed a spool of .035. after reading this thread iam going back to .030 may even try a 10lb spool of .023. i really noticed a difference in my weld quality after the wire change, i just blamed myself and my inconstant skills. i dont weld enough to keep a consistent quality. i know so many factors reflect that quality from human to machine its hard for me to dial in just where i am wrong. seeing what i am doing is a large problem for me, sometimes i can see the puddle well other times i feel blinded. its a miller elite hood but i feel like the cheap nesco i started with didnt do that. anyway this was a good read, i might take a few pictures of my stuff and post them for constructive criticism purposes. iam in now way going to be showing off any killer welds.
 
If you feel like you're having troubles seeing the puddle well try putting a shop rag over your head next time.

You need to cover the area from your head to the top of the mask. I had the same problem and realized that at some angles light would come in the top of my hood and reflect off the inside of the lense. Took me a long time to figure out that was the problem.

It's especially bad if you're in a shop with lights right over your head or out in the sun looking down.
 
Ill try that in the morning. I have to get a oxygen bottle traded out Friday so I think I'll go back to .030 wire again for sure. Thanks Chris.
 
I don't see anything there that wouldn't pass muster. Hell, I still lay worse beads than that sometimes! The important thing is your wetting looks good. Good toe and tie-in. Maybe a tad cold or you could dial the wire back a touch, but I like a flatter bead. I'm impressed you're running uphill on the sides! If you dial the wire back for those, it will help with the gravitational challenge of pushing a puddle straight up. There's also a couple of weave patterns that help, too. Or you could do like most folks would and run it downhill. It's not structurally as smiled upon, but it's much easier and works fine if you set up right. For the metal you're cooking on, I'd say stick with 0.030. 0.023 might be harder to dial in, slower to run, and kinda wasteful.
 
I had to google weld wetting, I had no clue what the meaning was. I try to plan my path around what Iam welding so I can try to keep a steady hand and that I can see exactly what Iam doing. Seems like I always end up on the wrong side of the nozzle or in front on the weld I guess would be the right thing to say. Stoping and starting Iam no good at, especially welding around something that I have to reposition myself. Ill slow that wire down in the am and see what that looks like. YouTube and trial and error have gotten me this far. Thank you for chiming in on this.
 
Last edited:
Planning ahead before you pull the trigger is something most folks never do. And it's a great habit to get into. Sometimes, though, you just get stuck with a funky position and you may as well close your eyes for all you can see. That's where experience and practice are the only things that will allow you to feel your way around that bead. And it's usually in a spot that you can't get a grinder if you screw it up, either!
 
030 helped. Seems like I have a little more time to work with over the .035. I can slow down and try to focus on what's going on. I mean I still have a long way to go but seems to improved. I was going to spend a couple hrs at marsfab one evening with some welding help but I just can't seem to find any time to do it.

So from this point any other suggestions?


image.jpg
 
Looking at that weld I could give this advice...
I'm assuming you pulled the gun left to right and you're right handed or you pushed from left to right and you're left handed. For the most part it looks like your circles are pretty evenly spaced. That consistency is one of the hardest things to conquer. You can pretty clearly see every time you had to either slide your hand or re-position because you jumped circles too far or too close and lost the consistency.

As you traveled your gun angle got higher and higher. You can tell this by the brown haze from lack of gas coverage growing above the weld from left to right. Focus on keeping the up and down angle of the gun the same as you travel, ideally half the angle of the joint. An inside "T" like this you'd wanna shoot for 45 deg.

It also looks like you either went from pulling the weld to pushing or you got the gun pointed too far behind the weld. You can see more undercut on the right end but I'm thinking you're left handed and pushed and got progressively steeper pointed ahead of the weld as you finished. Doing this will cause the filler to kinda spray out of the weld. You get more spatter this way and typically end up with more undercut because there isn't enough filler being deposited. 10 or 15 degrees ahead or behind the weld is what I shoot for. Tubing is the only time I'll really ever venture away from that.

I the vertical piece thinner than the flat? I can clearly see the HAZ (heat affected zone) on the vertical piece but cant on the flat. That makes me think you may be a little cool on the flat one. Might need a bit more heat and wire to get good fusion but you'll have to focus it on the lower piece more obviously. But first try staying with the same settings and move slower. Slow down your circles, try to be as uniform with speed and shape as possible.

It really does look good man. That's a nice weld any way you shake it.
 
Ok like I said Iam in no way showing off. Just looking for tips suggestions criticism etc
View attachment 175723 View attachment 175722 .


This weld looks good too. Your uphill is probably better than mine. From a fabrication stand point you could make it look better by taking 3/8 to a half inch off the bottom leg of the angle. The weld across the front of it is on the verge of being an overhead bead. Shortening that leg would allow you to weld it on top, making it easier and more visible.

I spend a lot of time thinking out brackets and tabs like that so they weld nice. It goes a long way in little details on a finished product. I say this all the time but, fitment is one of the most important details that set one job apart from the rest. It unfortunately takes a lot more time and you rarely get paid for it but it is what people will one day come to you for over the next guy.
 
Chris Iam right handed and worked left to right. I had no clue what caused the brown around some of my welds. Now I know, thanks for that. Seems like I tend to gradually start working faster, I try to keep its slow so can focus on my circles. You are also correct on a different bead when I moved or repositioned. Those two pieces are different thickness's by the way. Right after I welded those two pieces of angle I realized that I didn't mill that bottom leg down some, I milled them to width, I got in a hurry to see it sit on its own weight. I appreciate all the comments and tips.
 
It is so hard to keep a steady speed on long welds like that. The best thing I've found as funny as it sounds is to use music. You will never come in my shop and not hear tunes playing. Usually so loud you can't hear to have a conversation lol. The tempo of the song is what I weld to. Keeps you in time and hurts everybody's ears so they don't hang out and waste your day talking.

And don't use that country music crap either. It has to be music that scares women and children. Country will F a weld up in a heart beat. Makes you daydream about weird shit. You can't focus on a beat, much less the weld if the song has you crying or thinking about drinking half waway through. I'm not kidding either. Don't do it. It's dangerous. Peoples lives depend on your welds.

Pandora radio works best. Try killswitch engage or metalica or something similar. I don't wanna see any country welds next time you post :)
 
Well we're are on the same page with pandora. 10 years radio usually throws a good hand so does a perfect circle or trivium, and dj magic mike radio is pretty good to. Ill agree on the wutang to lol . My wife just doesn't understand why I like the "kill the puppies" music. I get hate texts from her to "TURN IT DOWN!" Anyway ill see if I can produce some death metal welds here soon.
 
Back
Top