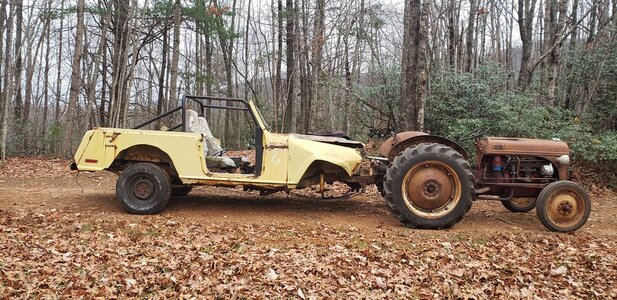
Rutherfordton Nc Ford 8n retrieval and Resurrection. I hope!

Ok so yesterday I tried to get her going. She wasn’t having any of it. So I dove right in. Decided to check fuel first. I put a jar under the carb and opened the bottom screw. She drained and stopped. Well there you go. Not enough fuel. So removed the line and the elbow with the screen. Bingo. Chunks of dirt is something in it. Ran her pretty good ripping up roots and vines after that. Now I need a box blade.
89994C4E-CD33-41F6-AF58-8C98707D113A.jpeg
 
Went yesterday to check out a box blade. A friend I went to college with said she had one. She said she thought it was a 5’.
Only picture she sent.
D6B60E26-AA0B-4713-9FE6-2635C106BD5F.jpeg


So I went to Marion, SC to see what was there. No teeth but a solid 6’ blade.
B021D444-0AC5-4330-BA2E-C5BE6324164E.jpeg
D5182C9E-64C0-4633-BFA4-64700F8A6744.jpeg
AD63C89D-B12C-4387-8636-46FF653BE29D.jpeg
 
So let me give a quick box blade set up lesson if you and anyone else is willing to listen. When attaching it to the 3 point hitch, the front of the hitch should be almost vertical but the main goal is to have both cutting edges contacting the ground evenly. It looks like the rear blade on this one is hinged or is called a "spreader gate" as I've known them so it's best to set it up on pavement so you can see that both are touching the ground evenly. When pushing in reverse you'll have to lift a bit for that rear blade not to dig in. This set up will give you the best front and rear grading and spreading capabilities.
It irks me to no end seeing people with the box blade set up leaning way too far forward and allowing the sides of the blade to contact the ground and then wearing as this one has. And this one isn't as bad as many I've seen. When it leans that far forward, the rear blade barely has contact with the ground and the front blade is not at a good angle to work with.
And you would be doing yourself a favor by welding those links (that are bolted now) that the top link attaches too. Weld them to the frame of the blade and even reinforce them with some additional bracing.
I wish I had pictures of the beefy Gannon one I used to have. The sides were missing about 5" at the front and the cutting edge hung down almost 2" below the sides.

@ghost, given the size/weight/power of your tractor, I'd try to bank some $$$$ on that 6ft blade and get a 4-5 footer. Even my 35hp Massey with filled tires and low range gears has a hard time pulling a 6ft blade with a good load it in.
 
So let me give a quick box blade set up lesson if you and anyone else is willing to listen. When attaching it to the 3 point hitch, the front of the hitch should be almost vertical but the main goal is to have both cutting edges contacting the ground evenly. It looks like the rear blade on this one is hinged or is called a "spreader gate" as I've known them so it's best to set it up on pavement so you can see that both are touching the ground evenly. When pushing in reverse you'll have to lift a bit for that rear blade not to dig in. This set up will give you the best front and rear grading and spreading capabilities.
It irks me to no end seeing people with the box blade set up leaning way too far forward and allowing the sides of the blade to contact the ground and then wearing as this one has. And this one isn't as bad as many I've seen. When it leans that far forward, the rear blade barely has contact with the ground and the front blade is not at a good angle to work with.
And you would be doing yourself a favor by welding those links (that are bolted now) that the top link attaches too. Weld them to the frame of the blade and even reinforce them with some additional bracing.
So I don't have any pavement here. Suggestions? I'll definitely listen to anyone that wants to teach me. The top hole is off so I'll probably have to loosen the bolts and align the top link holes I assume. Going to head to TS and get some pins so I can attach it to the tractor.
 
I wish I had pictures of the beefy Gannon one I used to have. The sides were missing about 5" at the front and the cutting edge hung down almost 2" below the sides.

@ghost, given the size/weight/power of your tractor, I'd try to bank some $$$$ on that 6ft blade and get a 4-5 footer. Even my 35hp Massey with filled tires and low range gears has a hard time pulling a 6ft blade with a good load it in.
I am considering that. I have to try though. Isn't that what we do?
 
I am considering that. I have to try though. Isn't that what we do?
Dang right! That's why I bought an 1100lb Cat2 7ft angle blade and tried to pull it behind my Massey 35 a few times :D
 
Here's the old Gannon blade I had
Apr162010 003.jpg

Notice the sideplate isn't even touching the ground at the blade!
 
So in daylight I see bent mounts and a bent bolt. Going to replace the bolt. Will welding the top link mount help it to not bend? I would think it would.
DAB182AF-9784-490D-9992-BD1C13C8E84F.jpeg
C0B5AE07-8FB1-4B09-8253-B41929721132.jpeg
 
If no pavement then a good flat surface will do. Those arms are bending because everything is moving. I would starighten with a BFE and weld but make sure the arms and top link from tractor will fit into them first.
 
If no pavement then a good flat surface will do. Those arms are bending because everything is moving. I would starighten with a BFE and weld but make sure the arms and top link from tractor will fit into them first.
Could not figure out how to tag you. Does that look good? I think it’s fairly straight.
Shit I'd run it with the bent bolt. That tractor doesn't have enough ass to hurt anything on that blade 😅
Well I wanted to replace it and see what happened. I think someone picked it up from that bolt.

Ok latest issue. Ignition switch isn’t turning it off. FB group suggested removing a wire to see if it dies and is the switch. No idea which wire. And a marine grade replacement. I guess I need a 2 position 3 pole?

BCA53E56-50A7-489E-BDCA-BE50EDBC8344.jpeg
 
So just been working it. Been ripping up wysteria. Some of the roots so big the tractor can't even rip them out the ground or in half. I'll post some pictures when I remember. I'll get a switch hopefully today. I drug a trailer out the woods. Got me to thinking. @Caver Dave you posted that picture of your tractor pulling the jeep. Do you have any pictures of how you hooked that up?
 
I drug a trailer out the woods. Got me to thinking. @Caver Dave you posted that picture of your tractor pulling the jeep. Do you have any pictures of how you hooked that up?
It was a bit sketchy, chained to the "drawbar" didn't give a lot of clearance and the "bumper" (4"×2" channel) kept riding the tires while turning... I pondered one of the implements to extend that connection, but figured it wouldn't have enough arse for both (Jeep alone had the fronts in slight "bobbing mode"). Once I get my boompole straightened/re-welded (PO damage) we'll try again with a tire holding it off the boompole and chaining as close to the bend as possible...

Using the drawbar with ball set in one of the multiple holes, I've pulled both trailers (my dad's old "bedframe & chicken wire" lawnmower trailer and my 5ton equipment) pretty easily...

20211217_162011.jpg
 
@ghost Is that a tater plow? Why not weld a tube/bracket on it to accept inserts? 🤔
It's a subsoiler/one row plow. I took the plow off and put the subsoiler on to rip up the roots and stumps and wysteria on the property. After google yes its a tater plow. ^^^ This is why I post here. I'm over here looking up drawbars and you just gave me the best cheapest solution. Pretty sure I have a rusted out xj reciever hitch I can salvage the tube from and weld it to that plow.
 
Last edited:
Started on my hitch project. I’ll add a vertical for the top link. I’ll also cap the ends Ran out of time today

3F1A50BA-B3F6-4D2A-8B5D-661E6E20C296.jpeg
 
Ok so she died working. Ended up being the coil. Yes I’ve been using the one that was in it. Ran for a day and stopped. Apparently my replacement gas cap wasn’t vented. 1/8 hole later and it worked for a bit. Neighbor came by the other day and helped get it running again. Points were glazed and condenser we think was messing up. I had them new from the tune up kit I bought so we did the condenser and sand papered the points. It was running rough and spark was hit or miss. So I decided yesterday to replace the points. One of the screws lost its washer with teeth. So now I’m on the hunt for replacement points screws. In the mean time I finished my trailer moving hitch. Made from a WJ 2” receiver hitch I cut down and other scrap in the bin. $12 at TS for the hitch pins.

E0C48F8D-6698-4350-B965-B5933F25B777.jpeg
 
Last edited:
I wouldn't think it would that hard to find? 99.999% to be SAE and a star washer available about anywhere?
Yes I realize that now. However we have no spark. Voltage to coil is low. I think the ceramic resistor is done. Can it be bypassed? From what I'm seeing in videos it cuts voltage to the coil.
 
Back
Top