Secondhand Tin Can.

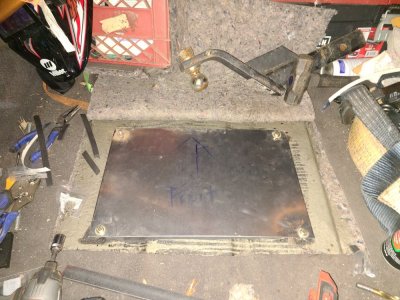
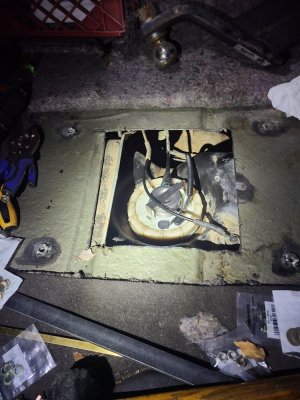
Fuel pump decided to start acting funny so I replaced it. Due to welding my hitch to my stiffners I couldn't pull my skid plate off all the way. There for I couldn't drop my tank. So I ended dropping it as far as I could so I could make an access pannel in the rear floor board with out cutting my tank. I then tacked in some nuts and washers before I put the tank back up and changed the pump. I used some door jam seal under the plate to allow it to seal to keep the majority of fumes and water out.

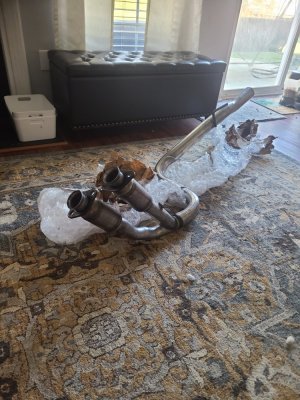
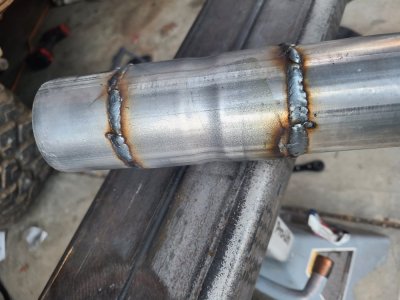
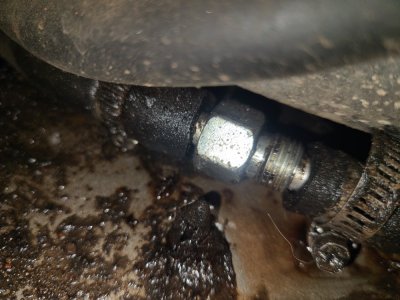
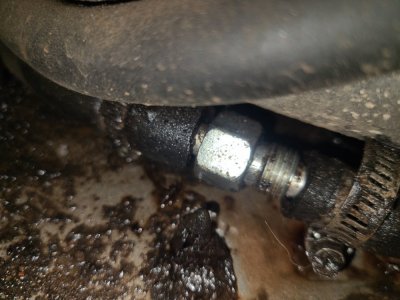
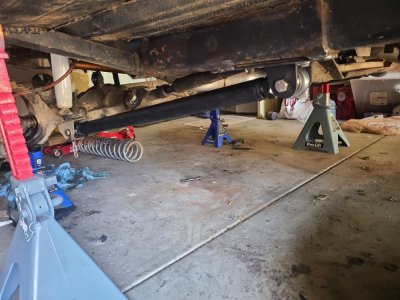
Currently the jeep is still in the garage waiting for me to finish pulling the exhuast and installing the new one. The cats were starting to go bad and I developed a really good sized exhuast leak. The rear bolt on the rear exhuast clamp is a pita to get to.

After fighting with my power steering cooler for the past couple of months trying to get it to stop leaking im saying screw it and removing it.
 

Attachments

  • 20210116_180116.jpg
    20210116_180116.jpg
    190.5 KB · Views: 169
  • 20210115_203334.jpg
    20210115_203334.jpg
    169.5 KB · Views: 167
  • 20210118_095530.jpg
    20210118_095530.jpg
    213.6 KB · Views: 172
I need to replace a pump on a 98. Can you give me some measurements so I know where I need to cut roughly? Other folks searching this might find it helpful too.
 
I need to replace a pump on a 98. Can you give me some measurements so I know where I need to cut roughly? Other folks searching this might find it helpful too.
I'm so happy that i decided to attempt to drop my tank before I resorted to cutting a hole. The reason is the tank basically touches the rear floor board. There is a divet in the tank for the pump where the tank is but it is just barely bigger than the pump. I can still pull measurements if you would like @77GreenMachine but I would not recondmend just cutting a hole with the room for error being very small.
 
I'm so happy that i decided to attempt to drop my tank before I resorted to cutting a hole. The reason is the tank basically touches the rear floor board. There is a divet in the tank for the pump where the tank is but it is just barely bigger than the pump. I can still pull measurements if you would like @77GreenMachine but I would not recondmend just cutting a hole with the room for error being very small.

I am reviled by none with my Jedi level cut-off wheel skills. I can give a newborn a haircut with an angle grinder while the mother breast feeds the young offspring.


Seriously, good to know. I’d have thought there would be more room. I will consider dropping the tank, but most likely won’t.
 
I will consider dropping the tank, but most likely won’t.

No need to drop it completely. Just unbolt it and drop it a few inches to get an idea of where to cut, then go at it without fear. Jack it back into place, and BAM...access door
 
I sent 77greenmachine the measurements earlier today. I decided not to post them due to the skill required to cut the hole with the tank in place.

I got the new y pipe in place with new o2 sensors. Then I welded the adapters on to connect it to my third cat and muffler. I should have mocked everything up before I burned in the adapters since now I'm having to ditch my third cat in order to be able to reinstall my exhuast. With the third cat it is putting the bend for the rear axel into the gas tank. Luckily my jeep is over 20 years old now and doesn't require emissions inspection. So I'm not concerned about not having the extra cat.
 

Attachments

  • 20210122_164922.jpg
    20210122_164922.jpg
    124.2 KB · Views: 160
I finally got the jeep all buttoned up. The new y pipe was angled down so it was causing my muffler to almost be level with my rear axel. So i ended up making two relief cuts in the exhuast and bending the pipe up to allow everything to be closer to the body. This also allowed me to redo my rear exhuast hanger to move my tail pipe away from my gas tank skid plate a little more. Then I fully welded my relief cuts and all my joints. I had two small exhuast leaks due to my welding so I touched those up and moved on.

Next I pulled my power steering cooler because it seemed like it was never going to stop leaking. I kept having to either fix a hose or tighten a fitting.

Then i changed the oil and check the rest of the fluids.
 
I officaly believe in a transmission cooler is worth the money the difference it makes on the trail is amazing. At the grand overland district with 4wd 101 my transmission got a little on the warm side. Today my transmission didn't even nearly get as hot. Sorry I didn't get pics of the install. I installed it when I replaced my radiator last week. So only got a ton of weird stares by people walking by when I did the work outside my on campus house.

Sent from my SAMSUNG-SM-G890A using Tapatalk

Well my redneck engineering solution for attaching two hoses when I installed my cooler has finally decide to start leaking. Instead of just tightening the hose clamps and hoping for the best. I have decided to fix it right by using the correct barbed fitting. If you look at my hose clamp orientation it has lead to me pulling the majority of the front end to be able to disconnect the hose from the cooler to fix it.
 

Attachments

  • 20210129_114421.jpg
    20210129_114421.jpg
    138.8 KB · Views: 157
  • 20210129_114426.jpg
    20210129_114426.jpg
    130.7 KB · Views: 153
  • 20210129_151627.jpg
    20210129_151627.jpg
    160.4 KB · Views: 154
Since I broke my clock spring when I was working on my gear box my horn hasn't worked. Since it is required for NC Inspection I decided to wire my horn to a switch. Fairly simple job besides figuring out which wire was for the horn.
 

Attachments

  • 20210303_180333.jpg
    20210303_180333.jpg
    125.2 KB · Views: 164
As I was looking over the jeep making sure it was ready for the next upcoming trips I noticed my rear diff was a little wet on the bottom. I decide to change the fluid and reseal it. I ended up stripping a total of 5 bolts. One was already stripped from the last time I changed the fluid. Then 3 happened the first time I put the cover on. They were the four that are not threaded all the way through. I was using a hand ratchet and they went righty loosey before they were snug. So I drilled them out and tapped them to 3/8-16. I also chased all of the other holes with correct tap to get rid of all the silicon build up. I also forgot to drill out the cover when I went to put on the cover. So I had to clean up gasket maker for the third time. Then the 5th happened when I put the cover on the third time and I was torqueing them to 30 foot pounds. Since it was on the top I chased the threads with the 5/16-18 tap and got her snug. I was not about to pull the cover off again.

When I was tapping I decide to leave the on because it was still wet to help catch the shavings. I also did cover the ring gear and majority of the carrier with a paper towel. While I was taping and drilling. I removed it for the pictures. I made sure to spray the diff out with brake cleaner and compressed air to make sure there are no metal shavings in it.
20210325_193400.jpg

20210325_194232.jpg

I also got the correct o-ring installed on the spedo sensor on the transfer case. A generic o-ring fit but didnt allow the gear to fully seat. Quadratec sales the correct one.

Some what jeep related I got a used trailer box and cleaned it up and mounted on the front of my trailer.
20210309_195407.jpg
20210313_172535.jpg


20210327_122707.jpg


This was an example of this coming to life. Thanks to @BigClay for the meme.
IMG_0270.JPG
 
Last edited:
Well after spending a few days researching and calling rustys offroad I have decided to 3 link the front in the next couple months. Since the radius arms I have are rustys 1st generation the bushings are not replace able. They are press fit and the eye they press into usually warps when you replace them. Also they do not sale replacement bushing anymore. It is just a little bit cheaper for me to 3 link it instead of buying or building new radius arms. It needs to be replaced because there is a good amount of play in the bushing now.

My plan is to use hiems on both ends for my lower control arms. I am just going utilize the same brackets my radius arms used. The lowers won't be hard at all. For my third link it appears I should be able to place it on the drivers sides and just weld a bracket on top of my transmission cross member. This is the same after market cross member my radius arms bolt to. My plan is to use a gusset on the back just to be safe. I am also going to swap out the uca bushing on the axle side for a uniball bushing to help prevent binding. So I will use the bracket from Barnes for the axle side and hiem for the frame side.

Am I overlooking anything with this plan?
Yeah. Putting tons under it so you don’t have to redo it all over again in two years.


I’m not kidding
 
Yeah. Putting tons under it so you don’t have to redo it all over again in two years.


I’m not kidding
This rig will not end up on one tons. Biggest tire im planning on running is a 35 maybe a 37. But I have started developing a plan for a rig on tons and 40s. If possible I would want to keep my cherokee and have a rig on 40s. That way I can take the xj to ure and potts mountain and still find them a little challenging. Then take the other to harlan and GER and have some fun.
 
This rig will not end up on one tons. Biggest tire im planning on running is a 35 maybe a 37. But I have started developing a plan for a rig on tons and 40s. If possible I would want to keep my cherokee and have a rig on 40s. That way I can take the xj to ure and potts mountain and still find them a little challenging. Then take the other to harlan and GER and have some fun.
Just drop it off at Chris Keziah's, with a blank check. He might even let you watch his Mastery!
 
@Keith1138 I think that’s a good plan! I did some serious work on my XJ but I was fairly set on not going to tons. It’s too much of a shitbox for all that jazz; I’m just going to enjoy it on 35s and have a good time.
 
Three link is almost complete. I am currently just waiting for the paint to dry on the links. My welds aren't perfect but I did two passes on everything to make sure I got good penetration. My only concern is my upper link possibly binding. I did replace the axle side bushing with a uniball. When I set up my upper link I set it up to be in the middle of the uniball's range of motion at ride height. So we shall see if it binds or not. As for clearance of the frame side bracket which is located on my cross member. I have about a 3/4 to 1 inch gap between the bracket, drive shaft, tub, and frame rail. I'll post pictures once I put everything back together for the 3rd time. I have a love hate relationship with mocking things up.
20210411_173826.jpg
This is a picture of the first pass before I went back over it. I hope it holds. 20210411_155518.jpg
I just did one pass on the corners of the barnes 4wheel drive brackets.
20210411_155511.jpg20210411_162808.jpg20210411_190419.jpg

I also welded the inside of the bracket to the cross member. That was really difficult and the welds do not look good.
 
All joints on a 3 link should be heims or Johnny joints. There shouldn’t be any bind at all.
Uniball is a Jonny joint. I'm just concerned because it is naturally angled towards the frame rail because where the factory upper goes. Im hoping by setting it up to be in the middle of its side to side movement at ride height. When it is articulating and the dif is slightly going left and right because of the track bar it doesnt bind. A link to the joint is below.

 
Uniball is a Jonny joint. I'm just concerned because it is naturally angled towards the frame rail because where the factory upper goes. Im hoping by setting it up to be in the middle of its side to side movement at ride height. When it is articulating and the dif is slightly going left and right because of the track bar it doesnt bind. A link to the joint is below.

Are you using the stock upper axle joint location in the diff housing? That probably isn’t enough separation. Also I would use a real 1/2” diameter fastener. Not a greasable one. Especially for a 3 link upper. 5/8” diameter would be best.
 
Are you using the stock upper axle joint location in the diff housing? That probably isn’t enough separation. Also I would use a real 1/2” diameter fastener. Not a greasable one. Especially for a 3 link upper. 5/8” diameter would be best.
I'm planning to swap it out to a solid 1/2 bolt and just grease the bolt when I install it. I think there will be enough separation according to the article posted by Barnes4wd.com they recondmend the separation be 25% of the tire size. So my end size is a 35 or 36 so I would only need about 9 inches. I'm pretty sure the distance between my lower control arm mount and the upper mount on top of the diff is close to this. Since the ring gear is about 7 inches across. But I'll measure any ways this afternoon.


Here is a link to the article.
 
So I just measured and there is 8.5 inches difference between the lower control arm mounts and the upper. Would I want it to be 9 yes can I live with it yes because I am currently only running a 34. If it becomes an issue I can always fix it.
 
Well I got everything installed and adjusted. I did a short 3 minute test drive just to let everything settle before I reconfirm everything is tight and call it done. The ride difference is night and day. The 3 link is not nearly as harsh as the radius arms were on bumps. At full bump and at full flex the drive shaft and upper link barely clears. Once I make sure everything is still tight I'll do a flex test with the tires on and recheck clearances.
 

Attachments

  • 20210412_164307.jpg
    20210412_164307.jpg
    112.2 KB · Views: 161
  • 20210412_163056.jpg
    20210412_163056.jpg
    158.1 KB · Views: 144
The three link worked great this past weekend at GER. Only carnage was a hard brake line that started leaking.


I am now trying to figure out what 36 or 35 I want to go to.
Screenshot_20210518-115734_Gallery.jpgScreenshot_20210518-115916_Gallery.jpgScreenshot_20210518-115815_Gallery.jpgScreenshot_20210518-120022_Gallery.jpg
 
Are you happy with the change? Wheels better?
Sorry I did not see this till now. I noticed that it is alot smother on the sevice roads. On the rocks it transitions alot better while going over rocks. The radius arms were alot harsher going up and over things. The three link also seems alot stabler in my opinion. My radius arms were also worn out. I also have plenty of flex. The thing that limits my flex is my limiting chains that allow me to just slightly unseat a spring. Let me know if you have any questions.
 
Back
Top