We Bought a RV Clark!! Oh no! Rebuild thread

Dylan W.

lone resident of Bro-Lite Island
Joined
Mar 17, 2007
Location
Mocksville NC
So..I've been wanting a rv for a while. Been looking and wishing and looking some more. With new ones selling for 70 80 90k and up, I could only afford to think about used ones. So when Chip placed his for sale on here, it caught my eye and as soon as I found time, I loaded up the family and we went to look at it. I could tell it needed some work, but we were excited about it. After a short inspection, a little negotiating, and lots of daydreaming of all the fun we could have, I handed off the cash and we headed to DMV for tags and title stuff. Brooke called our insurance company on the way. We were all set. I drove it home and immediately started packing it up for CTB fun Caravan.
It drove and towed fair enough. And it sure was nice not sleeping In a tent. But Ella woke up coughing like a barking duck and was having slight breathing problems. Kind of odd, but she is sensitive to air quality conditions more so than the rest of us.
The weekend went well and we headed home. Time for a real cleanup and to make this thing our own!
20181014_113310.jpg
 
As I said earlier..time for a real cleanup and to make it our own! Here's Brooke cleaning everything. She spent hours cleaning everything.
20181016_184517.jpg
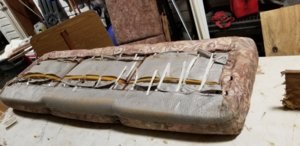
Ella is excited, the rv smells better thanks to a good scrubbing, but Ella says her throat still feels tickly when she goes in. Ok..now I'm thinking the fabric on the jack knife bed, the booth seats and end pcs. ( pictured here) have got to go. Also..the carpet needs to go. I know a guy.
20181016_184423.jpg
 
I have some lvt flooring that'll work great in the rv. This was leftovers from a pallet purchase. So free to me! First thing to go before installing new floor is old dirty carpet. This will get rid of the still lingering, slightly musty smell...right?
I had to remove the booths to do it right. This allowed me to see more of the side walls. Hmmm...the walls dont look so great and are showing me a bit more water damage than I, or anyone could see earlier.
20181016_191726.jpg
20181016_193213.jpg
The original carpet is green. The lighter colored carpet had been added later, but it was time for it all to go.
 
I removed the booths, cushions and decorative end pcs. And it wasnt long before I decided to go ahead and rebuild them. I kept part of the old framework, and added on,beefed up, and replaced some of the wood. The wooden end pcs and fabric covered pcs looked simple enough..I figured I could just build new stuff. So..I did. New plywood, cut to the shape Ella and I decided on..sanded, painted white. Also, new paneling to cover the sides. I will do new doors down the road.
20181017_194503.jpg
you can also see the new floors! I forgot to take pics of sub floor, but other than a few minor water spots, it was fine. I vacuumed it real good and sprayed it with some anti mold juice.
20181018_181813.jpg
 
Last edited:
20181018_181813.jpg
Brought the booths back inside the rv to get a good look. There's some decent storage under the booths so I cut a hole, and added a place to store shoes, flip flops, boots etc., right as you walk up the steps. This new feature should come in handy. Also..tossed the old cushions to the side. Brooke started searching the internets for new cushions. Also pictured are the old jacknife bed cushions. All this old fabric has gotta go! That'll make the musty smell dissapear..right?
20181018_181842.jpg
20181018_184832.jpg
20181017_193213.jpg
20181018_165822.jpg
 

Attachments

  • 20181017_193306.jpg
    20181017_193306.jpg
    102.8 KB · Views: 698
Last edited:
As I read along, I was wondering a bout Mold. Any roof, windows, doors, bathroom, floors, that may have leaked, might be hiding mold. I see you found some. Hope that was all, & replacing the items you are, will have Ella breathing well. Wonder if anyone has a machine that can detect mold spores in the air? I know there is an "Air Quality" machine.
 
With all the cushions,fabrics, carpets, and curtains gone, it was starting to smell a lot better. BUT...remember those ugly water stained walls?
I poked one with my finger...huh oh! That cant be good. I peeled the wall away like wet cardboard! At first it was just the lowest corner, behind the passenger seat. Then further up....then....damn it man! I kept finding more and more water damage and rotted wood. It just kept going. All hidden by seemingly fine wall materials. It was not fine. Some of the wood had the consistency of half cooked brownies. Seriously, I could have spooned it out.

The following pictures were taken over a 4 day span. I learned a lot about how these things are built. More than I ever intended to know.

20181027_211939.jpg
20181028_235736.jpg
20181028_235754.jpg
20181028_235802.jpg
20181029_231052.jpg
 
At this point, it has become obvious that new floors and a couple new seat cushions AINT gonna fix this.
Now, Brooke and I are faced with a decision.
But what are the choices?
Burn it? It's too waterlogged...doubt itll burn.

Sale it? Nah...I've already ripped too far into it.

RIP off the entire rv part and sale the van chassis? Nah...we want an rv.

The decision has been made. Were all in! Were gonna fix it. Going to try to find a balance of cheap and good. Doing most of the work myself will save tons of money. Money I can use to buy good materials and do it right! As right as I can anyway.
Remember..new RVs cost around 100k....I'll just repeat this in my mind, every time I spend money on this rv rehab!
 
It'll be worth it in the long run!
 
About those cushions....I've got a friend local to me who does upholstery work. He's done some r v seats.

You can't find better or cheaper online
 
keep going.. I ripped apart an entire slide in bed camper and rebuilt it.. was well worth it in the long run. I not post all the damage pics because once i get going i am usually so focused I forget to take pics.. but it was very bad.. much like yours

remeber this: Re-doing my Bed Camper and making a toyhauler
I had forgotten that, but a quick skim brought it all back. That was a cool build.

And yeah..I could/ should have taken many more pics. Truthfully, I never thought this project would end up in a build thread...until it did.
 
About those cushions....I've got a friend local to me who does upholstery work. He's done some r v seats.

You can't find better or cheaper online
Too late man. It only took Brooke a few minutes online and an order was placed. Actually..almost all of the dinette cushion sets were crazy expensive imo. But she found a place that had one last set of an older design. These are a couple years old, but are still brand new. These were a couple hundred bucks and free shipping. Which , believe it or not, was a few hundred cheaper than the rest she had found.
20181123_181707.jpg
And I too have a friend in the upholstery business. Twins upholstery here in Mocksvile. I have traded out some carpet work( 1 set of steps installed took me 2hrs to do) and in return, I had my sofa bed cushions refoamed and covered. Pretty good deal to me. Not an exact match with dinette cushions, but good enough for us!
20181123_181934.jpg
20181017_193213.jpg
 
With most of the wet wood out of the way it was time to start looking at how to fix it. But first...how was it built?
The outside walls are thin frp stuff. (Fiberglass reinforced plastic.)
Glued to that, is 1/4 inch luan, glued to that is 1 1/2in foamboard... glued to that, are the inside walls. Its all one big laminated/glued together sandwich. Which makes it pretty strong as a unit. I gotta figure out how to make it a sandwich again. I had no real clue how..but now I do. Unfortunately...I dont have a lot of pictures that show how it was originally built, or much of the tear apart process..so I'll just hit ya with this one picture... This should be a real WOW moment for yall.


20181031_164237.jpg
Brooke has since abandoned any talk of her hours of cleaning..lol. Good...that talk was getting old anyway!
 
Outside and rooftop photos. We will be installing a new rubber roof as well as a couple new vents. The most foward vent pictured (actually a square hole you can see)might be deleted, still thinking about that. Itll be one less place that can leak..right?
Also...Brooke is absolutely thrilled with how this project has spilled out into her yard. Lol. I need a shop right?
20181031_115405.jpg


20181031_140208.jpg
 
Delete hole over the top bunk. When it rains and you are sleeping up there it sucks. Super loud on plastic cover.

Put in a side window or side vent to let out CO2 of you ever have issues from Genny or heater.
 
Back
Top